Tutorials
Deploy a PD Service and Observe the Request Path
On this page
In this tutorial, you deploy Qwen/Qwen3-14B on two NVIDIA GPU nodes: Prefill (P) processes prompts, and Decode (D) generates tokens one at a time. You then send a request to summarize a long document and use role status, request details, and KV handoff logs to determine whether prefill/decode (PD) disaggregation works.
The screenshots in this tutorial show the English UI. The request IDs and measurements below come from this run; your results may differ.
Before You Begin
| Requirement | Configuration Used Here and Where to Check |
|---|---|
| Console access and permissions | You can view nodes, register models, import inference templates, create deployments, and use the Playground and Monitor Center |
| Two available nodes | Both nodes are connected and online, each with one idle RTX 4090 (48 GiB); their display names in this tutorial are host2 and host3, and both use GPU 0 |
| Software environment | Server version 79f927fc, runveil runtime, and NVIDIA driver 610.57.04; check the node environment and Agent versions in Compute Nodes details |
| Model files | Both nodes already have the complete BF16 files for Qwen/Qwen3-14B; the directory on both nodes in this tutorial is /model/ModelScope/Qwen/Qwen3-14B |
| Image | gpuworks/gpuworks-runner:cuda13.0-vllm0.30.0-r4, already available on both nodes |
| Network and disk | The nodes can reach each other; this tutorial uses the eth0 management network. Both the filesystem containing the model directory and the filesystem containing the runtime have enough space for weights, unpacked images, and runtime logs |
The 48 GiB capacity is the actual GPU memory on these nodes. Use the capacity shown in GPU Devices for your hardware. P and D each load the complete model, so check GPU memory capacity separately for each role.
Select your own corresponding nodes and replace the model directory with the actual absolute path on each node. If the model is not ready, follow Download, Cache, and Sync Models Between Nodes. For node connections and network configuration, see Connect Compute Nodes and the Node Network Guide, respectively.
1. Register the Model and Import the Example Template
- Open GPU Devices. Check that neither selected GPU has an assigned instance and that both have enough GPU memory.
- Open Models → Register Model. Set Source to ModelScope, Source ID to
Qwen/Qwen3-14B, and Name totutorial-qwen3-14b, then click Confirm registration. If the same model is already registered, use that entry. - On the model card, click the folder icon, Register node path. Select
host2, enter the existing directory/model/ModelScope/Qwen/Qwen3-14B, and click Register. Repeat forhost3. Open Model Files in the model details and check both nodes, their registered paths, and the Available status. - Download qwen3-14b-vllm-template.yaml. Open Inference Templates → Import Templates and select the file. After Templates imported appears, open Qwen3-14B, open Details for the NVIDIA vLLM user spec, and confirm
bf16-vllm-nvidia-tutorialunder Run Configuration → Spec ID.
Registering a node path uses the existing files; it does not copy or move them. If the directory is missing, unreadable, or incompletely downloaded, resolve the file issue before registering it.
The example template uses BF16 and vLLM 0.30.0, with reasoning output disabled by default so that you can directly observe answer generation. Importing adds a user spec and retains the existing official entries. Select this tutorial's spec in the steps that follow.
2. Select the Model and Inference Template
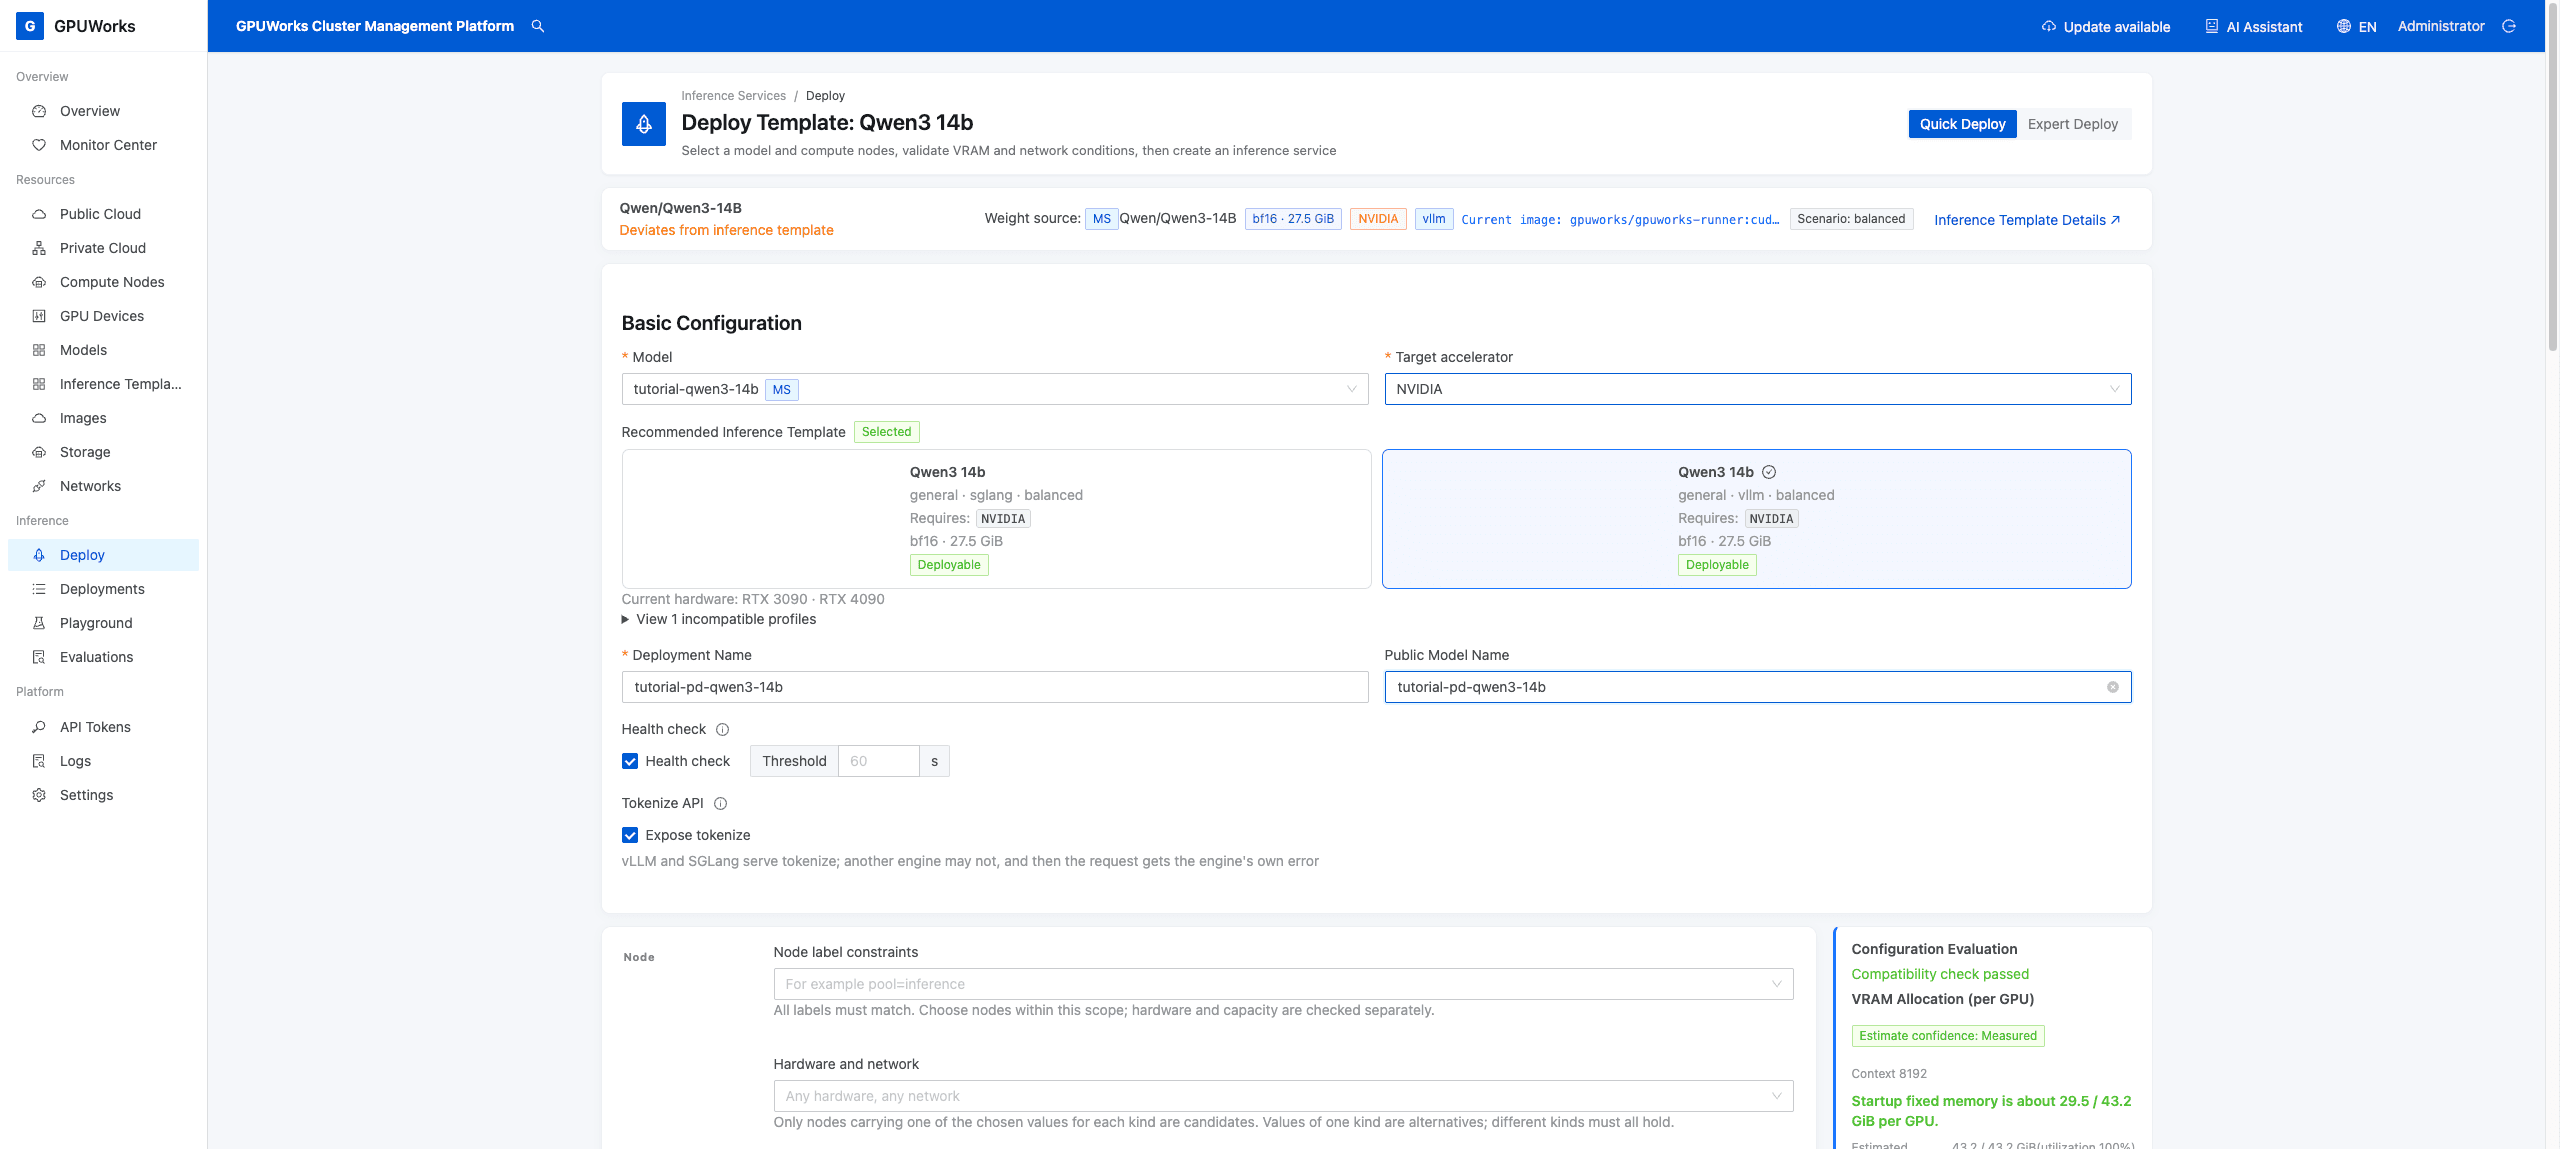
- Open Inference Services → Create Deployment → Quick Deploy. In Basic Configuration, select
tutorial-qwen3-14band set Target accelerator to NVIDIA. - Under Recommended Inference Template, select the general · vllm · balanced spec for Qwen3-14B and check the bf16 tag. If multiple specs have the same name, return to Inference Templates and click Deploy on the user spec whose ID you checked in the previous step. If the Use a registered model? page appears, select your
Qwen/Qwen3-14BMS registration and click Use this model and deploy. - Check that the source ID is
Qwen/Qwen3-14Band the current image isgpuworks/gpuworks-runner:cuda13.0-vllm0.30.0-r4. - Set both Deployment Name and Public Model Name to
tutorial-pd-qwen3-14b, and leave health checks enabled. If the name is already in use, choose an unused name and select that same service in later calls and monitoring.
3. Configure P and D Roles and Resources
- In the Nodes section below, select PD disaggregation and set PD Mode to
vllm-nixl. - Configure the two roles as follows. The page shows Decode first, then Prefill. Keep one instance per role and select only one node per instance.
| Role | Node | GPU | TP | PP | Instances |
|---|---|---|---|---|---|
| Decode | host3 | 0 | 1 | 1 | 1 |
| Prefill | host2 | 0 | 1 | 1 | 1 |
- Set Fallback to Fail with a retryable error and KV load failure policy to Fail the request. This makes requests fail when P is unavailable or KV handoff fails, helping you identify problems in the disaggregated request path.
- Check the resource and parameter configuration below, and keep the template launch mode.
| Field | Value |
|---|---|
| Maximum Context Length | 8192 |
| GPU Memory Utilization | 0.90 |
| Sleepable | Off |
| dGPU Memory | Disabled |
| KV Offload | Off |
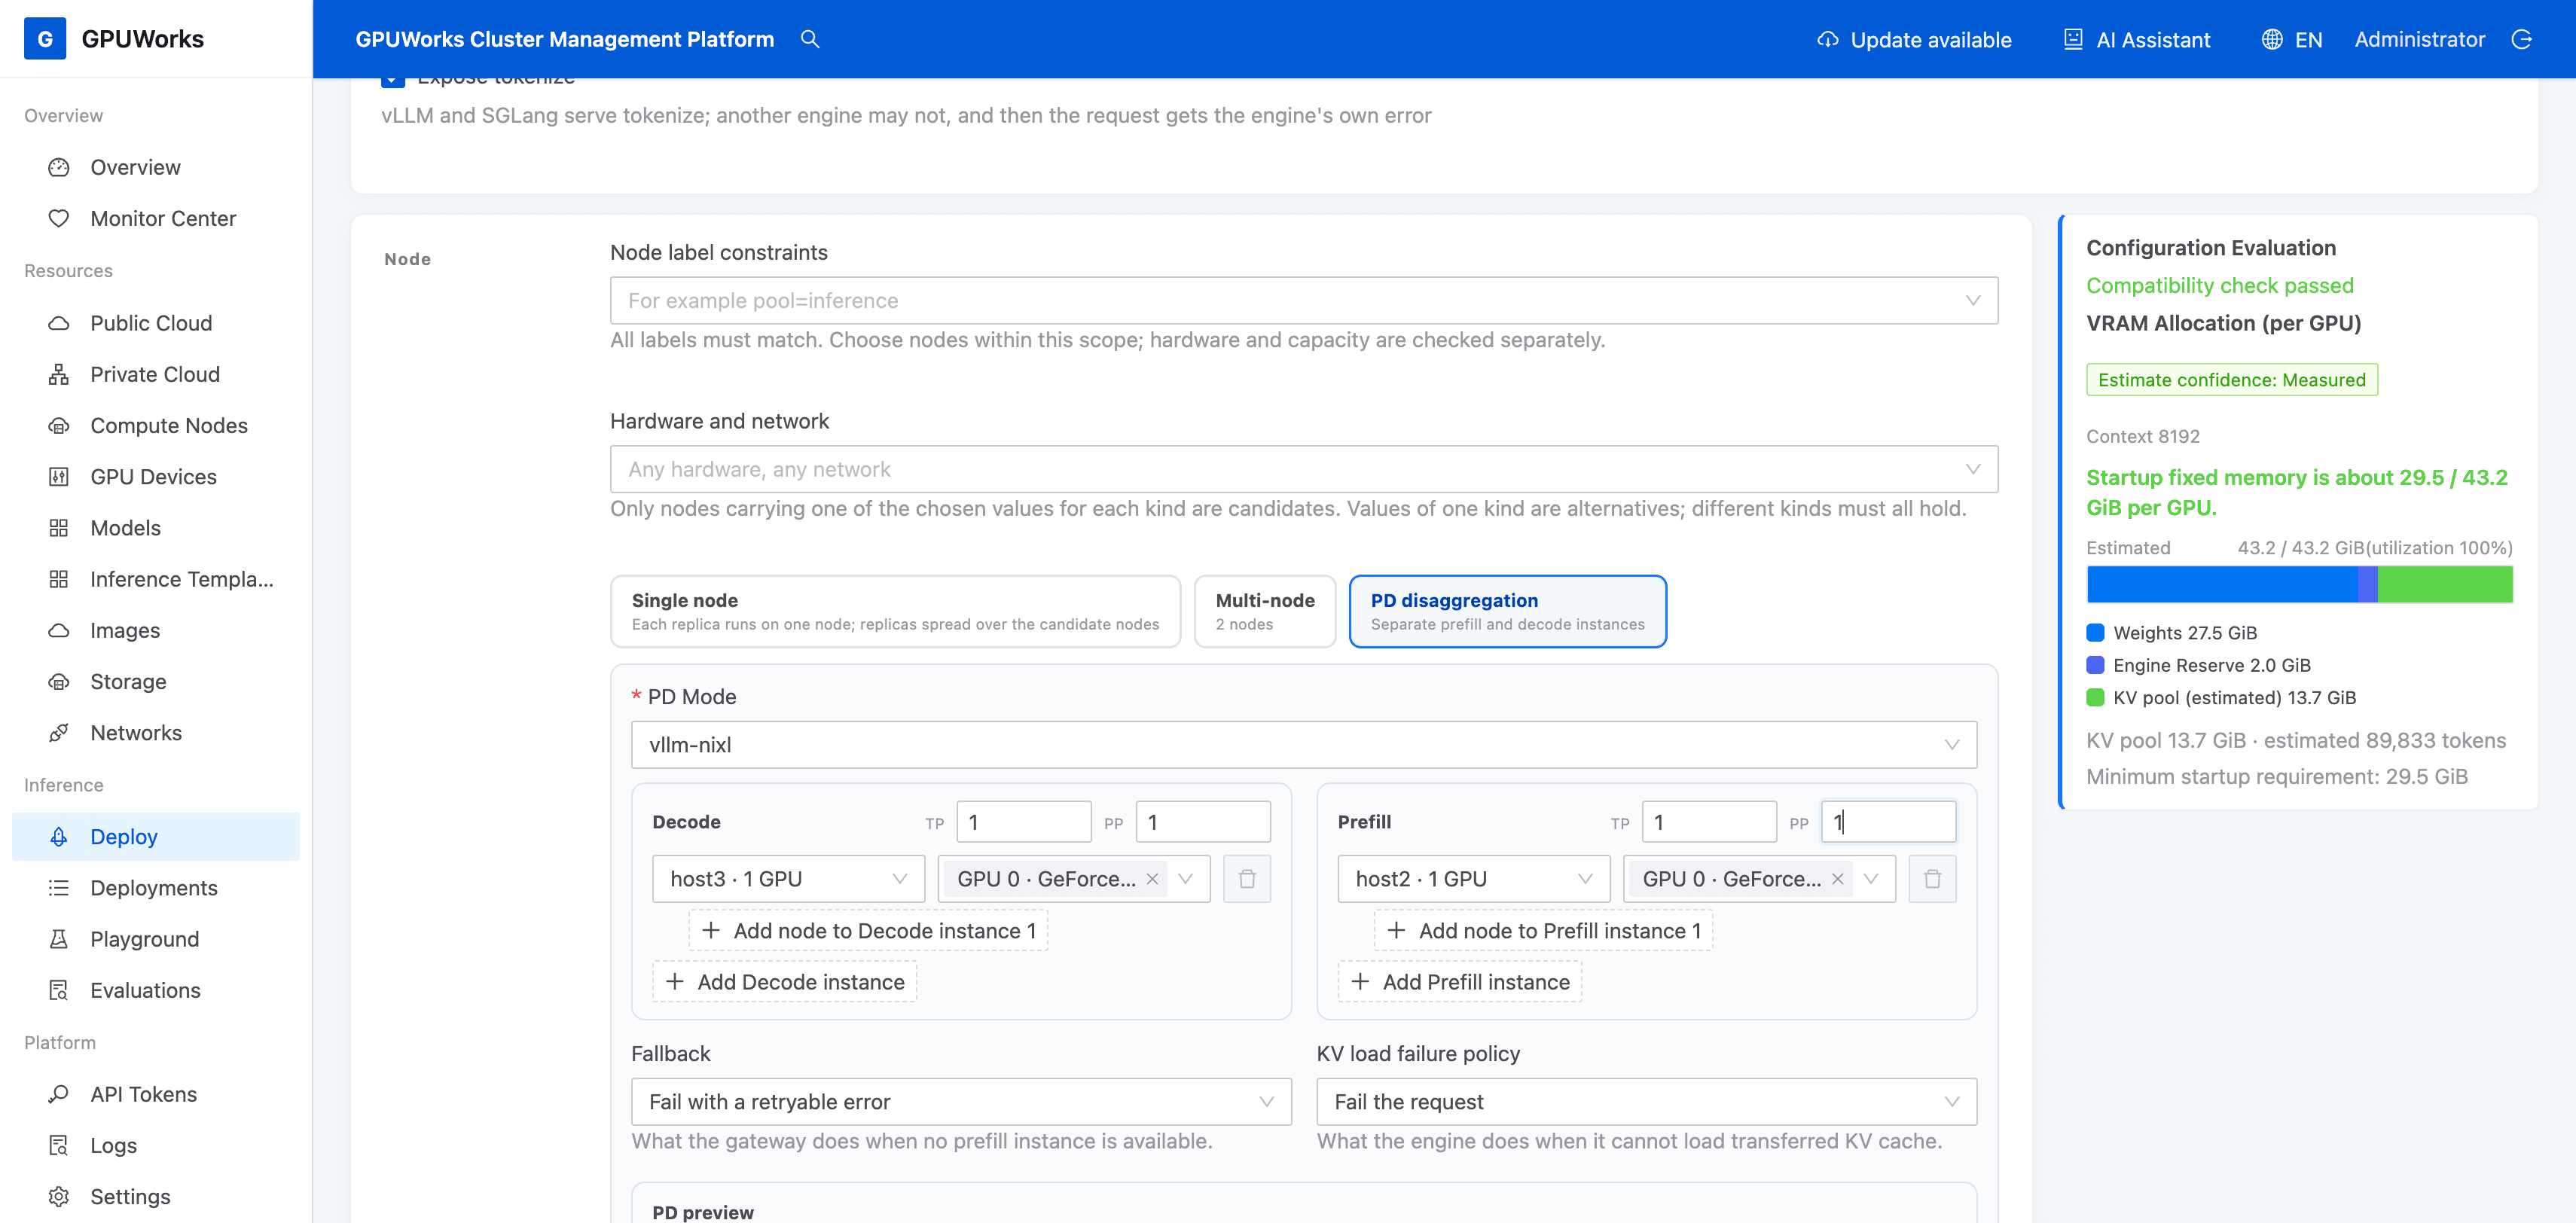
- Wait for Compatibility check passed on the right. In PD preview, confirm that both roles show the correct nodes and GPUs and are marked Fits. If evaluation reports resource, network, or configuration errors, resolve them as prompted and evaluate again.
Configuration evaluation checks whether you can submit the deployment. You still need to confirm image unpacking, model loading, and actual inference after deployment.
4. Submit the Deployment and Observe Both Roles
- Click Deploy, then open
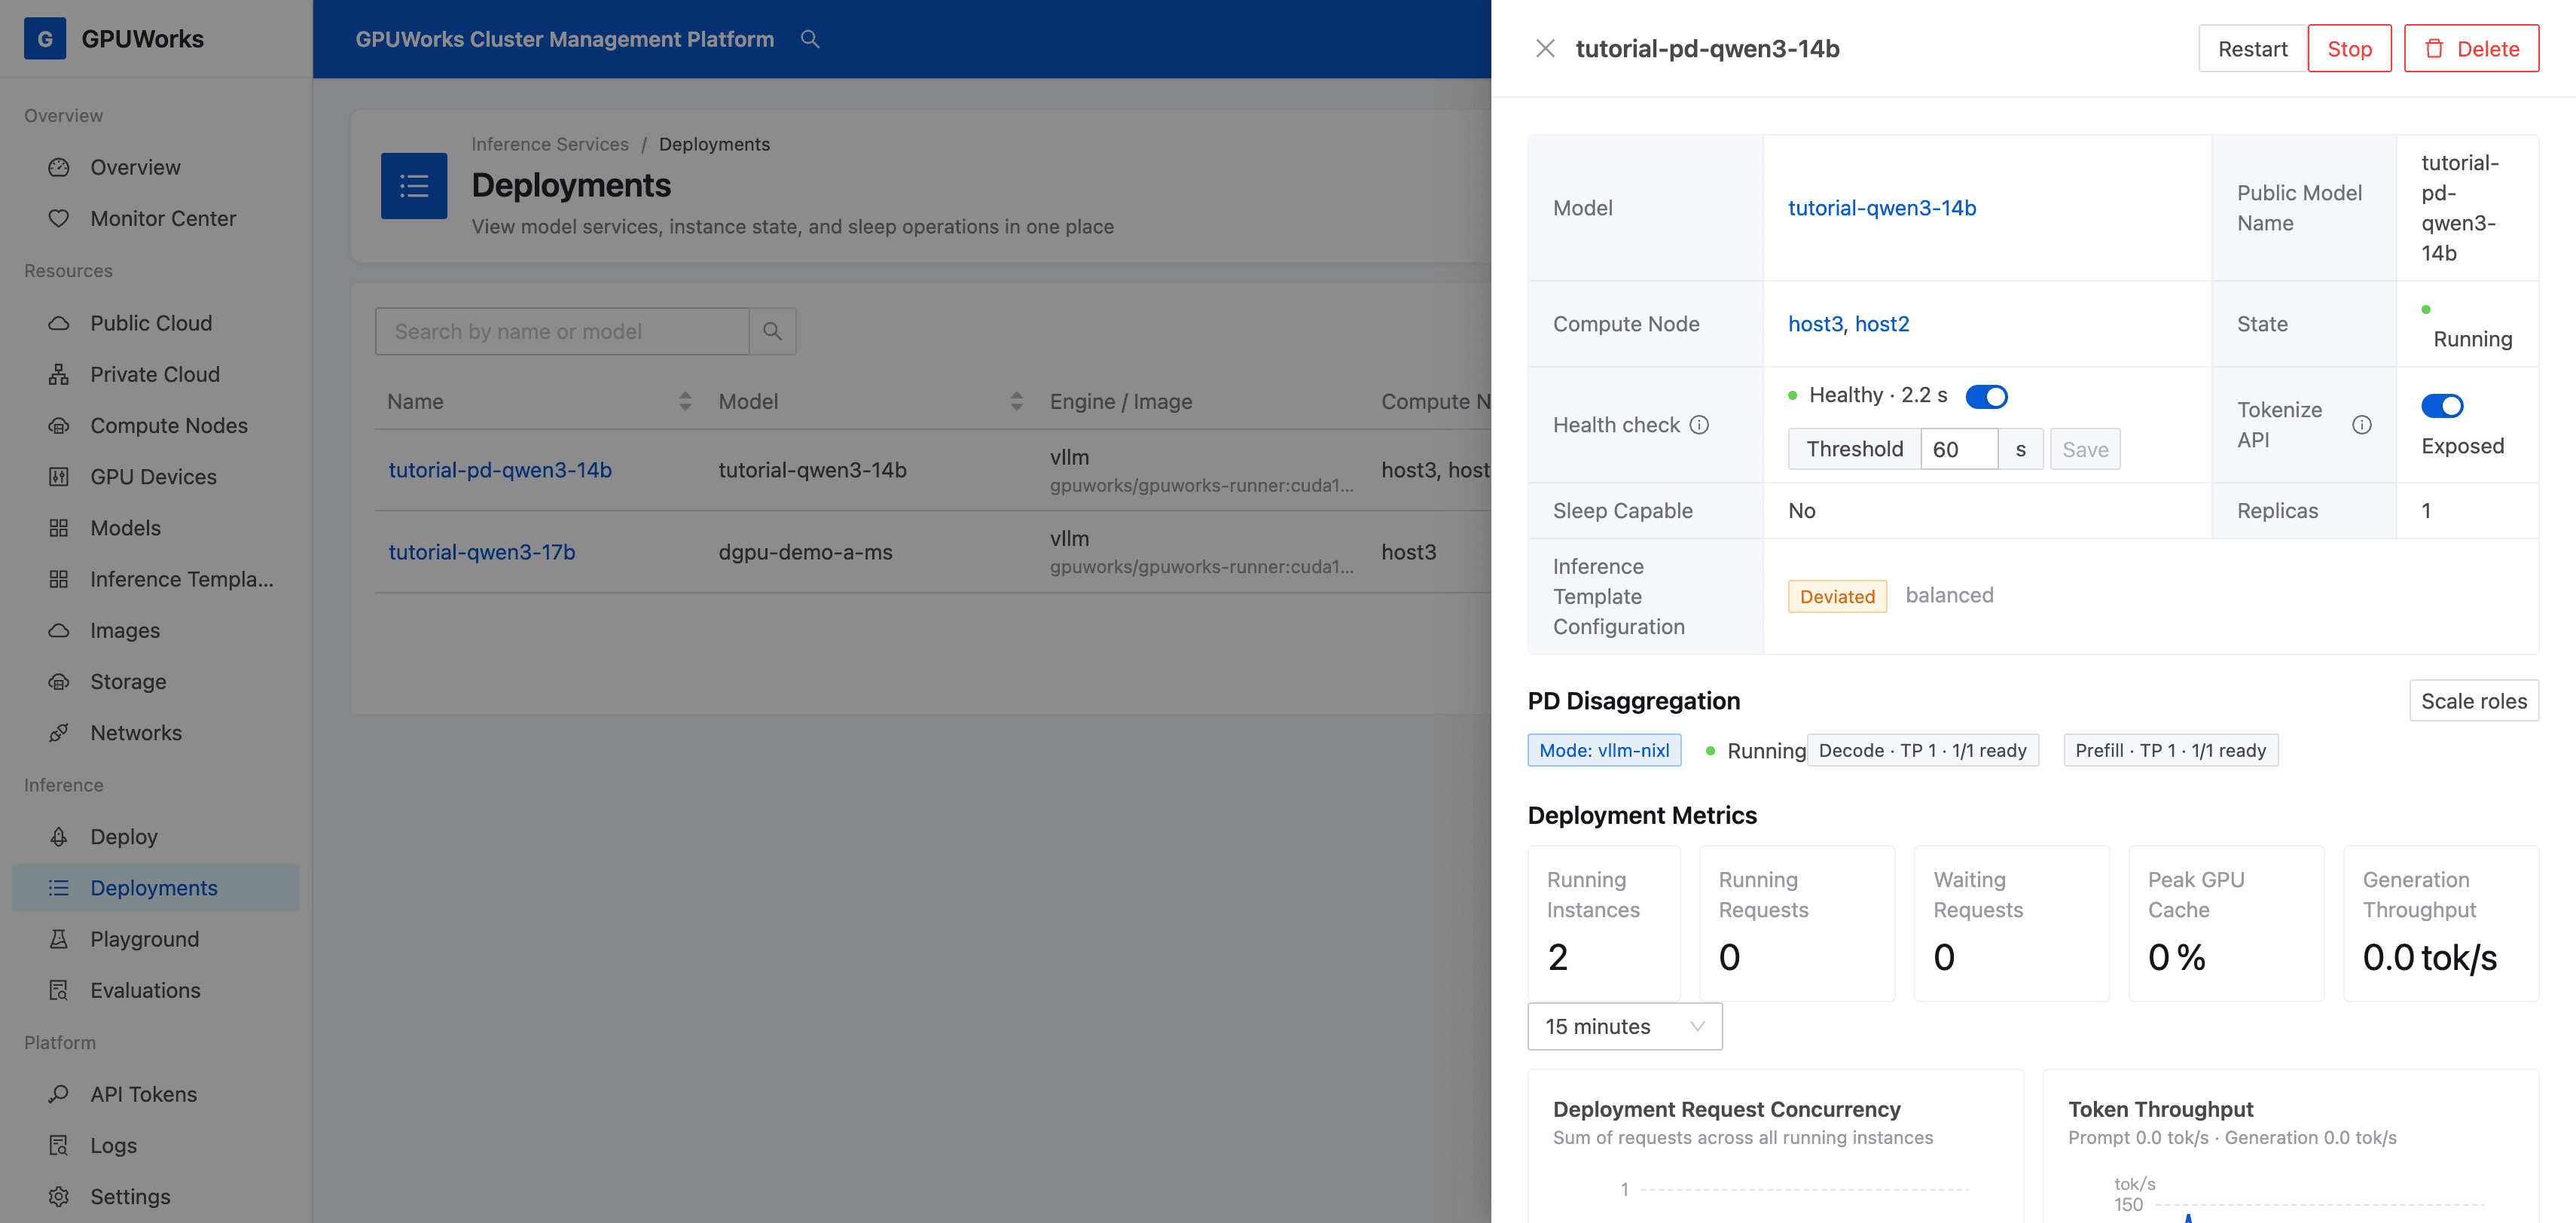
tutorial-pd-qwen3-14bin Inference Services. - Wait for container startup, model loading, and health checks to finish. Confirm that Prefill and Decode each show
1/1ready and that both instances show Running. - Open the details of both instances. Confirm that P runs on
host2GPU0and D runs onhost3GPU0. Wait until both roles are ready before sending a request.
If an instance fails, check its Logs for the cause. If disk space is insufficient, free or add space first; if the model is still loading, wait for it to finish. After resolving the cause, click Retry for the instance if the page says that retries have stopped. For other startup issues, see Troubleshooting.
5. Summarize a Long Document in the Playground
-
Open Playground → Chat, click New conversation (the plus sign), and select
tutorial-pd-qwen3-14b. If it does not appear, click Refresh Models and return to deployment details to confirm that both roles are ready. -
Click Parameters to the right of the model selector, select Maximum Output Tokens, and enter
1024. This is an output limit; the answer may finish earlier. -
Open long-prompt.txt (English practice document), copy all its text into the message box, and append the following question on a new line. Note the current time and click Send. The screenshots and measurements record the same task using the original Chinese document and a Chinese question and answer. The English translation changes the input token count; check your own request details rather than expecting the recorded counts.
Summarize the three highest-priority risks in this record as bullet points, and give one improvement suggestion for each. -
Wait for generation to finish. Confirm that a normal answer appears without request errors. The long document is synthetic practice material; the answer only needs to summarize it and does not have to match the example word for word.
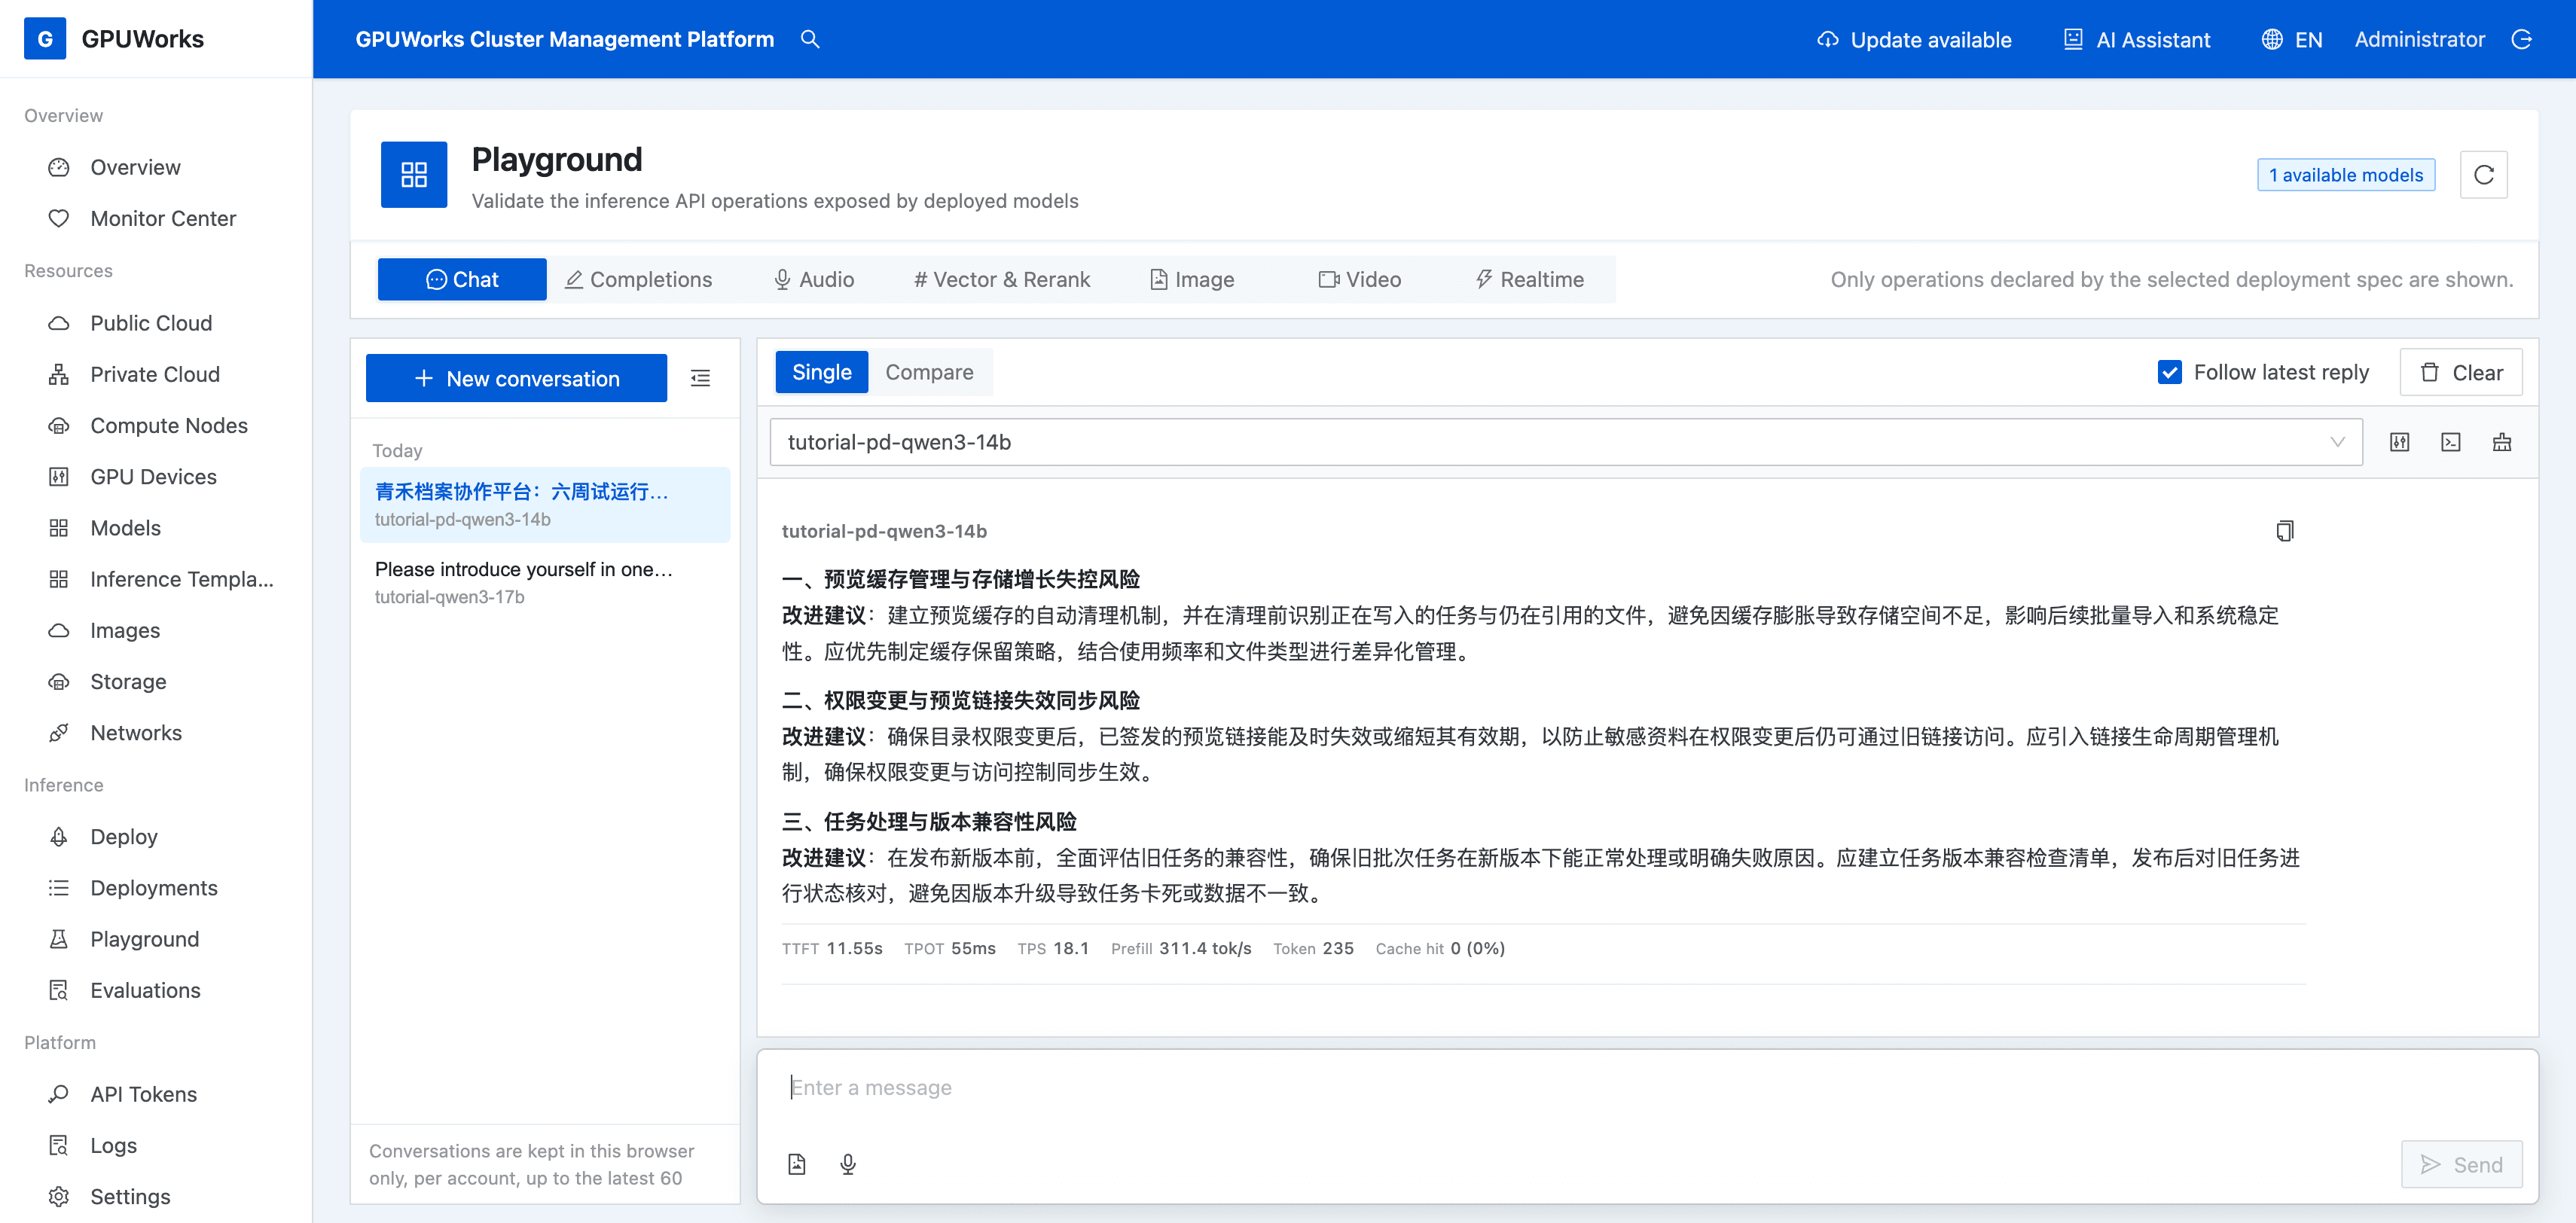
This request has 3598 actual input tokens and 235 output tokens, with both reasoning tokens and cache-hit tokens at 0, within the 8192 context limit. Your token counts and answer may differ; check them in the request details in the next section. Do not substitute character counts for token counts.
6. Observe Service Status and Locate the Request
- Open Monitor Center, enter service monitoring for
tutorial-pd-qwen3-14b, and select a time window that includes your call. Review the PD disaggregation card at the top.
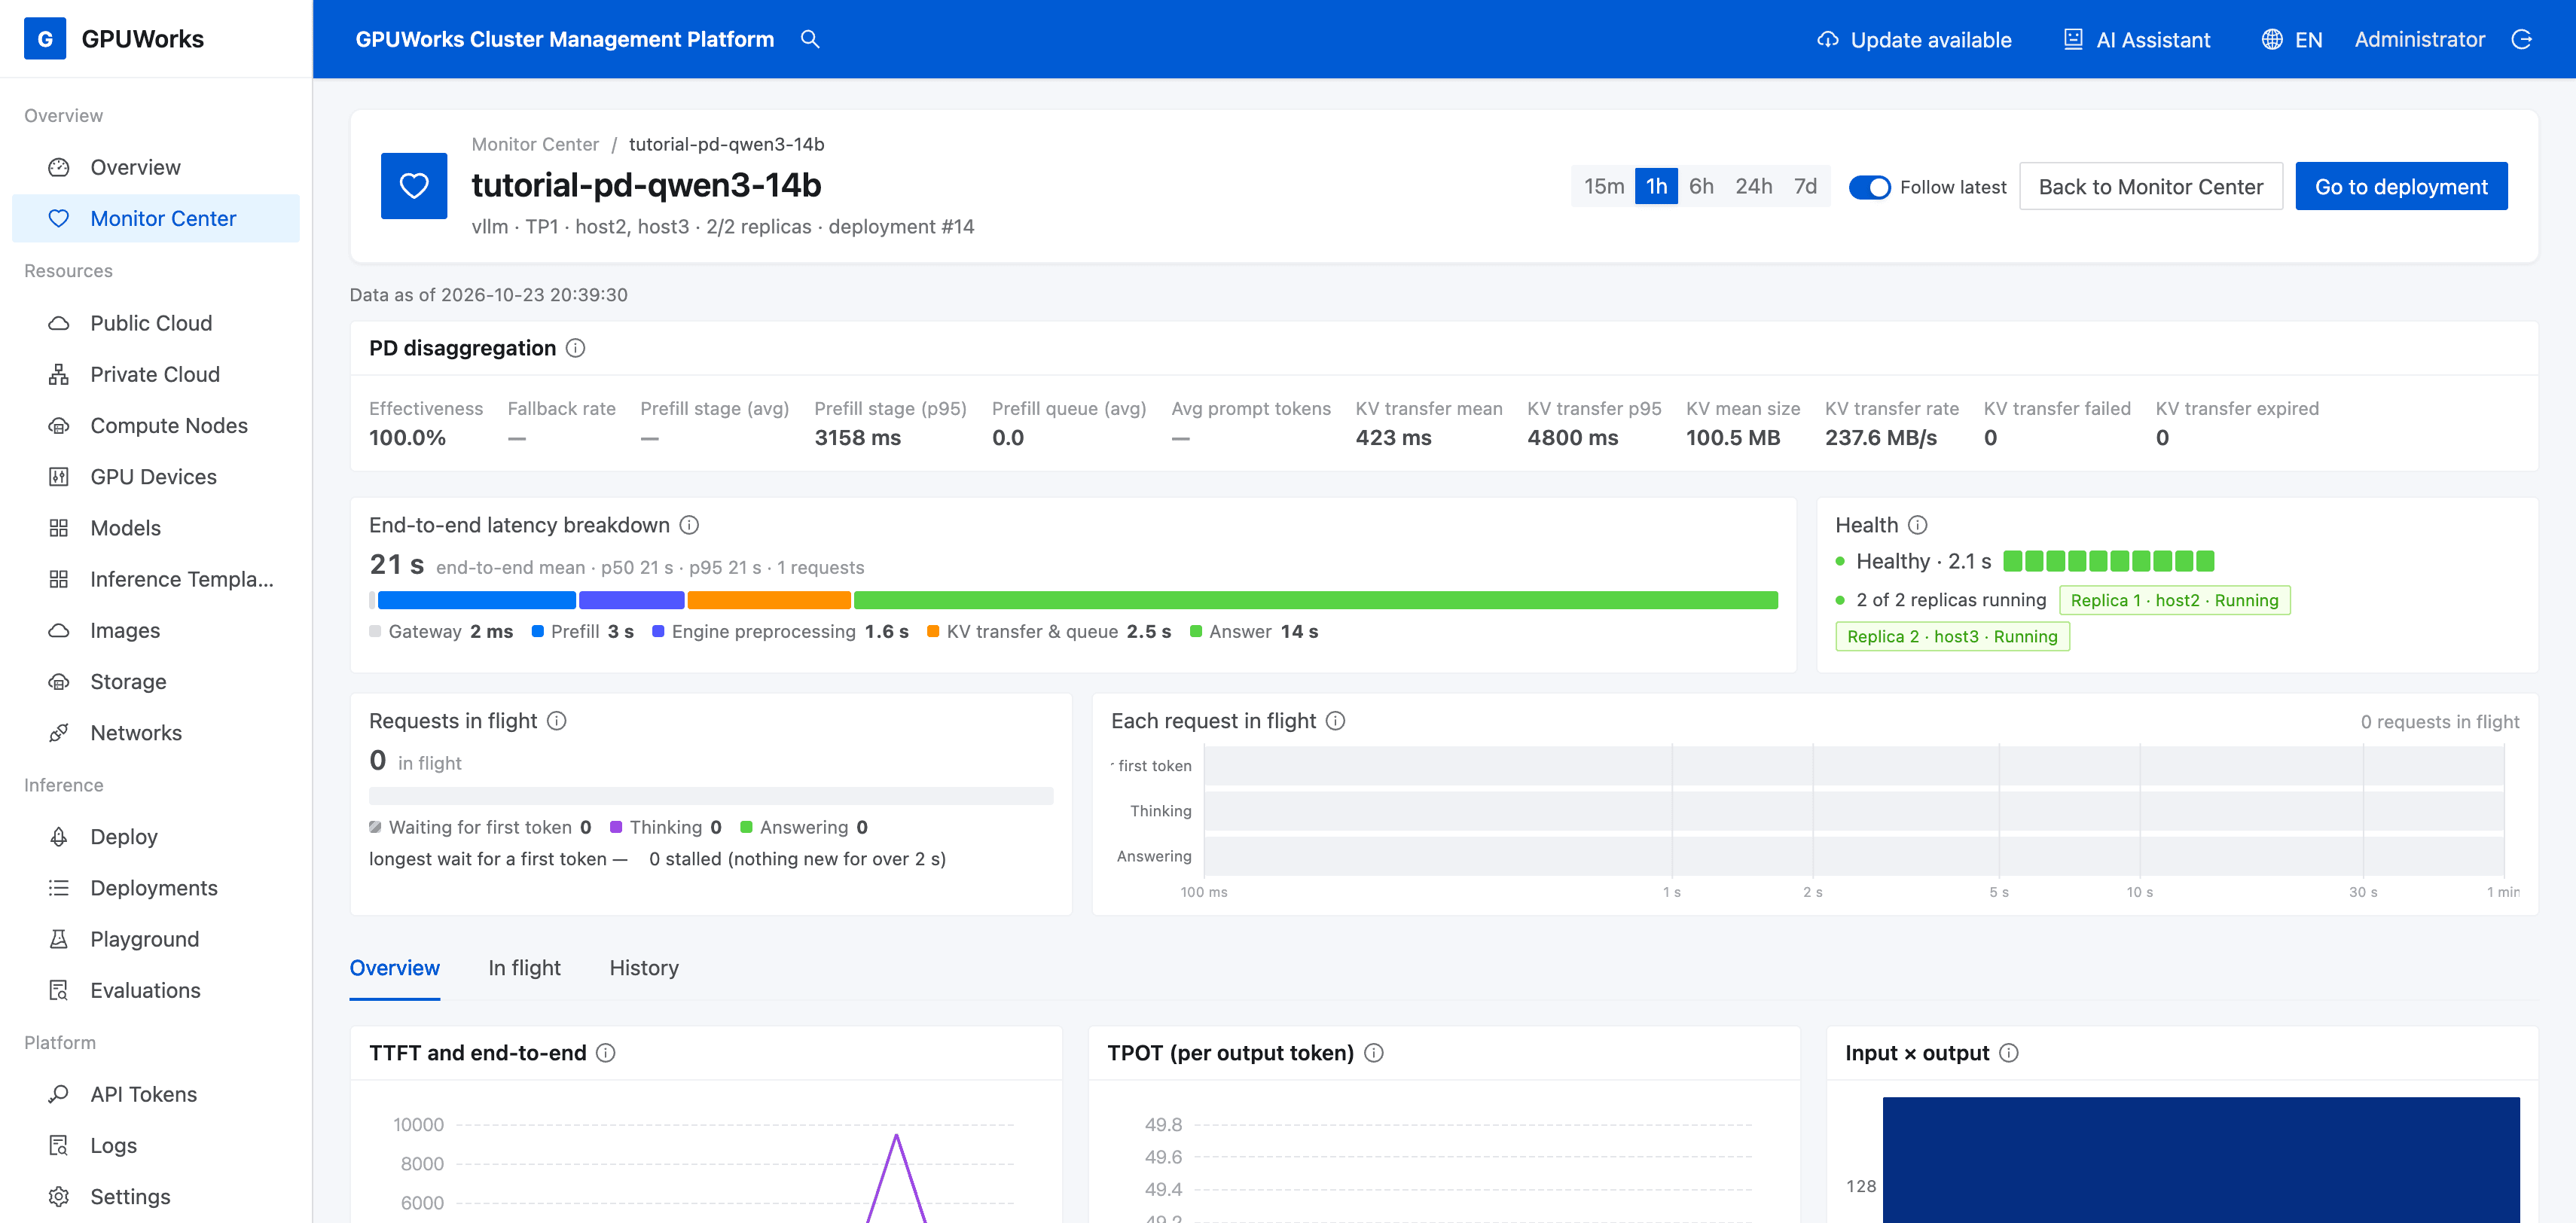
| Item | How to Interpret It |
|---|---|
| Effectiveness, Fallback rate | Effectiveness is the proportion of D's prompt tokens received through KV transfer; read it together with fallback information to determine whether the service uses the disaggregated path |
| KV transfer mean, KV mean size, KV transfer rate | Review handoff performance within the current window; these aggregate values do not represent the transfer volume or duration of an individual request |
| KV transfer failed, KV transfer expired | Watch for anomalies, then investigate requests and instance logs from the corresponding period |
In this screenshot, PD effectiveness is 100.0%, and KV transfer failures and expirations are both 0. Some statistics show —, which means that no value is available for the current window; do not read it as 0.
- Switch to History, find the Playground request by the time of your call, and open Request details. If it is missing, check the time range at the top and click Reload.
- Check that Received matches this call and copy the Request ID. At the bottom of the details, confirm Status 200 and Finish Reason stop.
- In PD disaggregation and the phase breakdown, check the following information to confirm that P participates and there is no Fallback reason.
| Location | What to Check |
|---|---|
| Prefill instance and PD prefill stage | A P instance ID and P stage duration are present |
| Decode replica | Identifies the D instance that generates this response |
| KV transfer & queue | The phase in which D waits for KV and queues; do not treat the entire phase as network transfer time alone |
| First-token recompute | Prefill computation on D; whether it appears separately depends on the engine data and the page's display precision |
| Answer and request result | Answer text is generated, and the request finishes normally without fallback |
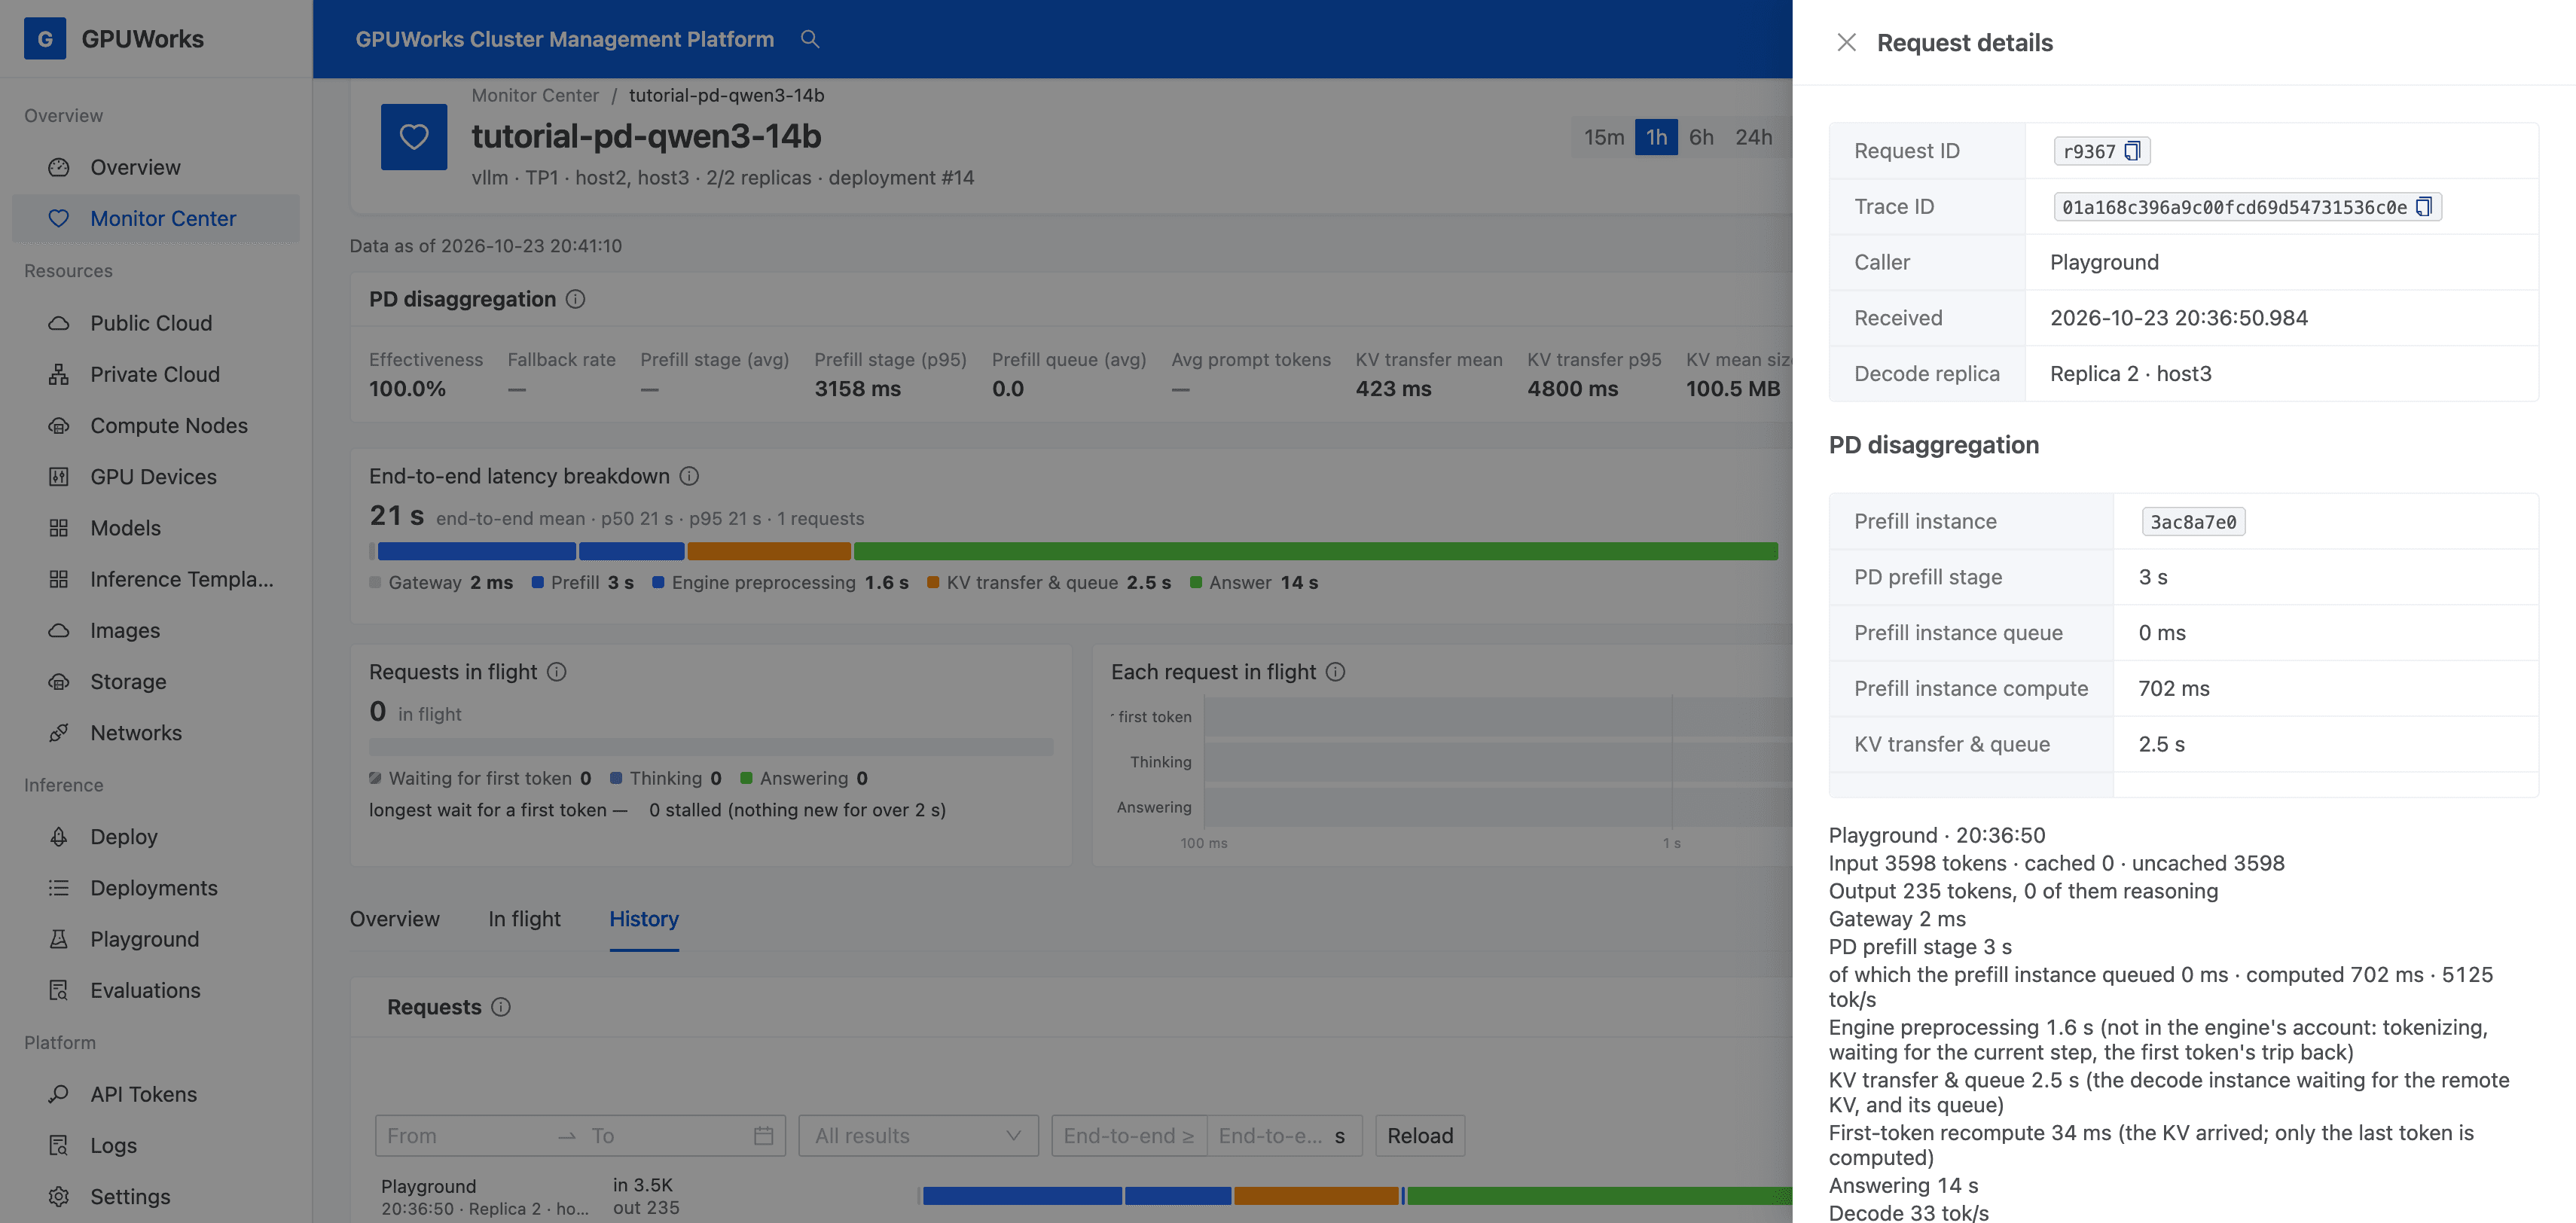
The request in this example is r9367, with Trace ID 01a168c396a9c00fcd69d54731536c0e. Its details show Status 200, Finish Reason stop, and no fallback. The following table lists its main phases; the page rounds some values. Record your own request ID and durations as you follow the steps.
| Phase | Recorded Value | Meaning |
|---|---|---|
| Gateway | 2 ms | The gateway's own processing time |
| PD prefill stage | 3 s | Time the gateway waits for P to process the prompt and return handoff information, including 702 ms of actual P computation and 0 ms of queueing |
| D engine preprocessing | 1.6 s | Time before D's first token that is not attributed to engine queueing or computation |
| KV transfer & queue | 2.5 s | Combined time D waits for remote KV and queues |
| First-token recompute | 34 ms | First-token computation after D obtains KV |
| Answer | 14 s | From the first answer token to the last text chunk |
| End-to-end | 21 s | From the gateway receiving the request to the request ending |
This record shows that P processes the prompt, D continues generating the answer, and the request ends with 200 / stop and no fallback. P's actual computation time is included in the PD prefill stage; do not add it again. KV transfer and queueing also do not represent network transfer time alone. Use these values to understand this request path, not to conclude that PD is faster than a standard deployment.
If a Fallback reason or request error appears, or you cannot confirm P's participation, retain the request ID and investigate with the instance logs in the next section. Resolve the issue and send another request.
7. Check the KV Handoff Self-Test and Logs
- Return to Inference Services → tutorial-pd-qwen3-14b, open the Prefill instance's Logs, select Live, and find the system event KV handoff verified (
PD_HANDOFF_VERIFIED). - Record the transport method and transfer volume in the event, and check the corresponding instance. This example uses Ethernet; the actual result should match the node network. If the result is
unmeasured, the transferred byte count was not measured, and you still need additional evidence of the handoff. - Open the P and D instance logs separately. Select a historical range such as 1 hour that includes startup and the call, then review the persisted engine logs for KV handoff failures or engine errors. Each log line's time prefix is the server collection time and may differ from the engine's embedded timestamp.
- In the D instance logs, find
KV Transfer metricsand reviewNum successful transfers(successful transfer count),Avg xfer time (ms)(average transfer duration),Avg MB per transfer(average transfer size), andThroughput (MB/s)(throughput). These values cover the log's statistics interval; without a request ID, they cannot be attributed to an individual request as its precise transfer data.
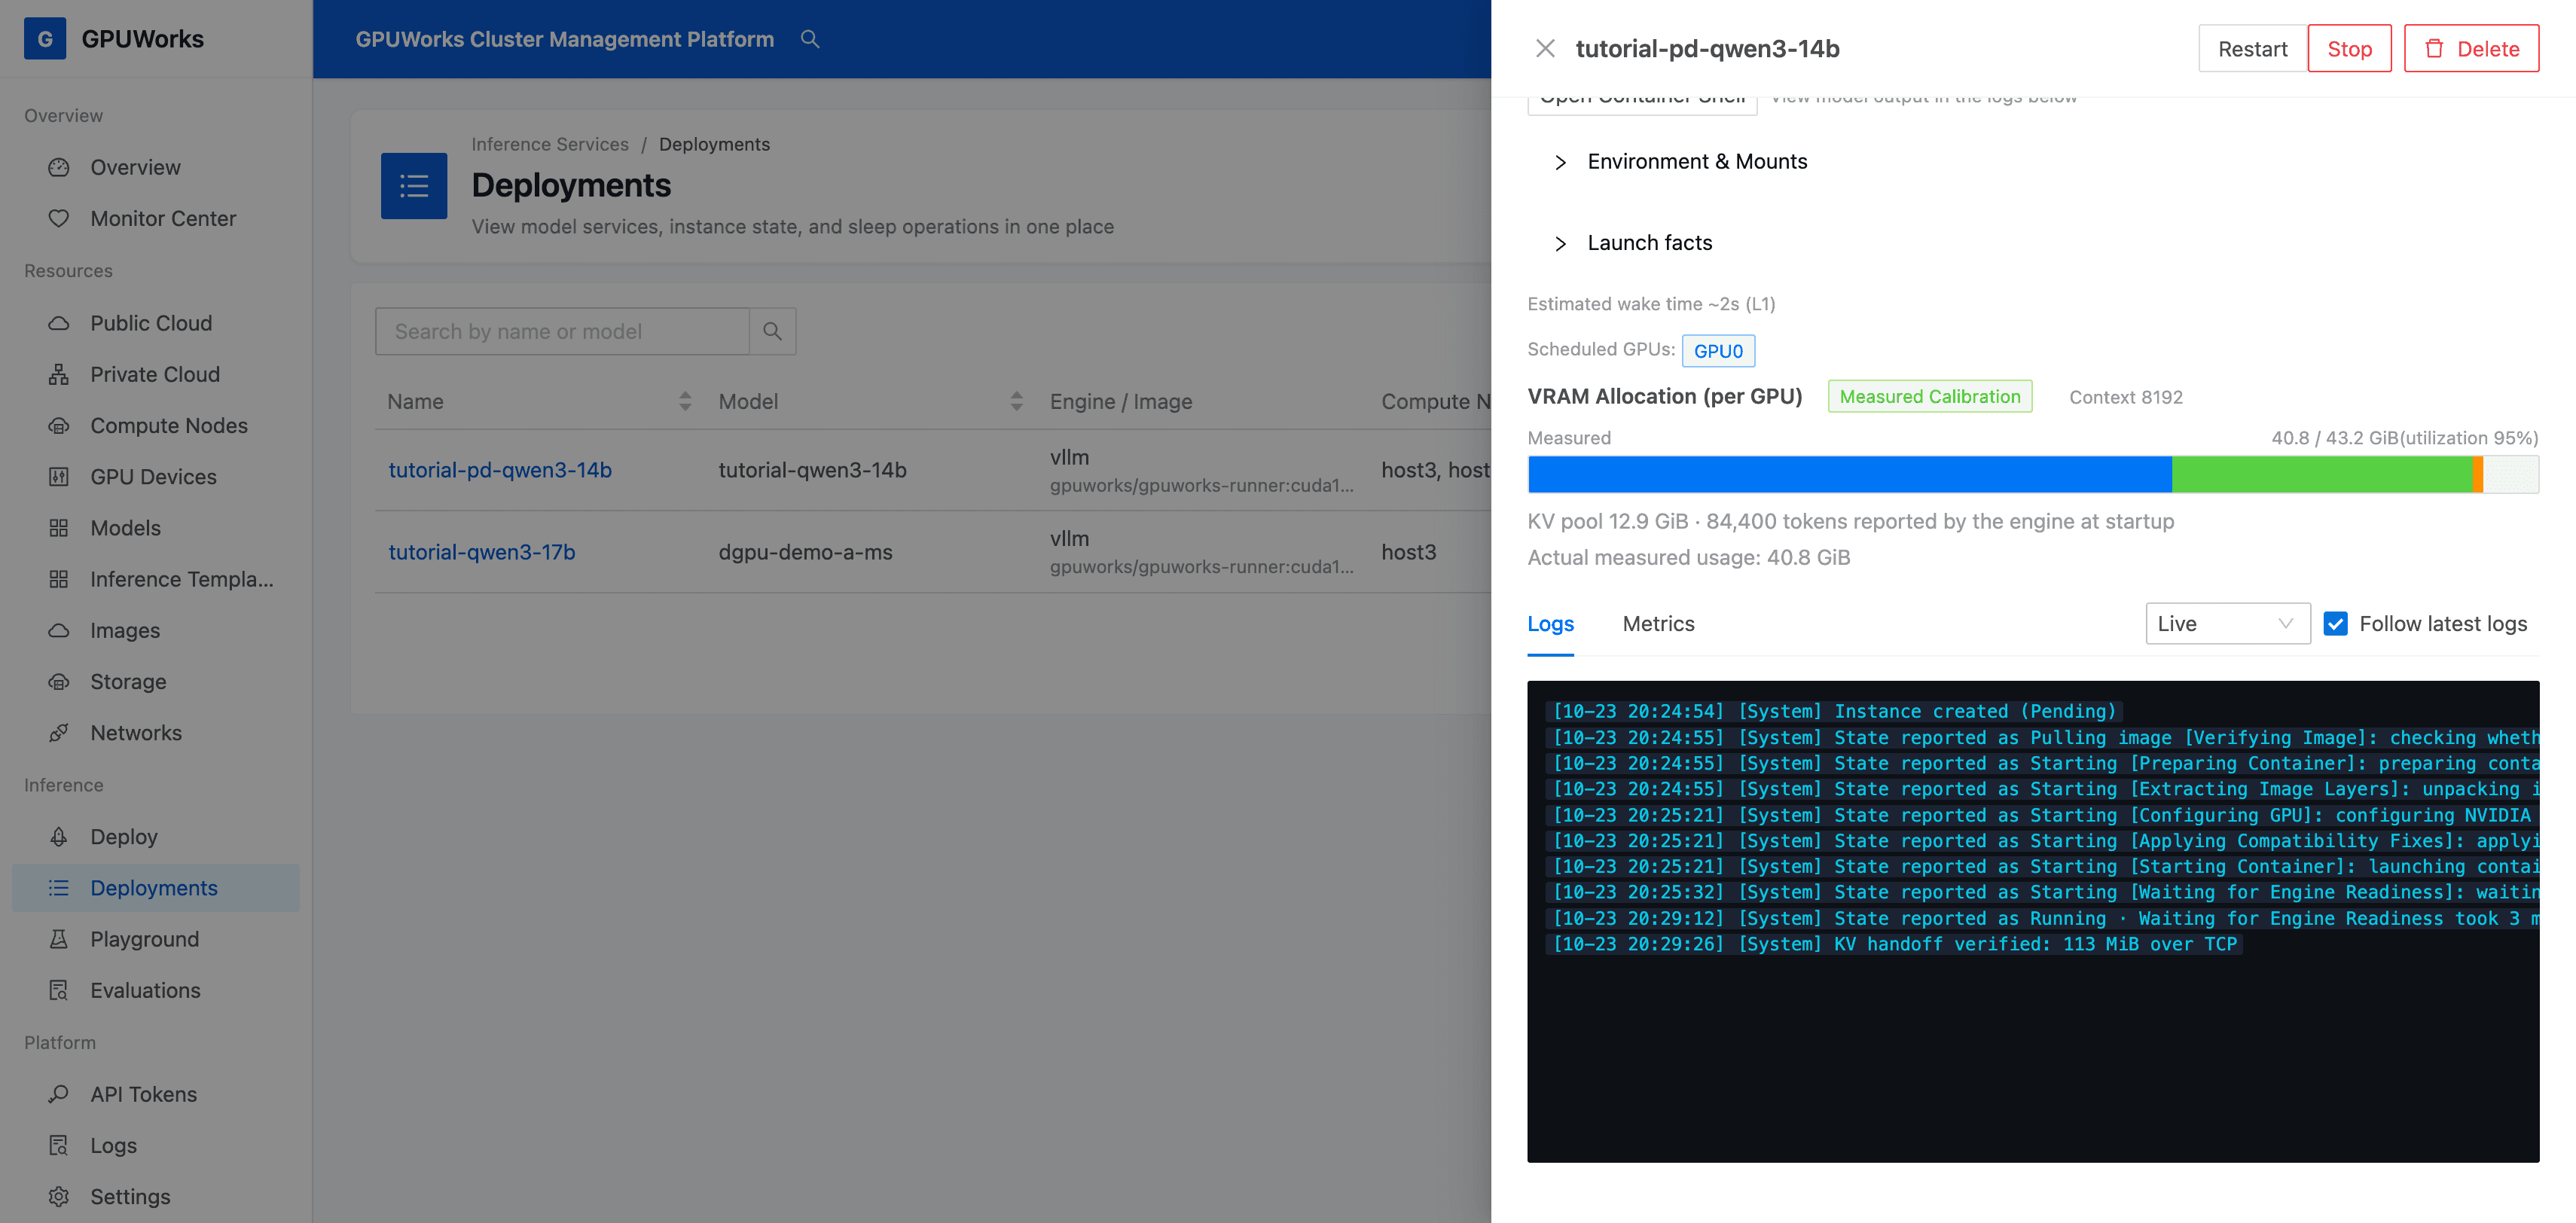
The self-test displays 113 MiB over TCP. This transfer belongs to the deployment self-test, not to request r9367, and it does not establish that RDMA is verified.
KV handoff verified is evidence from the deployment self-test; the request details in Section 6 record this long-document call. HTTP 200 entries in the logs may also come from health checks, so a single success log does not establish that it belongs to the long-document request. Use the request details to identify the P and D instances involved in this call.
Completion criteria: P and D each have one ready instance; the long-document summary request succeeds; request details show participation by both P and D without fallback; and you can find the KV handoff self-test result and open the corresponding instance logs to check for anomalies. Phase durations help you understand this call; performance still depends on the model, network, and business workload.
For more modes, scaling operations, and monitoring information, see the PD Disaggregation Deployment Guide.
Was this page helpful?