Tutorials
Scale a Model Service from One Replica to Two
On this page
Use case: A model already runs on a single GPU. You want to add an independent replica to share requests, then scale back to one replica when demand drops.
Goal: Create tutorial-replicas-qwen3, scale from one replica to two, confirm that both nodes receive successful requests, then scale back to one replica and complete a conversation.
The screenshots in this tutorial show the English UI. The recorded evaluation uses the original Chinese prompts; the downloadable English instructions preserve the tasks and request settings but change the input token counts. Names, request IDs, and timings are examples; your run may differ.
Before You Begin
| What you need | Configuration and checks used in this tutorial |
|---|---|
| Console permissions | You can view nodes, create and edit deployments, create evaluations, and use the Playground |
| Two available nodes | host2 and host3 are online and allow scheduling. Each has an idle RTX 4090 (48 GiB). Check the instances occupying them under GPU Devices |
| Model | Qwen/Qwen3-1.7B from ModelScope is registered, and its files are Available on both nodes. The example registration name in this tutorial is dgpu-demo-a-ms |
| Inference template and image | Profile bf16-vllm-nvidia-general, image gpuworks/gpuworks-runner:cuda13.0-vllm0.30.0-r4. Both nodes already have the image |
| Software environment | The English walkthrough uses Server build 79f927fc, the runveil runtime, and NVIDIA driver 610.57.04; check your Agent build in the node details |
| Node connectivity and disk space | Both nodes can serve requests from the Server. The runtime filesystem has enough space for unpacked images and runtime logs |
| Practice data | Download benchmark-prompts.jsonl (English prompts) to the computer running your browser. It contains 8 synthetic prompts, each with /no_think and an output limit of 128 tokens. The English instructions retain the original task of producing a short Chinese paragraph |
host2, host3, and dgpu-demo-a-ms are example names in the screenshots. Select your own corresponding nodes and find your registered model by source ID Qwen/Qwen3-1.7B; its registration name can differ. If the model is not ready, follow Download and Sync Models to prepare its files on both nodes.
If experimental deployments still occupy these GPUs, click Stop in their deployment details and wait for the GPUs to be released before continuing. Note which deployments you stop so you can restore them after the experiment if needed.
This tutorial uses Single node, which means each replica performs inference entirely on one node. After scaling to two replicas, each node runs a complete copy of the model.
1. Create a Service with One Replica
- Open Inference Services → Create Deployment → Quick Deploy. Under Basic Configuration, select your registered
Qwen/Qwen3-1.7Bmodel (dgpu-demo-a-msin this example) and set Target accelerator to NVIDIA. - Under Recommended Inference Template, select the general · vllm · balanced profile for Qwen3-1.7B and check the bf16 label. If the Use a registered model? page appears, select the MS registration for this model and click Use this model and deploy.
- Confirm that the source ID, profile, and image match the prerequisite table. Enter
tutorial-replicas-qwen3for both Deployment Name and Public Model Name.
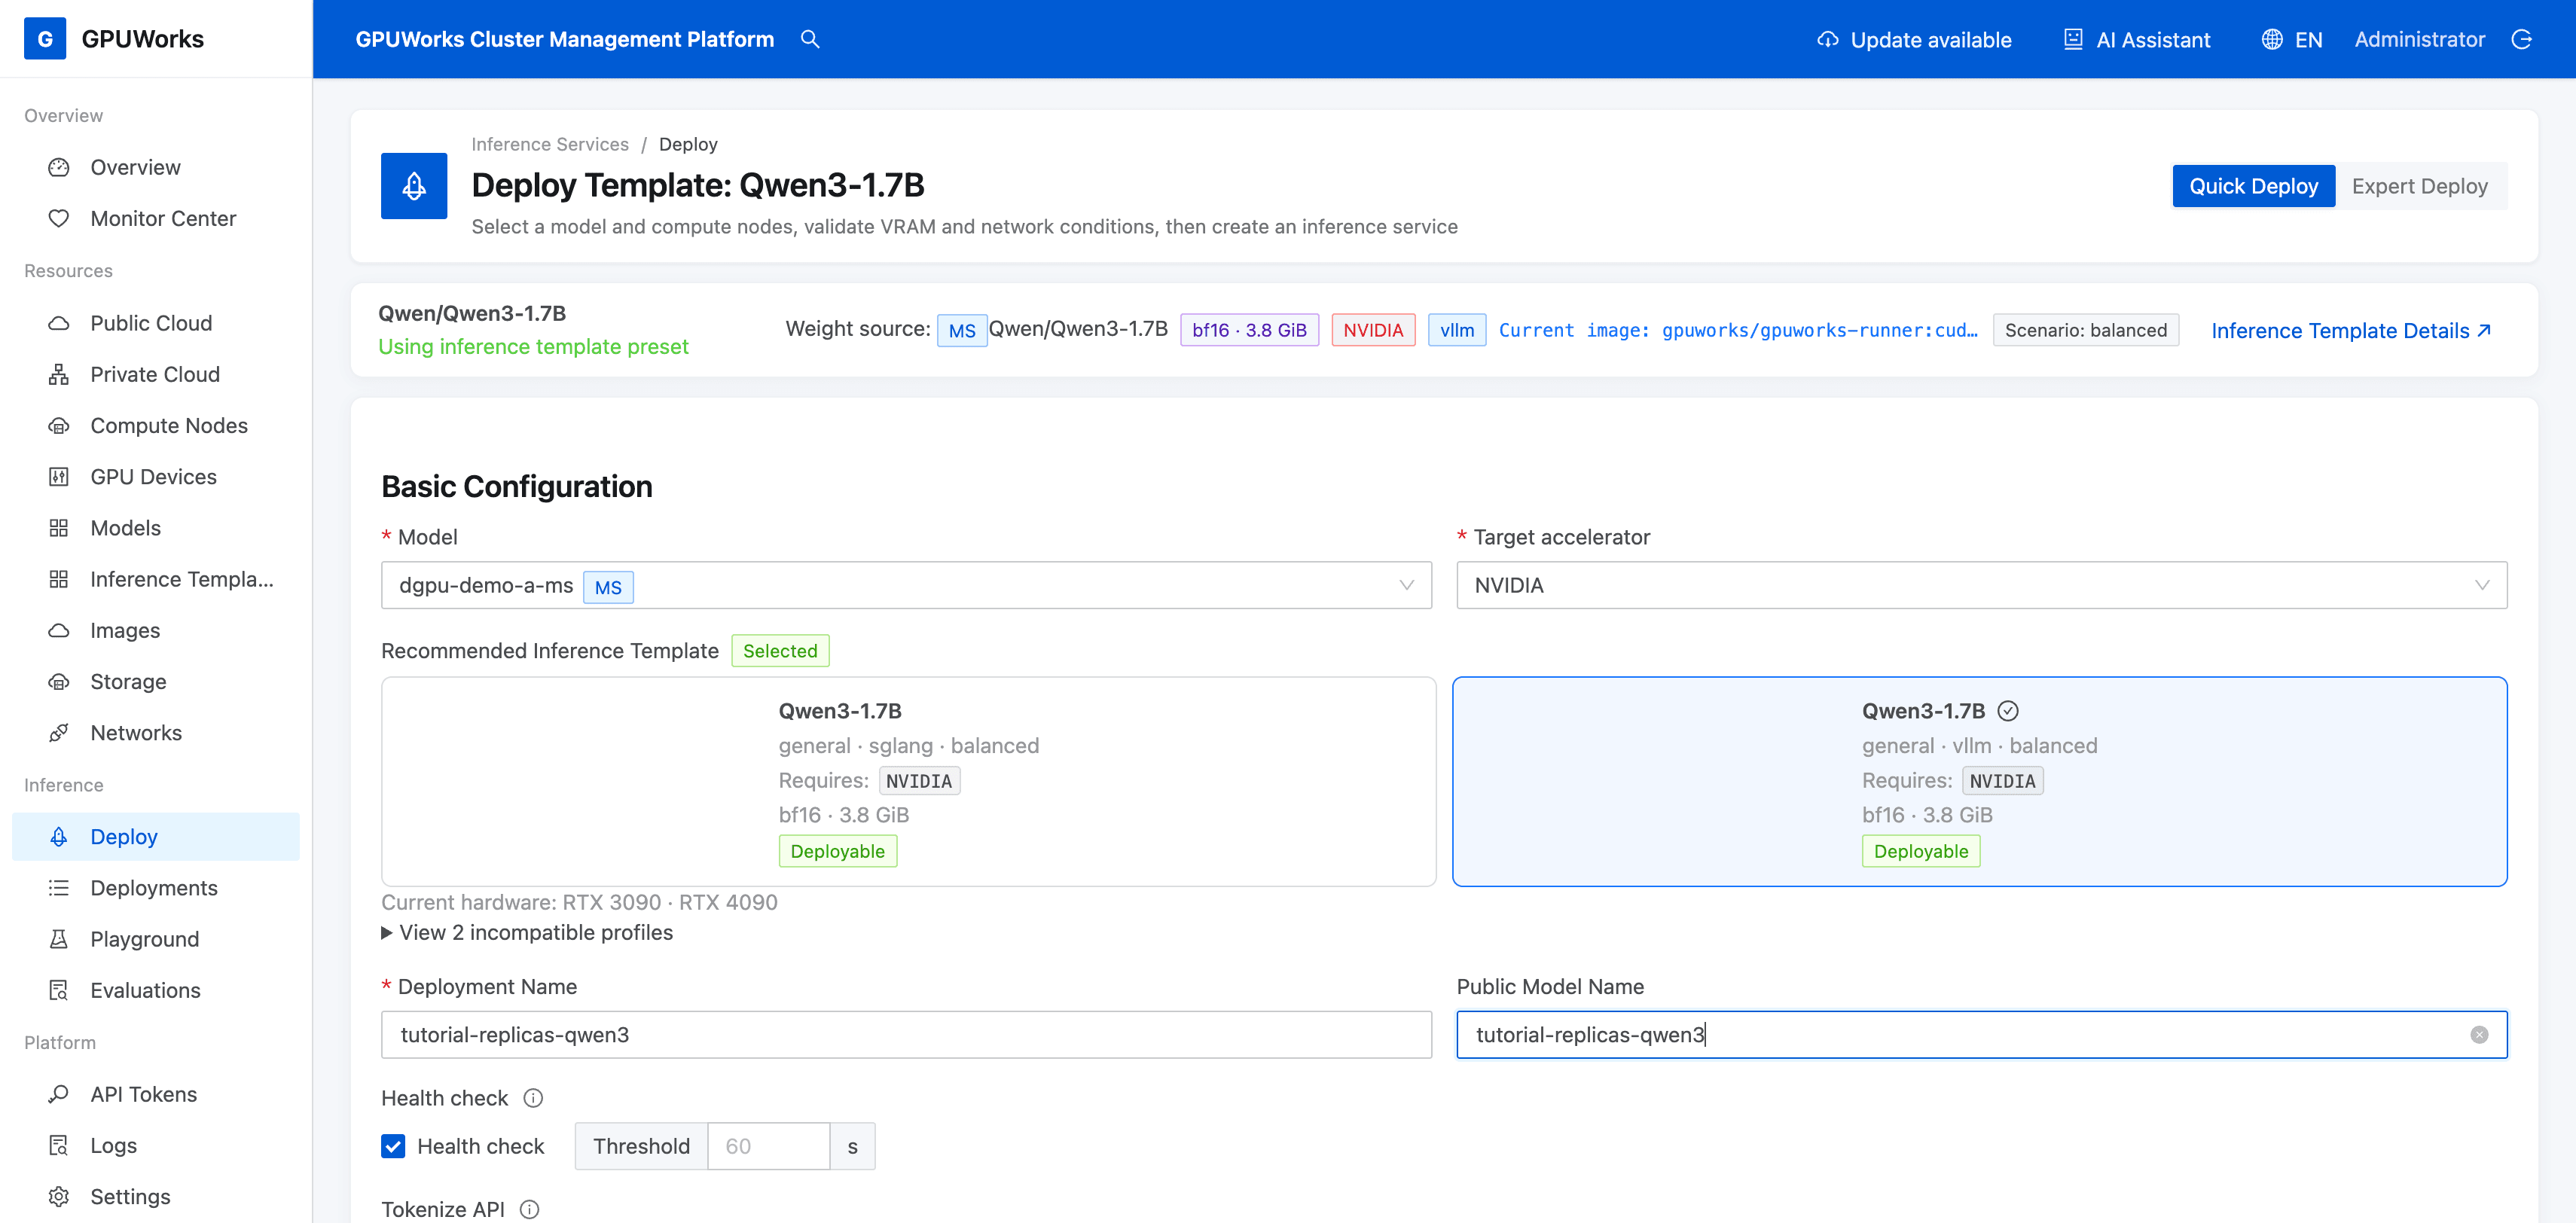
- Under Node, select Single node → Automatic. Select both
host2andhost3under Only these nodes. Expand Placement options and keep Placement strategy set to Spread. - Enter the resource settings below and keep health checks enabled.
| Field | Value |
|---|---|
| Replicas | 1 |
| Tensor Parallelism TP | 1 |
| Pipeline Parallelism PP | 1 |
| Maximum Context Length | 2048 |
| GPU Memory Utilization | 0.90 |
| Sleepable | Off |
| dGPU Memory | Disabled |
| KV Offload | Off |
Only these nodes limits replica placement to these two nodes. Spread prefers candidate nodes with fewer replicas of this deployment. The scheduler selects GPUs automatically. Check the preview on the right to confirm that one replica uses one GPU.
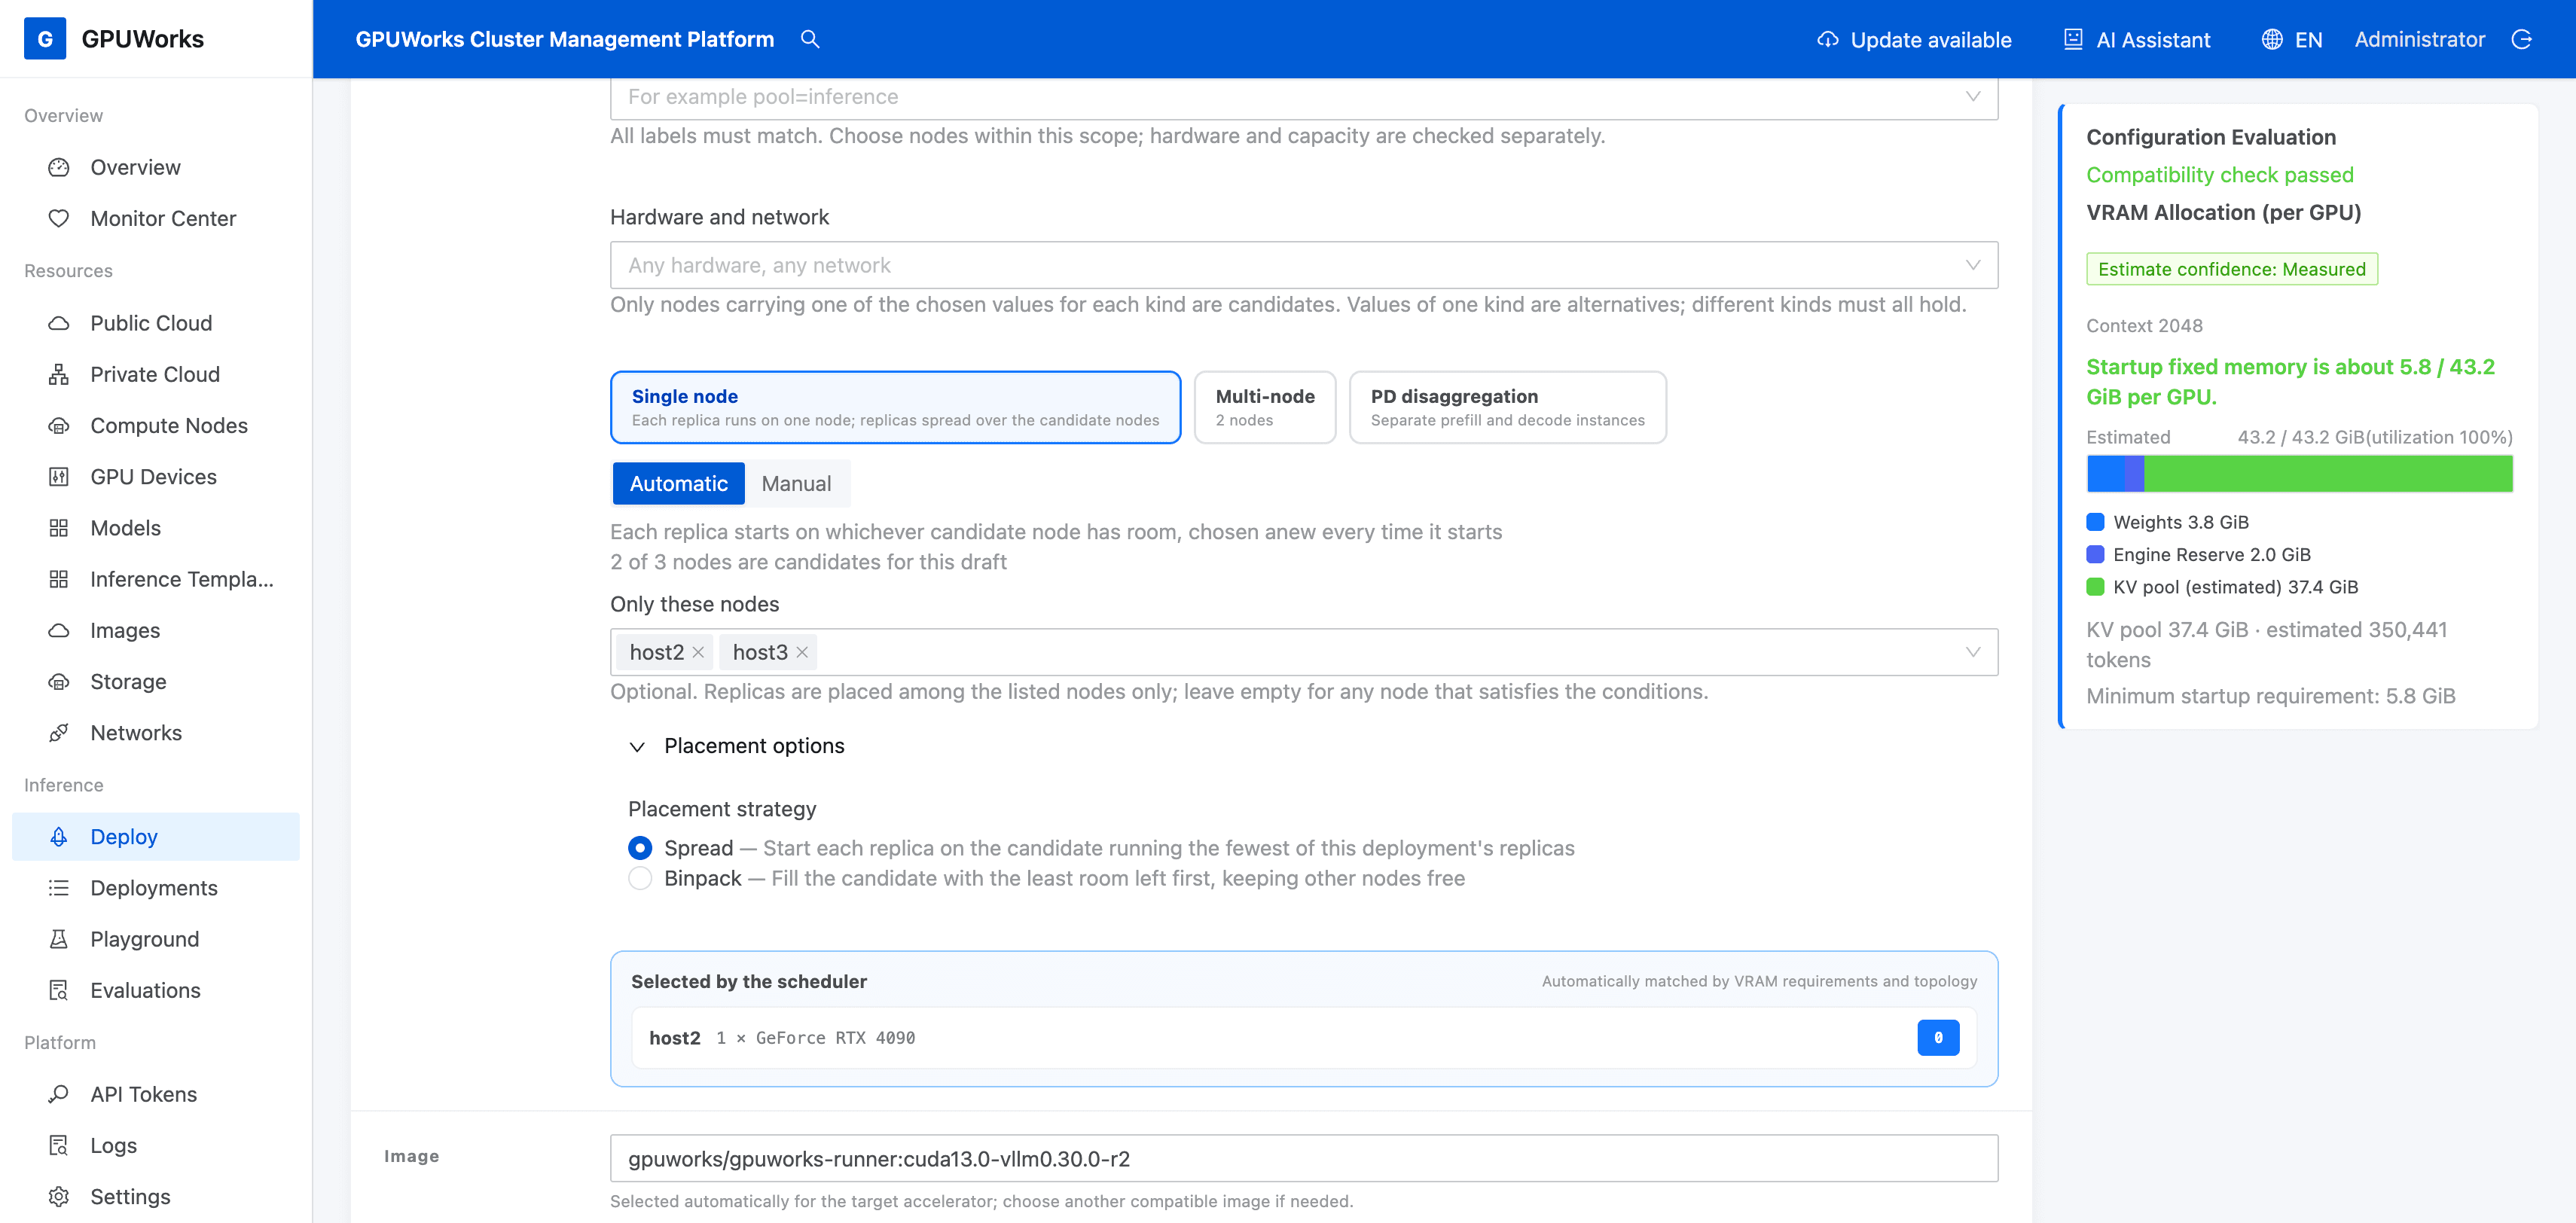
If you just stopped another deployment and released its GPU but the creation form still reports no available GPUs, reopen Inference Services → Create Deployment → Quick Deploy, enter these settings again, and check the candidate nodes.
- Wait for Compatibility check passed on the right, then click Deploy.
- Open
tutorial-replicas-qwen3in Inference Services. Wait until Replicas shows 1 of 1 running and the health check is normal. Record the first instance's node and GPU. - Open Playground → Chat, click New conversation, and select
tutorial-replicas-qwen3. Send “Explain a model replica in one sentence.” and confirm that you receive a normal answer.
The first replica can run on either candidate node; it does not have to be host2. If the replica is waiting for a node, check the wait reason in the deployment details and open View candidate nodes. If startup fails, open the instance's Logs, resolve any GPU memory, model file, or disk issues, then retry.
2. Scale to Two Replicas
- Return to Inference Services → tutorial-replicas-qwen3.
- In the number field to the right of Replicas, change
1to2and click Apply. - Wait until Replicas shows 2 of 2 running. Expand both instances and confirm that one runs on
host2and the other onhost3, each uses one GPU, and both show Running. - Check the Routing Policy that now appears and keep it set to Load balance.
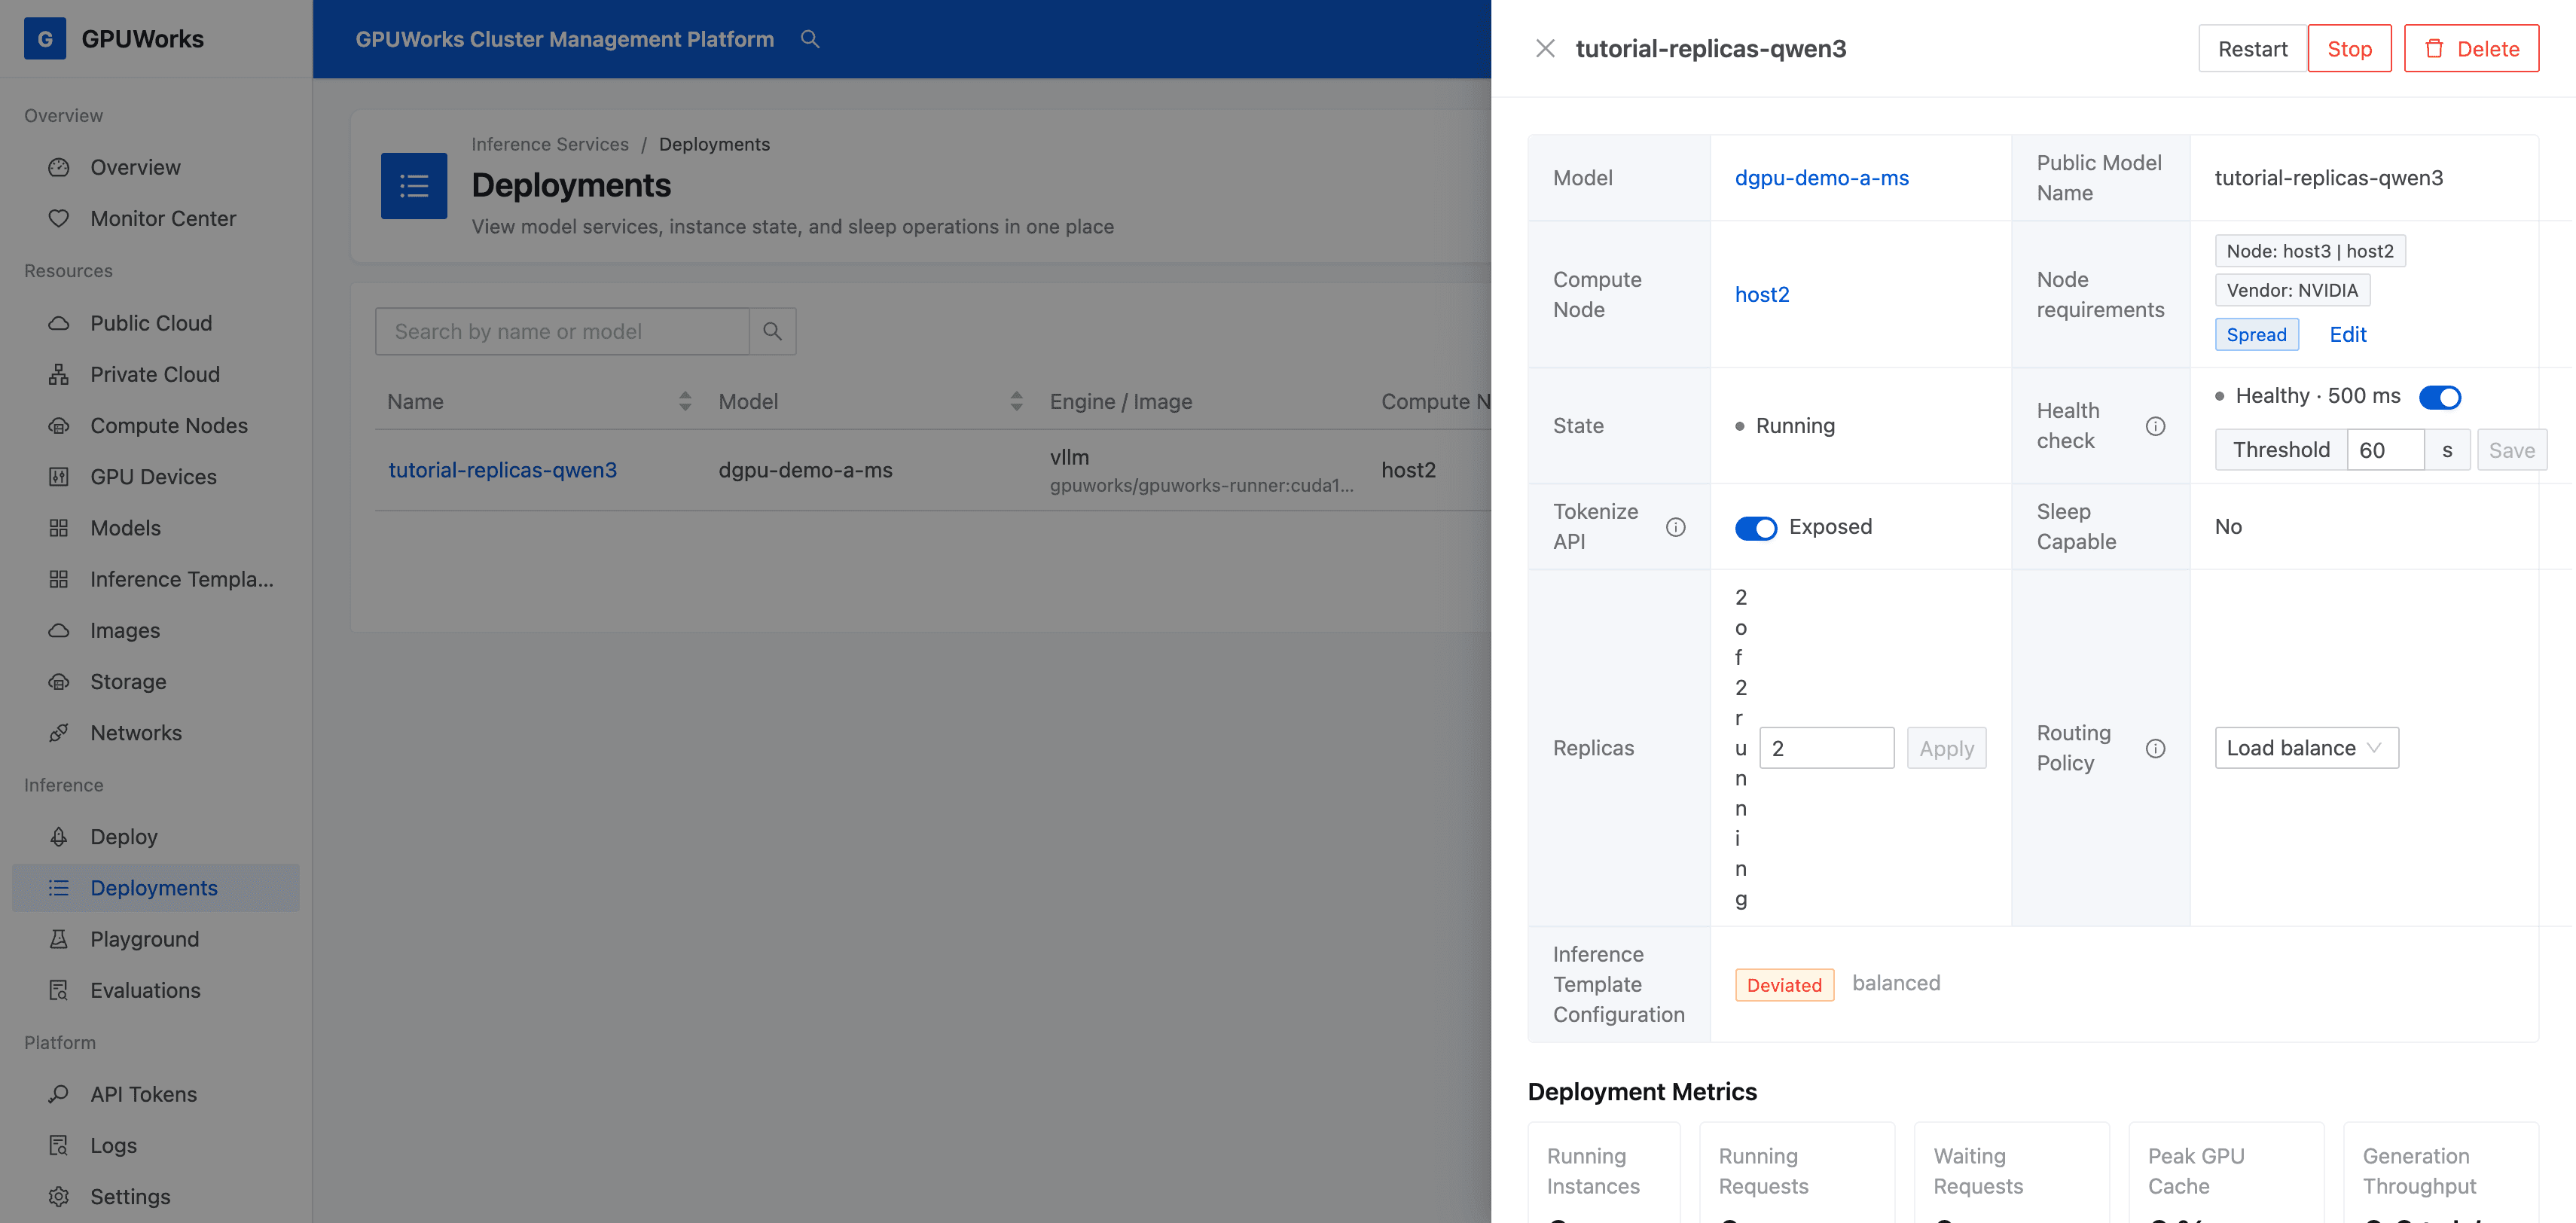
Clicking Apply only updates the desired replica count. The new instance still needs to start and pass its health check. A desired value of 2 does not mean scaling is complete. Wait until both instances are running before verifying request distribution.
If the status remains 1 of 2 running, first check that the second node is online, allows scheduling, and has a free GPU. Also check the new instance's logs. Wait for model or image preparation to finish before judging the result.
3. Send Concurrent Requests and Check Both Replicas
- Open Inference → Evaluations, click New Evaluation, and select Parameter Sweep under Choose Question.
- Under Set Target, enter:
| Field | Value |
|---|---|
| Evaluation Name | tutorial-replicas-distribution-en |
| Target | Managed Instance |
| Inference Service | tutorial-replicas-qwen3 |
| Load Origin | Server |
Server sends requests through the service's gateway and load balancing. If you select a compute node instead, the evaluation measures the instance on that node and cannot verify how requests are distributed across both replicas.
- Click Next. Under Dataset, select Imported Production JSONL, click Import JSONL, and choose the
benchmark-prompts.jsonlfile you downloaded. Confirm that the import summary shows 8 corpus samples. Although the option name includes “Production,” this tutorial imports synthetic practice data. - Set Samples per Channel to
4and Concurrency List to2. Expand Advanced Settings, select Fixed concurrency, set Warmup requests to1, select Keep per-request details, and set Tokenizer Source to Estimate.
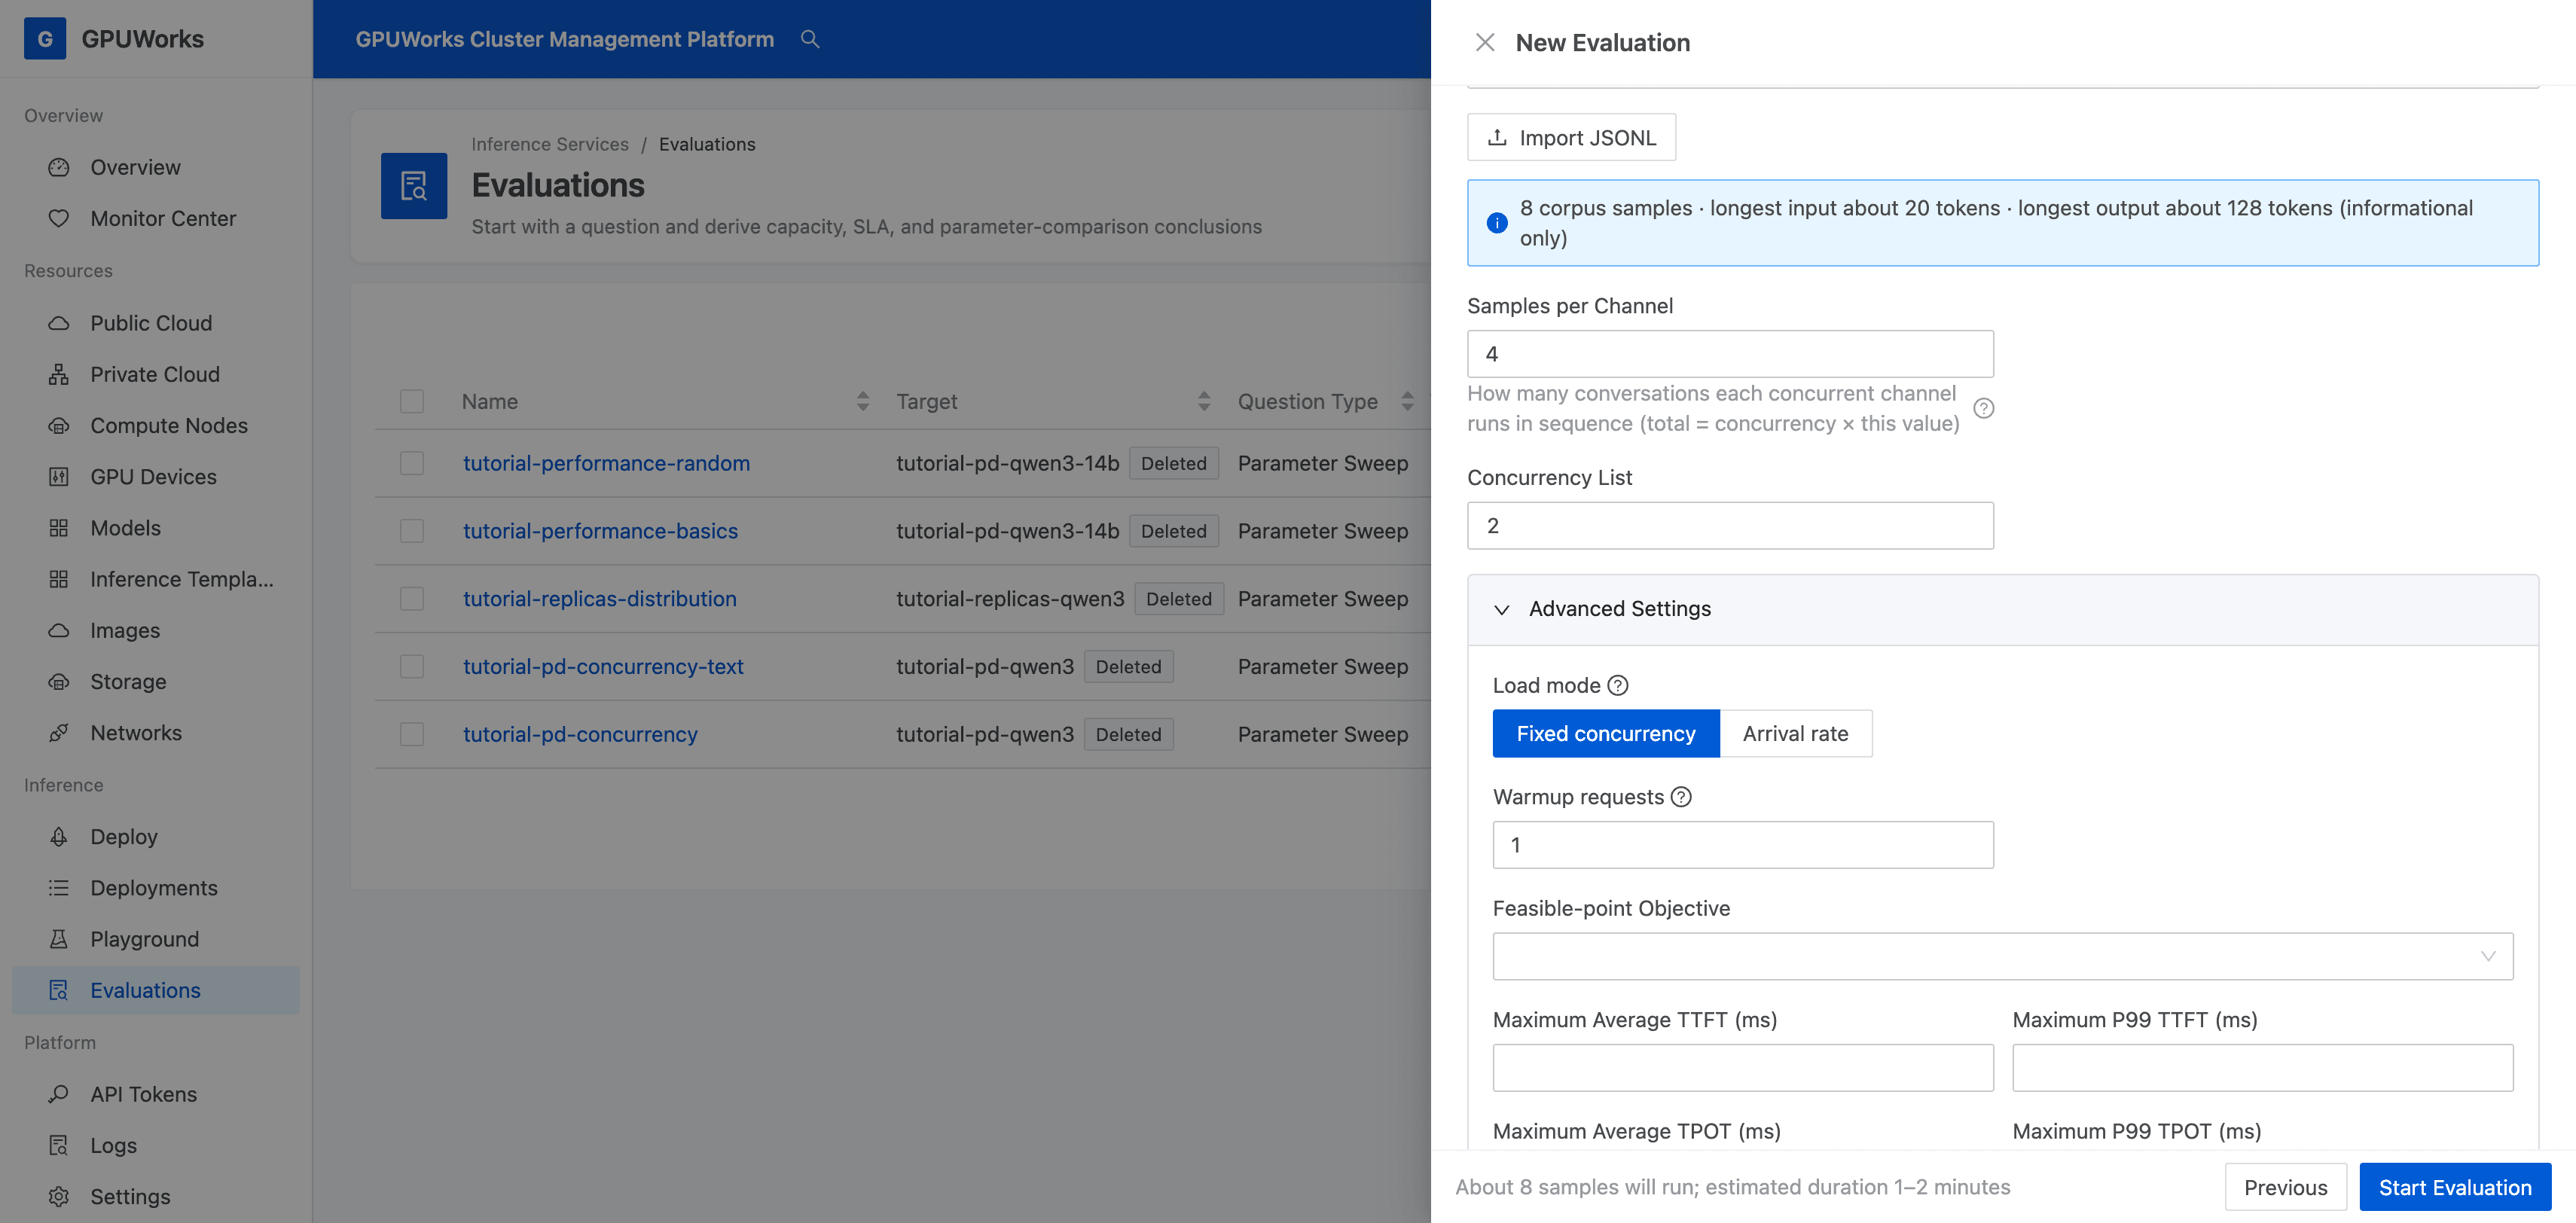
Imported samples are sent exactly as written in the file; no tokenizer is needed to generate fixed-length inputs. Leave Input Length (ISL) and Output Length (OSL) blank and do not enable fixed output length. Each sample's output_tokens: 128 is an upper limit, and an answer can finish earlier. The samples use /no_think to produce final answers, so the evaluation does not depend on requests that produce only reasoning output and lack valid timing data.
- Click Start Evaluation and wait for it to finish. Confirm that the run has only one point, with concurrency
2,8measured requests, and a success rate of100%. Warmup requests are excluded from the point's results but can appear in the service's request history. - Open Monitor Center → tutorial-replicas-qwen3 → History. Select a time range covering this evaluation and locate its successful requests.
- Open requests handled by different replicas and check the Replica field. At least one request must be handled by the instance on
host2and at least one by the instance onhost3. Both requests must have status200.
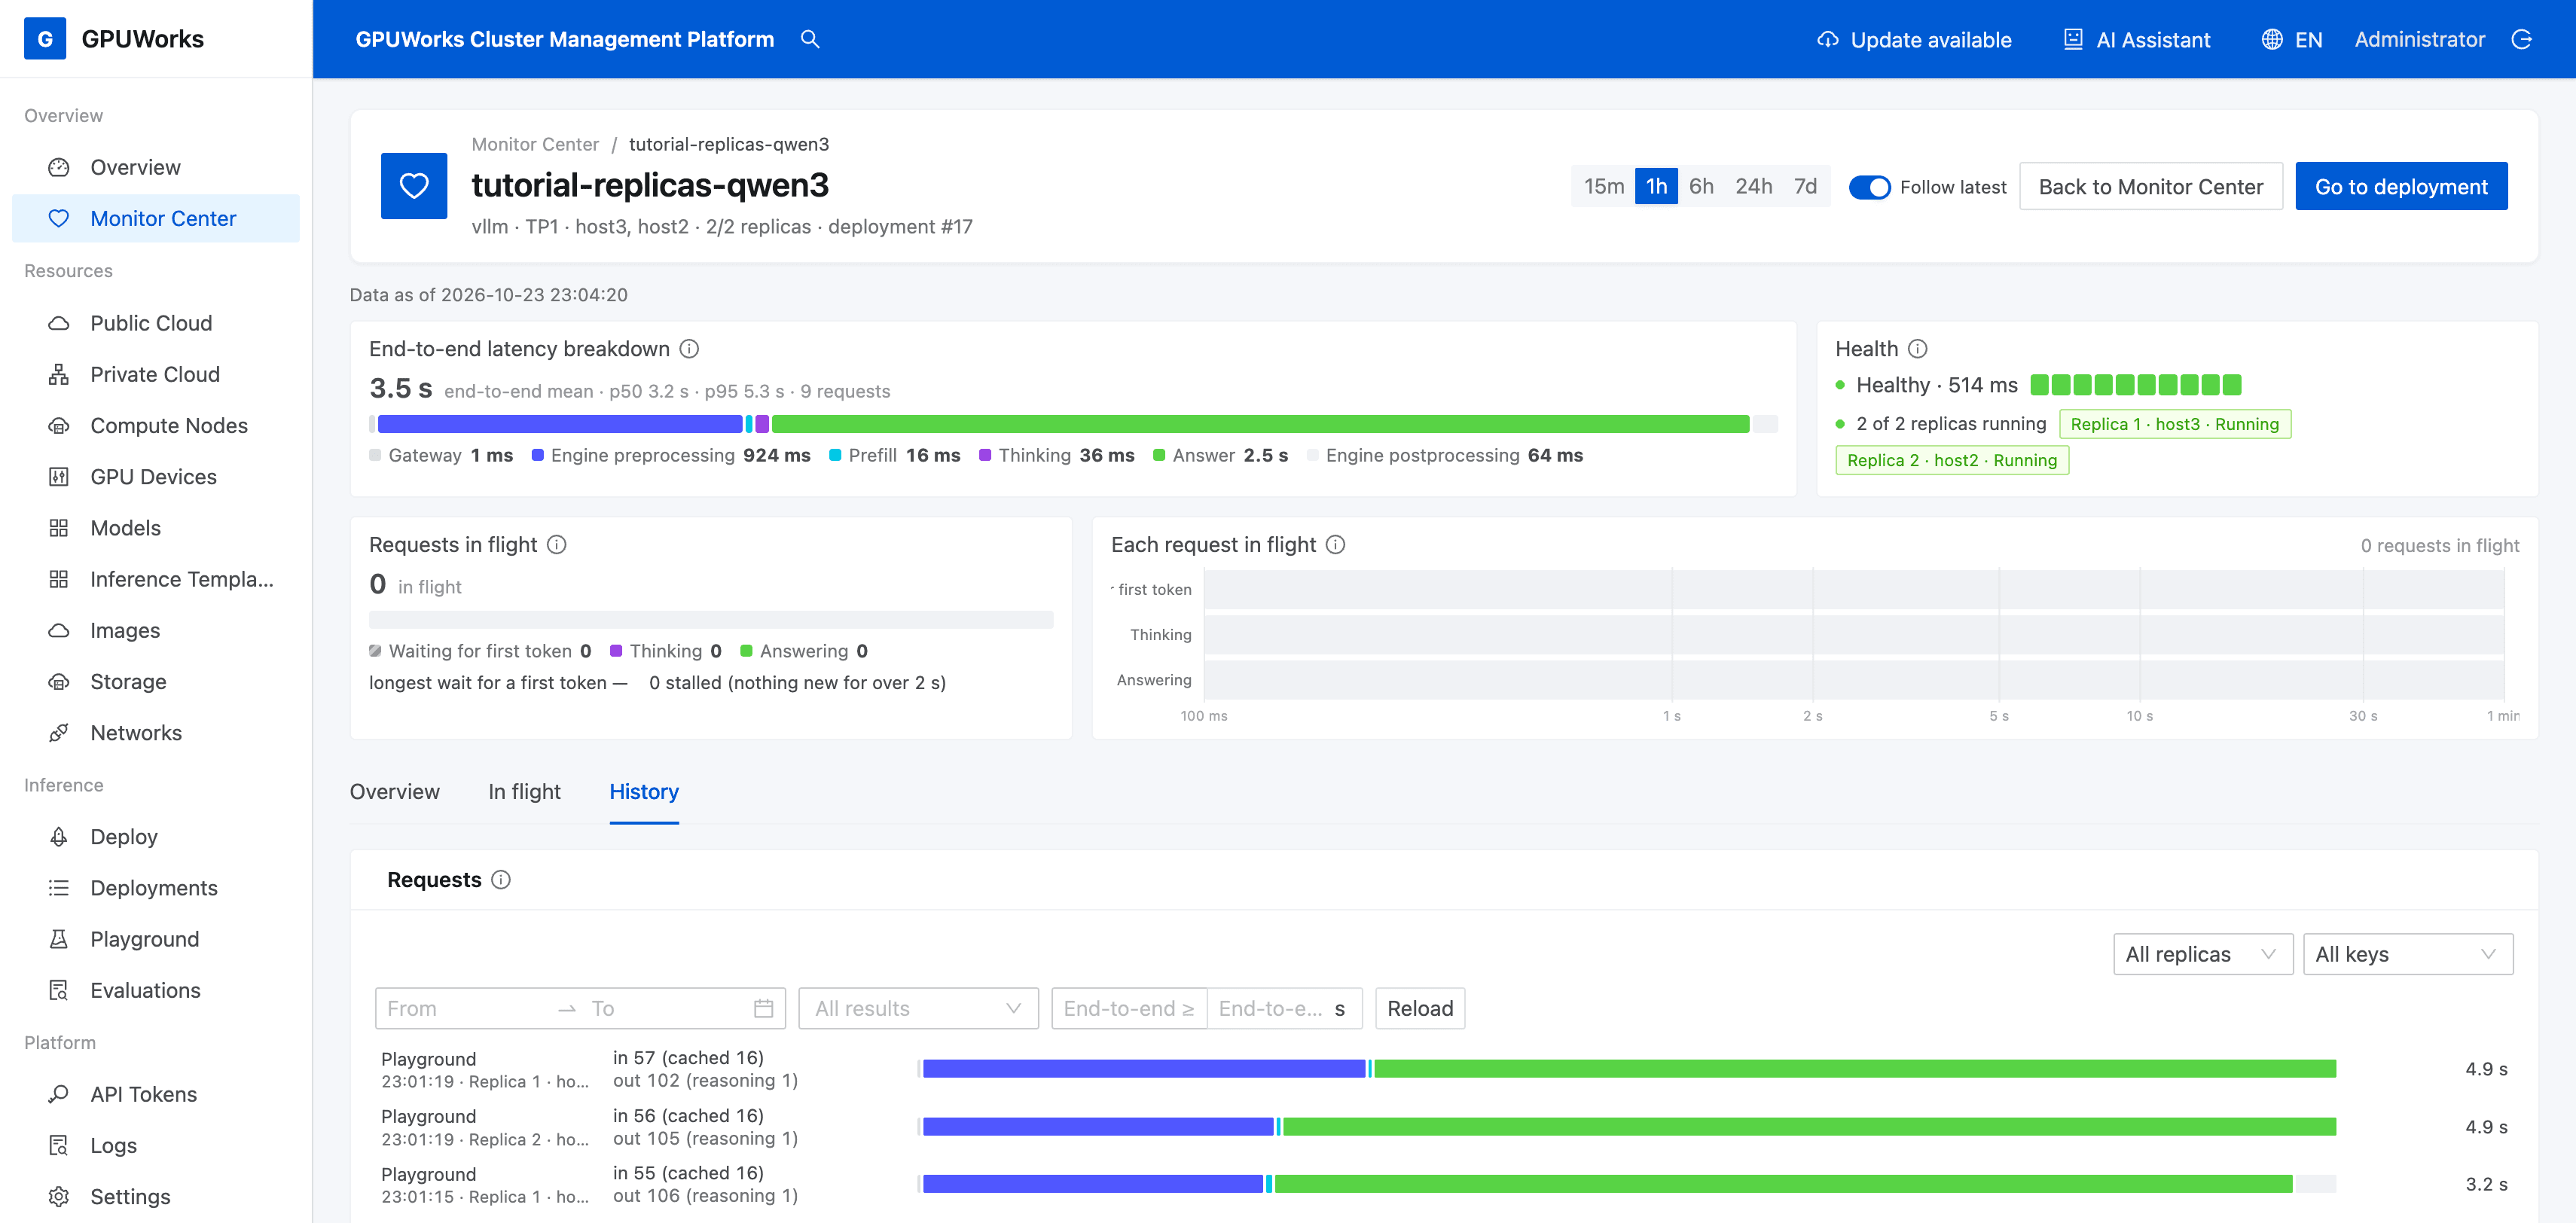
All 8 measured requests in this evaluation succeeded, and both replicas served requests. An additional 1 warmup request was handled by host2 and is excluded from the table below.
| Node | Successful measured requests | Verified request details |
|---|---|---|
host2 | 4 | r15225: status 200, finish reason stop, total time about 4.9 s |
host3 | 4 | r15226: status 200, finish reason stop, total time about 4.9 s |
Your request IDs, distribution, and timings may differ. Hit the length limit in the screenshot means an answer reached its configured output limit. Open its details to check the HTTP status; not every request needs a finish reason of stop.
Load balancing prefers the replica with the lighter current load. The request counts do not need to be equal. This tutorial verifies that both replicas actually serve requests. To determine whether two replicas improve throughput, benchmark one replica and two replicas with the same workload and other settings, then compare the results. For evaluation and report instructions, see Run a Performance Evaluation and Read the Report.
If the history shows only one instance, first check that Server is selected, both replicas are running and awake, and Routing Policy is Load balance. Then confirm that the time range covers these requests. Instance startup alone does not prove that request distribution works.
4. Scale Back to One Replica and Call It Again
- Wait for the evaluation to finish, then return to Inference Services → tutorial-replicas-qwen3.
- Change Replicas from
2to1and click Apply. - Wait until Replicas shows 1 of 1 running. Confirm that the retained instance is Running and the other instance is no longer running. Then open GPU Devices and confirm that the removed instance's GPU is released.
- Open Playground → Chat, click New conversation, and select
tutorial-replicas-qwen3again. Send “Explain in one sentence why model services need to scale up and down.” - Wait for a normal answer to finish. In the service's request history, confirm that the retained instance handles this request and its status is
200.
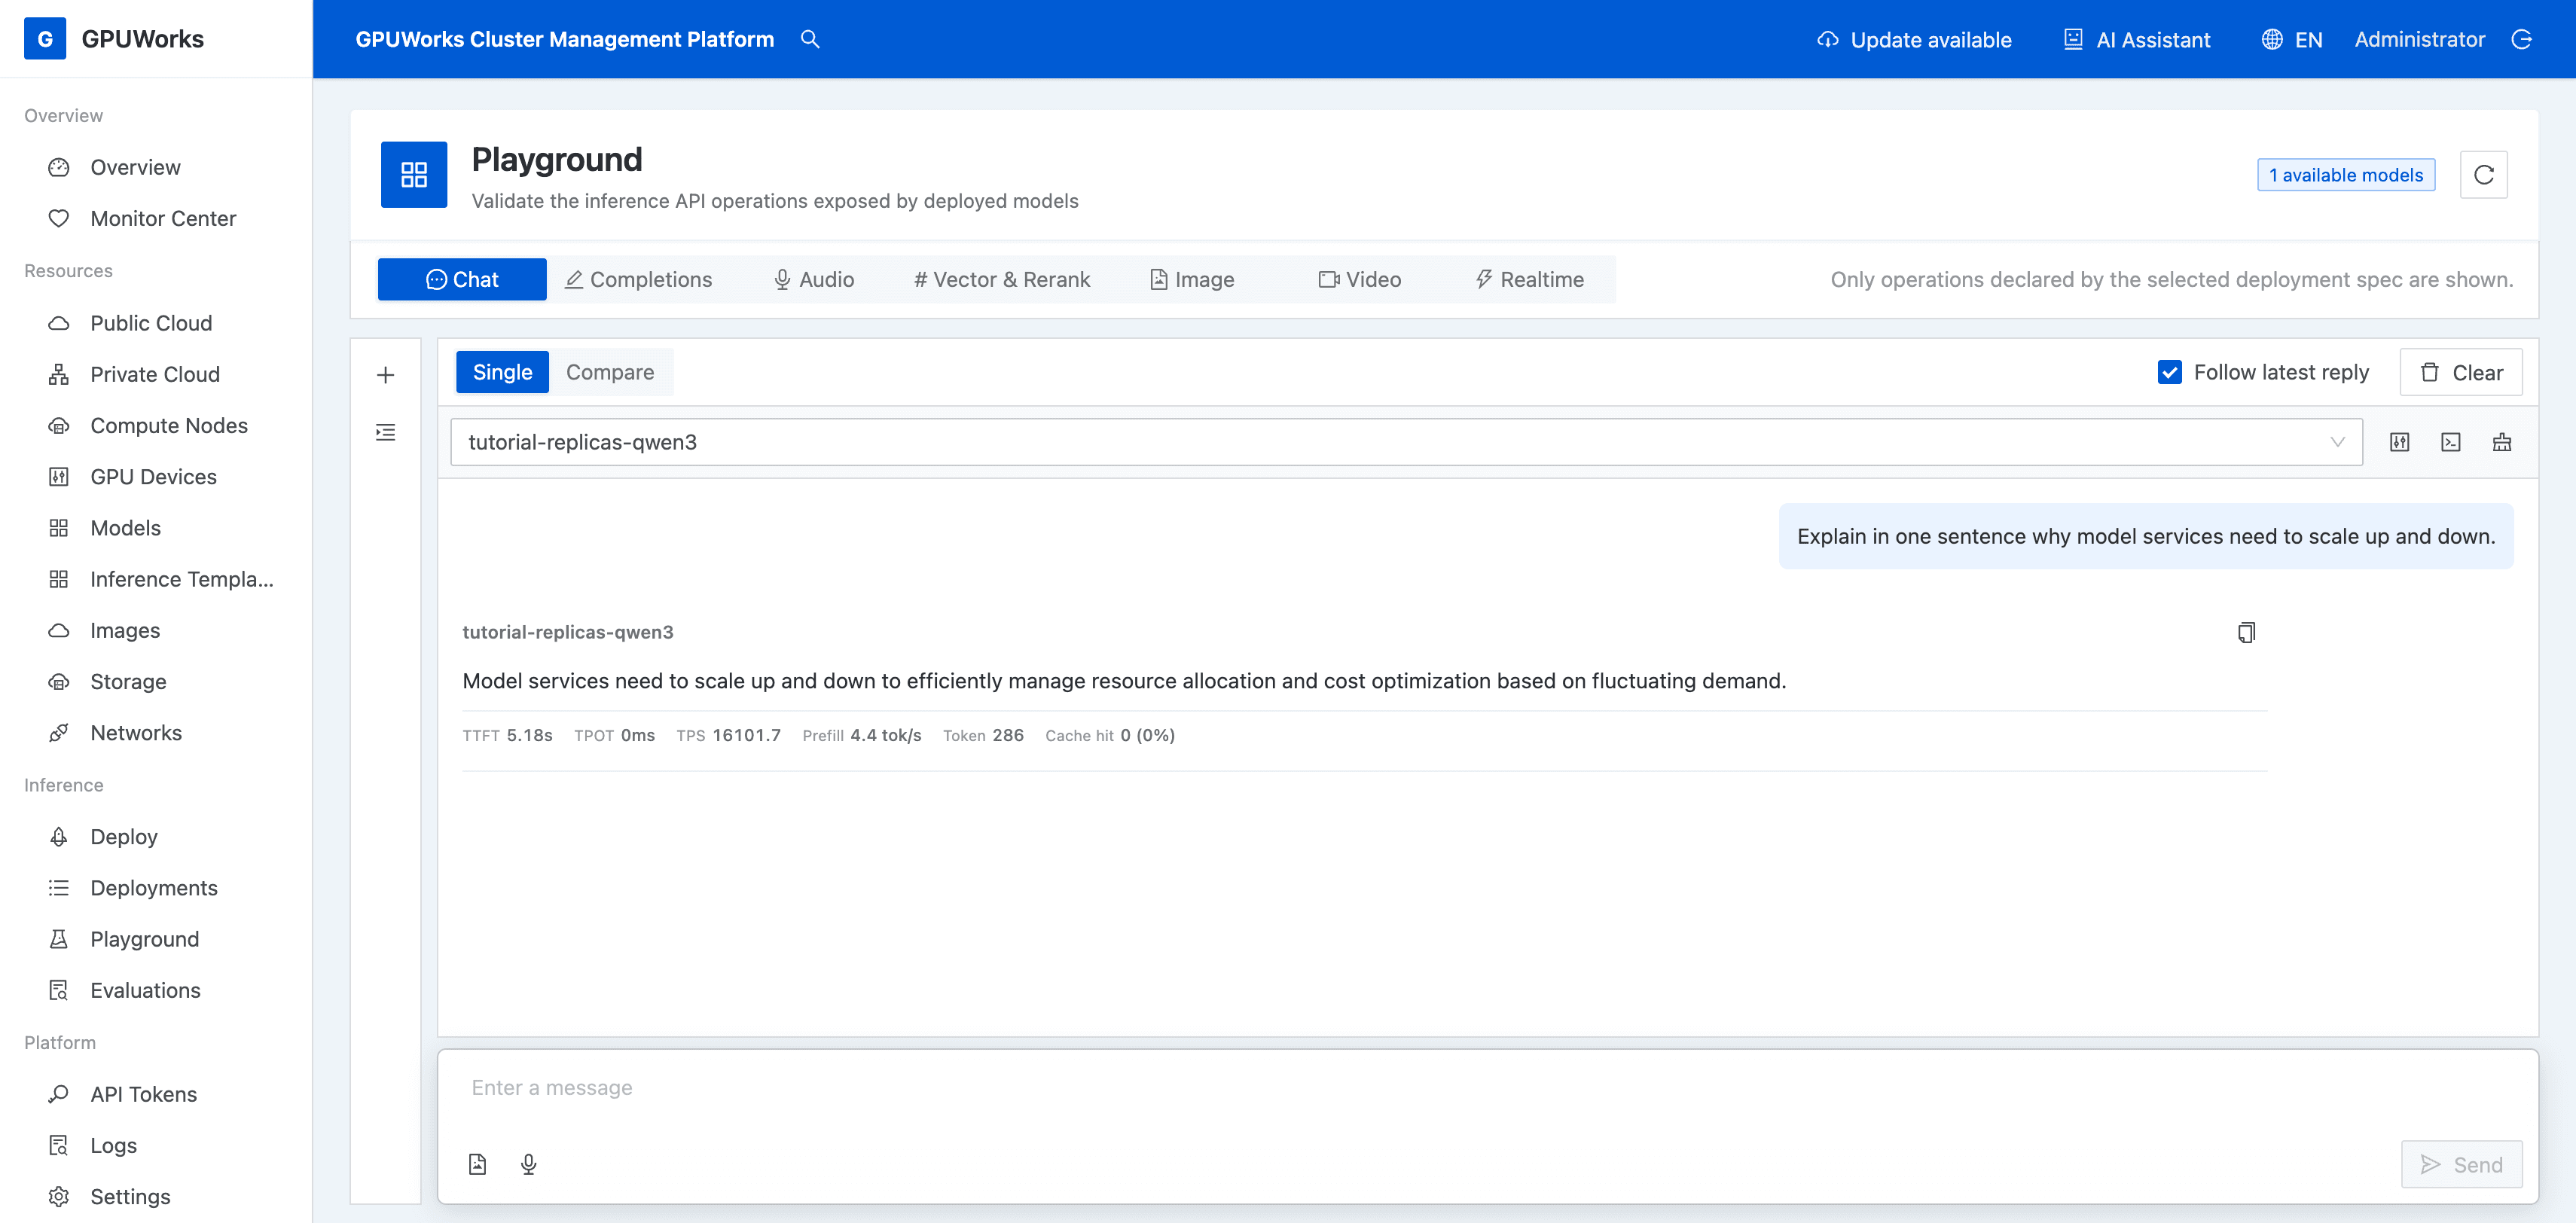
This example completes the 1 → 2 → 1 scaling and inference checks. The instance on host2 remains after scaling down, and host3 GPU 0 is released. The next request, r15621, succeeds using the same model name. It is handled by the retained instance with status 200 and finish reason stop.
During scale-down, the platform chooses which replica to remove and lets it finish existing requests before stopping. You do not specify which node must remain. To remove a particular replica, use Remove this replica in that instance's actions. This also decreases the deployment's replica count.
Completion criteria: The service answers with one replica. After scaling up, two instances run on different nodes and both handle successful requests. After scaling down, only one instance remains running, the other GPU is released, and the same public model name still returns normal answers.
5. Clean Up Experimental Resources
- When you no longer need the deployment, open Inference Services → tutorial-replicas-qwen3, click Delete, and confirm using normal deletion.
- Wait for the deployment to disappear from the list, then confirm that it no longer occupies either GPU. The registered model, model files, and image remain available for reuse.
- Find
tutorial-replicas-distribution-enin Evaluations. Export its report first if needed, then click Delete. Deletion removes the run's point results and per-request details. - If you stopped other experimental deployments before starting, click Start in their deployment details. Wait for their original replicas to return and verify inference.
Was this page helpful?