Tutorials
Run Your First Local Model on a Mac
On this page
Install GPUWorks on an Apple silicon Mac, connect the Mac to the console, choose a model from an inference template, and complete your first local chat. This tutorial covers a first installation and local trial. When you finish, you can stop the model to release resources.
Before You Begin
- You have an Apple silicon Mac with macOS 15 or later. GPUWorks also provides an Intel Mac package, but the model and deployment steps in this tutorial apply only to Apple silicon Macs.
- You can use a terminal and browser and, if necessary, enter your Mac administrator password in the terminal.
- You can access the GPUWorks release source, ModelScope, and the inference environment package repository, and you have enough disk space for downloaded and unpacked files.
- This tutorial is for a new local trial environment. If GPUWorks is already installed, follow Install and Upgrade the Control Plane to identify the existing directories and services first and avoid a duplicate installation.
This example uses Apple M5, 32 GiB unified memory, macOS 26.3.1, and GPUWorks nightly b40eddfc. The Agent installation command is specific to that version. The model download is approximately 11.3 GiB; you also need space to download and unpack the inference environment package and store runtime data. Evaluate other devices based on their actual configuration.
Both the console and the inference node run on this Mac. The Mac uses the host runtime, with the inference engine running as a native process. GPUWorks downloads a Metal-compatible environment package, so you do not need Docker Desktop. The system and other applications also use unified memory. Base your deployment on the available capacity detected by the platform and the configuration evaluation.
1. Download the Release Package and Install the Console
-
In a terminal on this Mac, create a download directory and download the current nightly Apple silicon release package and checksum file.
mkdir -p "$HOME/Downloads/gpuworks-mac"
cd "$HOME/Downloads/gpuworks-mac"
GPUWORKS_SOURCE=https://gpuworks-dl.oss-cn-shanghai.aliyuncs.com
GPUWORKS_RELEASE=$(curl -fsSL "$GPUWORKS_SOURCE/nightly/latest")
GPUWORKS_PACKAGE="gpuworks-$GPUWORKS_RELEASE-darwin-arm64"
curl -fLO "$GPUWORKS_SOURCE/releases/$GPUWORKS_RELEASE/$GPUWORKS_PACKAGE.tar.gz"
curl -fLO "$GPUWORKS_SOURCE/releases/$GPUWORKS_RELEASE/SHA256SUMS"
shasum -a 256 -c SHA256SUMS --ignore-missing
Continue only after the downloaded
darwin-arm64.tar.gzshowsOK. Download it again if verification fails. Nightly is a rolling preview channel; the command retrieves the current release at the time you run it. -
Extract the package, check the version, and install it in the current user's directory.
tar -xzf "$GPUWORKS_PACKAGE.tar.gz" cd "$GPUWORKS_PACKAGE" ./gpuworks version ./gpuworks install --addr 127.0.0.1:8800 --quiet--quietskips installation prompts. A new installation generates a random administrator password and provides it in the final summary. On a Mac, the default installation directory is~/gpuworks/server, and the console runs as a background process without registering a service to start at boot (run~/gpuworks/server/gpuworks install --autostartlater if you need one). The console in this tutorial listens only on the local address127.0.0.1:8800. -
Check that the console is ready.
curl -fsS http://127.0.0.1:8800/healthzConfirm that the returned
statusisok. Openhttp://127.0.0.1:8800in your browser and sign in withadminand the random password in the installation summary.
2. Connect This Mac to the Console
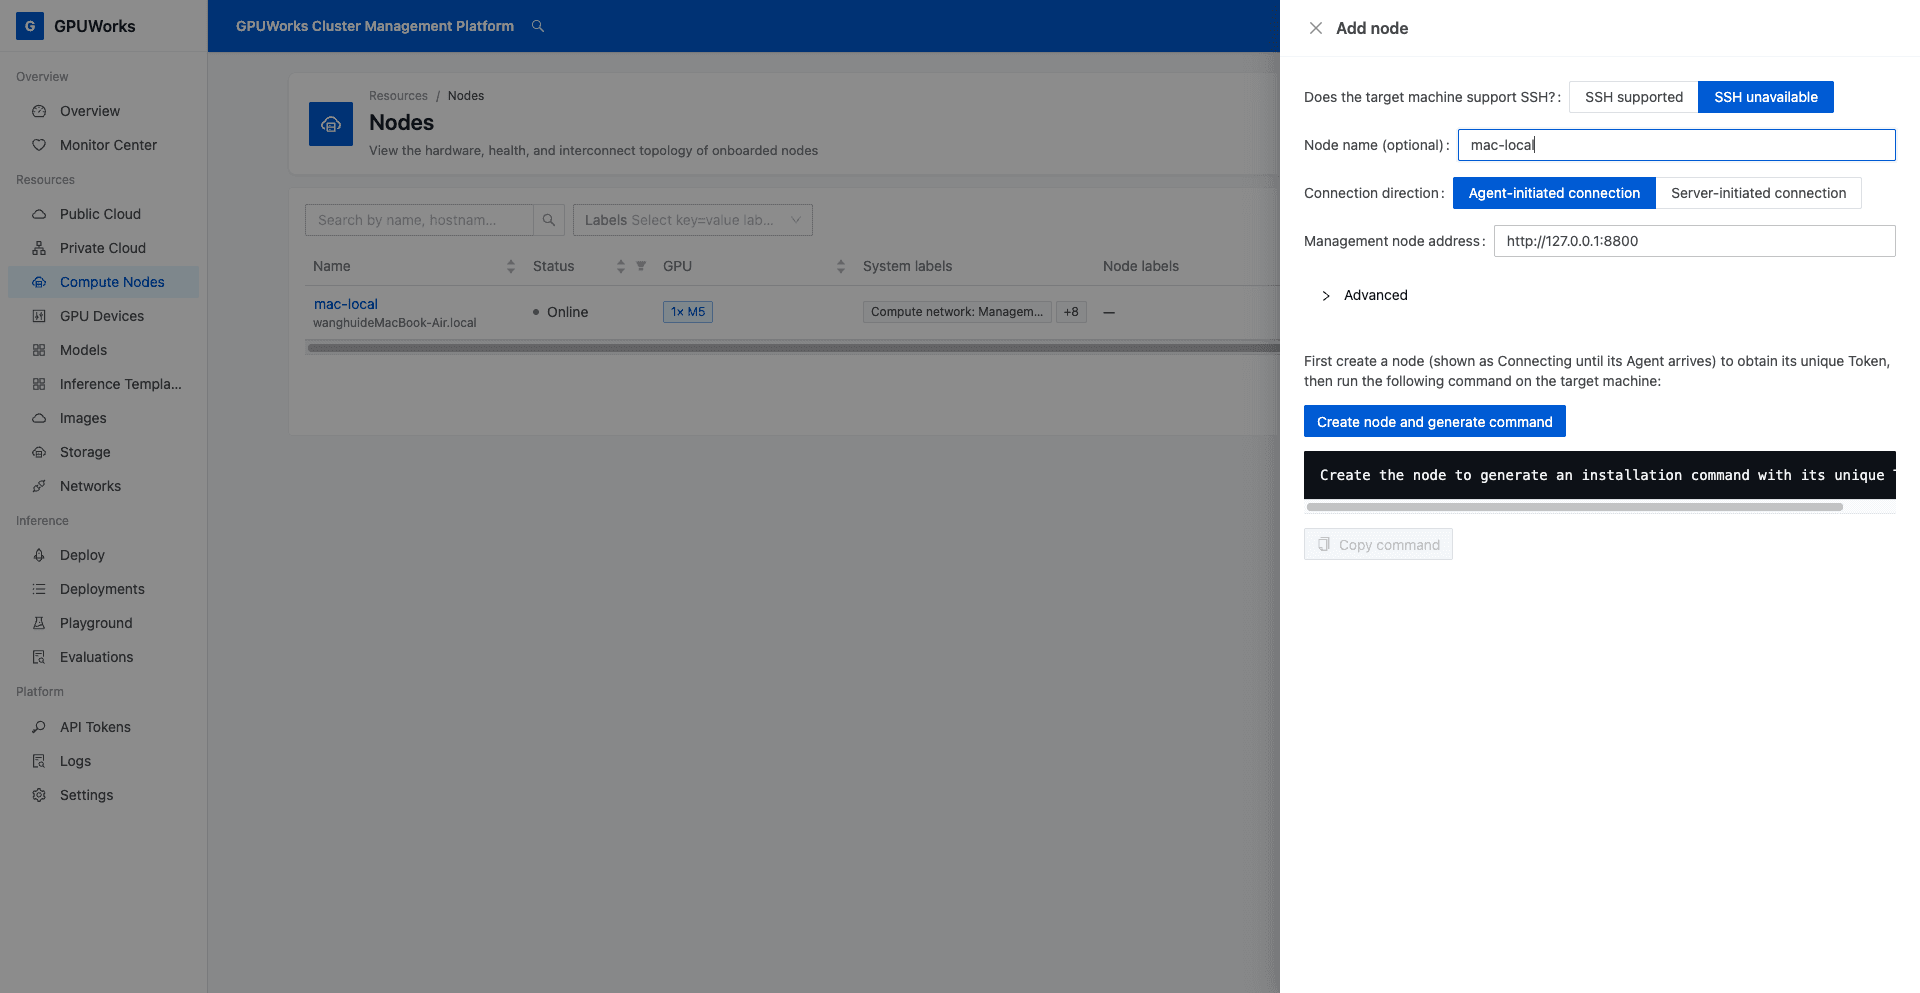
- Open Compute Nodes → Add node and enter the following values.
| Field | Value |
|---|---|
| Does the target machine support SSH? | SSH unavailable |
| Node name | mac-local |
| Connection direction | Agent-initiated connection |
| Management node address | http://127.0.0.1:8800 |
-
Click Create node and generate command. Copy the complete command, append
--no-sudo, and run it in a terminal on this Mac. Keep the node-specific token in the generated command.The agent and node data go to
~/gpuworksby default, separate from the console's~/gpuworks/server.--no-sudoperforms a user-level installation. Normally, the agent runs through the user's launchd job and is available only while that user is logged in. If a LaunchAgents permission error appears, follow the permission troubleshooting steps below before continuing to Step 3. -
Wait for the installation output to show
agent running under launchd. Return to Compute Nodes and confirm thatmac-localis Online. This example shows1× M5,32 GiBof system memory, and thehostruntime.
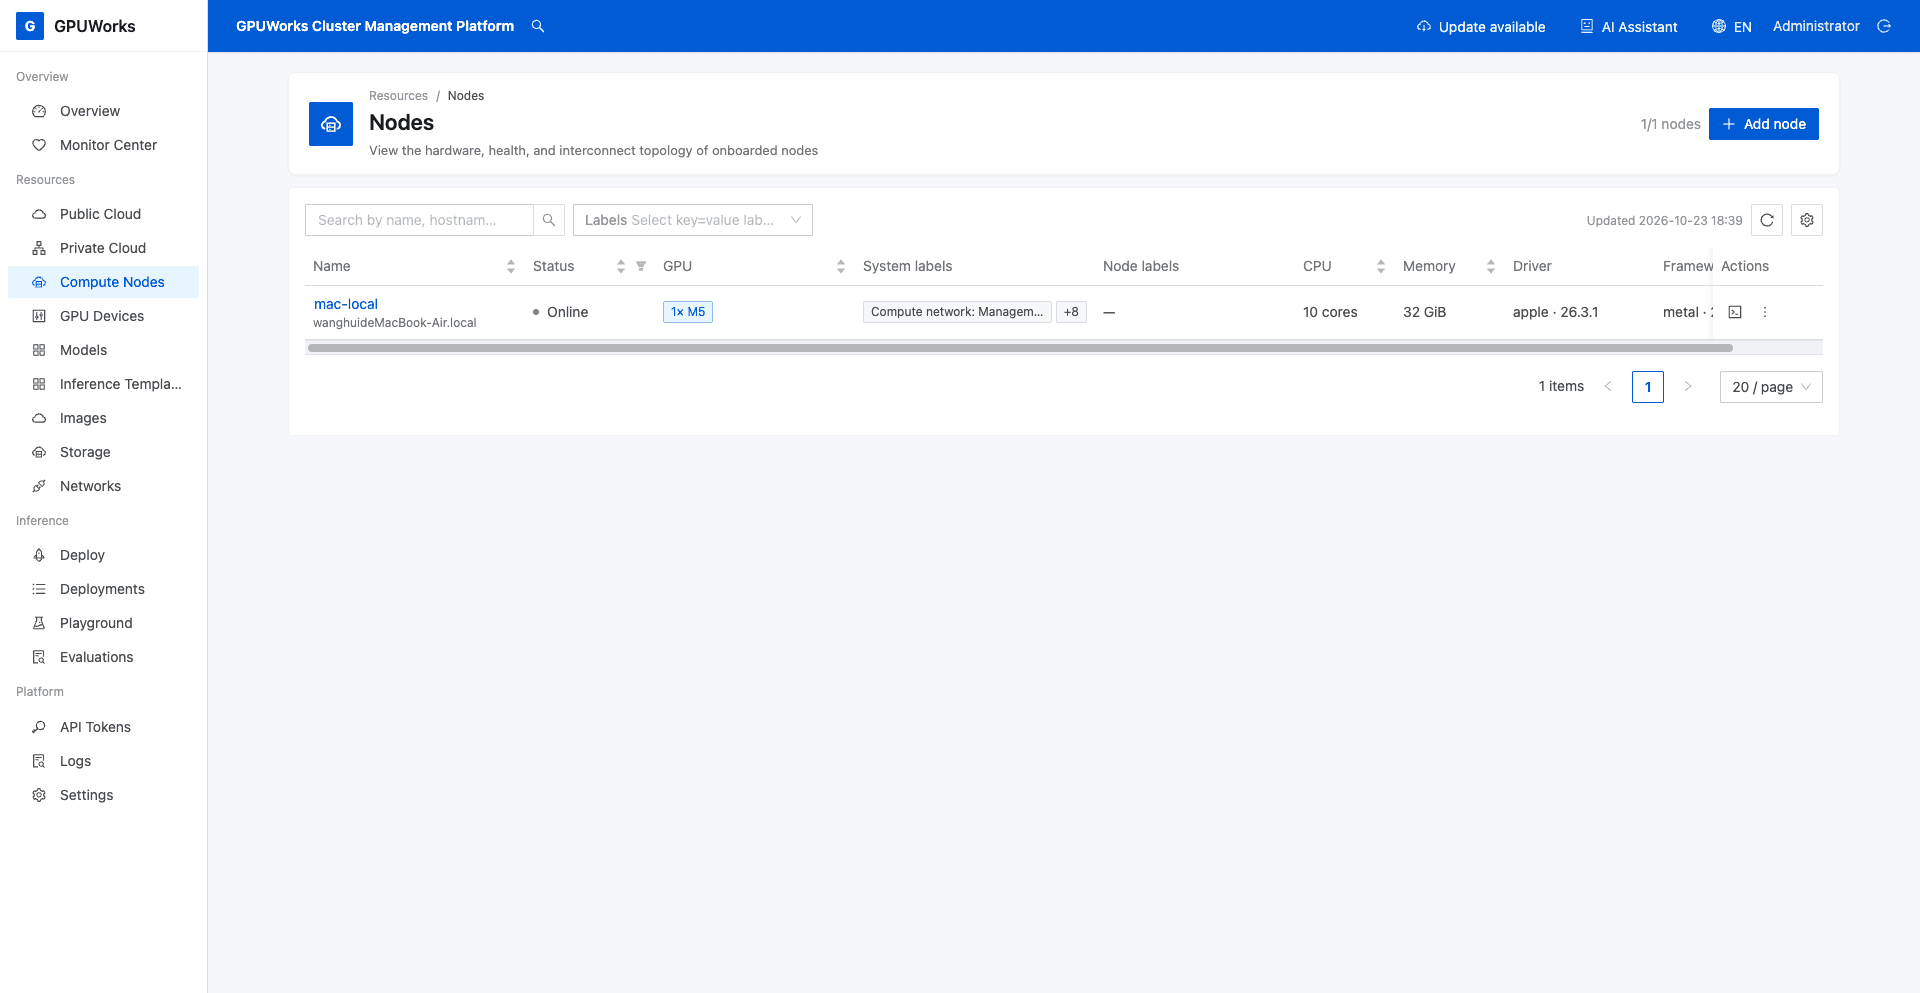
The system's 32 GiB is the total unified memory; you cannot treat all of it as GPU memory available to the model. In this example, the platform detects a GPU working set of approximately 21.3 GiB. Subsequent deployment evaluation uses the GPU working set and the selected resource parameters.
If a LaunchAgents Directory Permission Error Occurs
If installation fails while writing the launchd configuration with an error such as open .../Library/LaunchAgents/.ai.gpuworks.agent...: permission denied, check the directory owner and permissions in the same terminal:
ls -ld "$HOME/Library/LaunchAgents"On the device in this example, the directory belongs to root and the current user cannot write to it. At this point, the installation script has already written the node configuration to ~/gpuworks. You can register the installed agent directly as a system-level LaunchDaemon:
sudo "$HOME/gpuworks/gpuworks-agent" install-service \
  --state "$HOME/gpuworks" \
  --user "$(id -un)"
Enter your Mac administrator password when prompted. The command registers a system service only for this agent; the agent still runs as the current user specified by --user. You do not need to change ownership of the entire LaunchAgents directory. After agent running under launchd appears, confirm that the node is online in the console. A system-level service can start when the user is not logged in.
For other connection issues, see Connect Nodes.
3. Choose a Model From an Inference Template
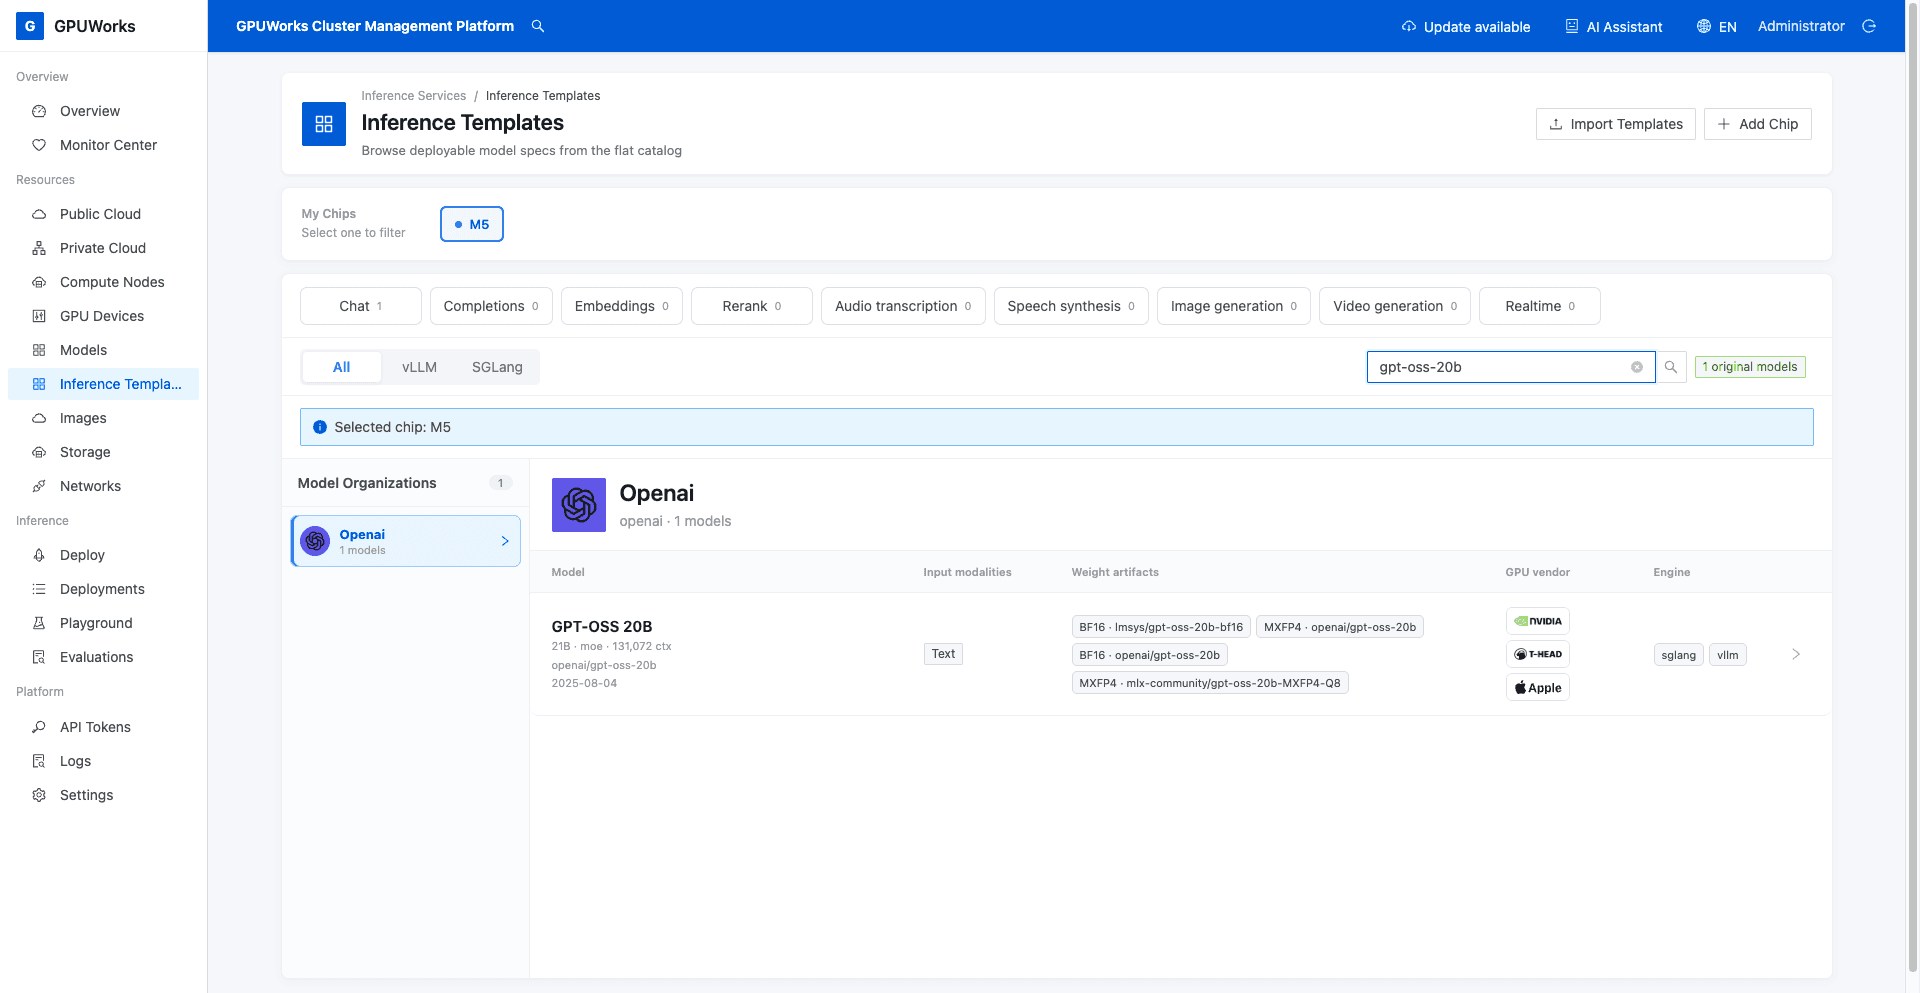
- Open Inference Templates. Under My Chips, select your local chip (M5 in this example), search for
gpt-oss-20b, and open GPT-OSS 20B details.
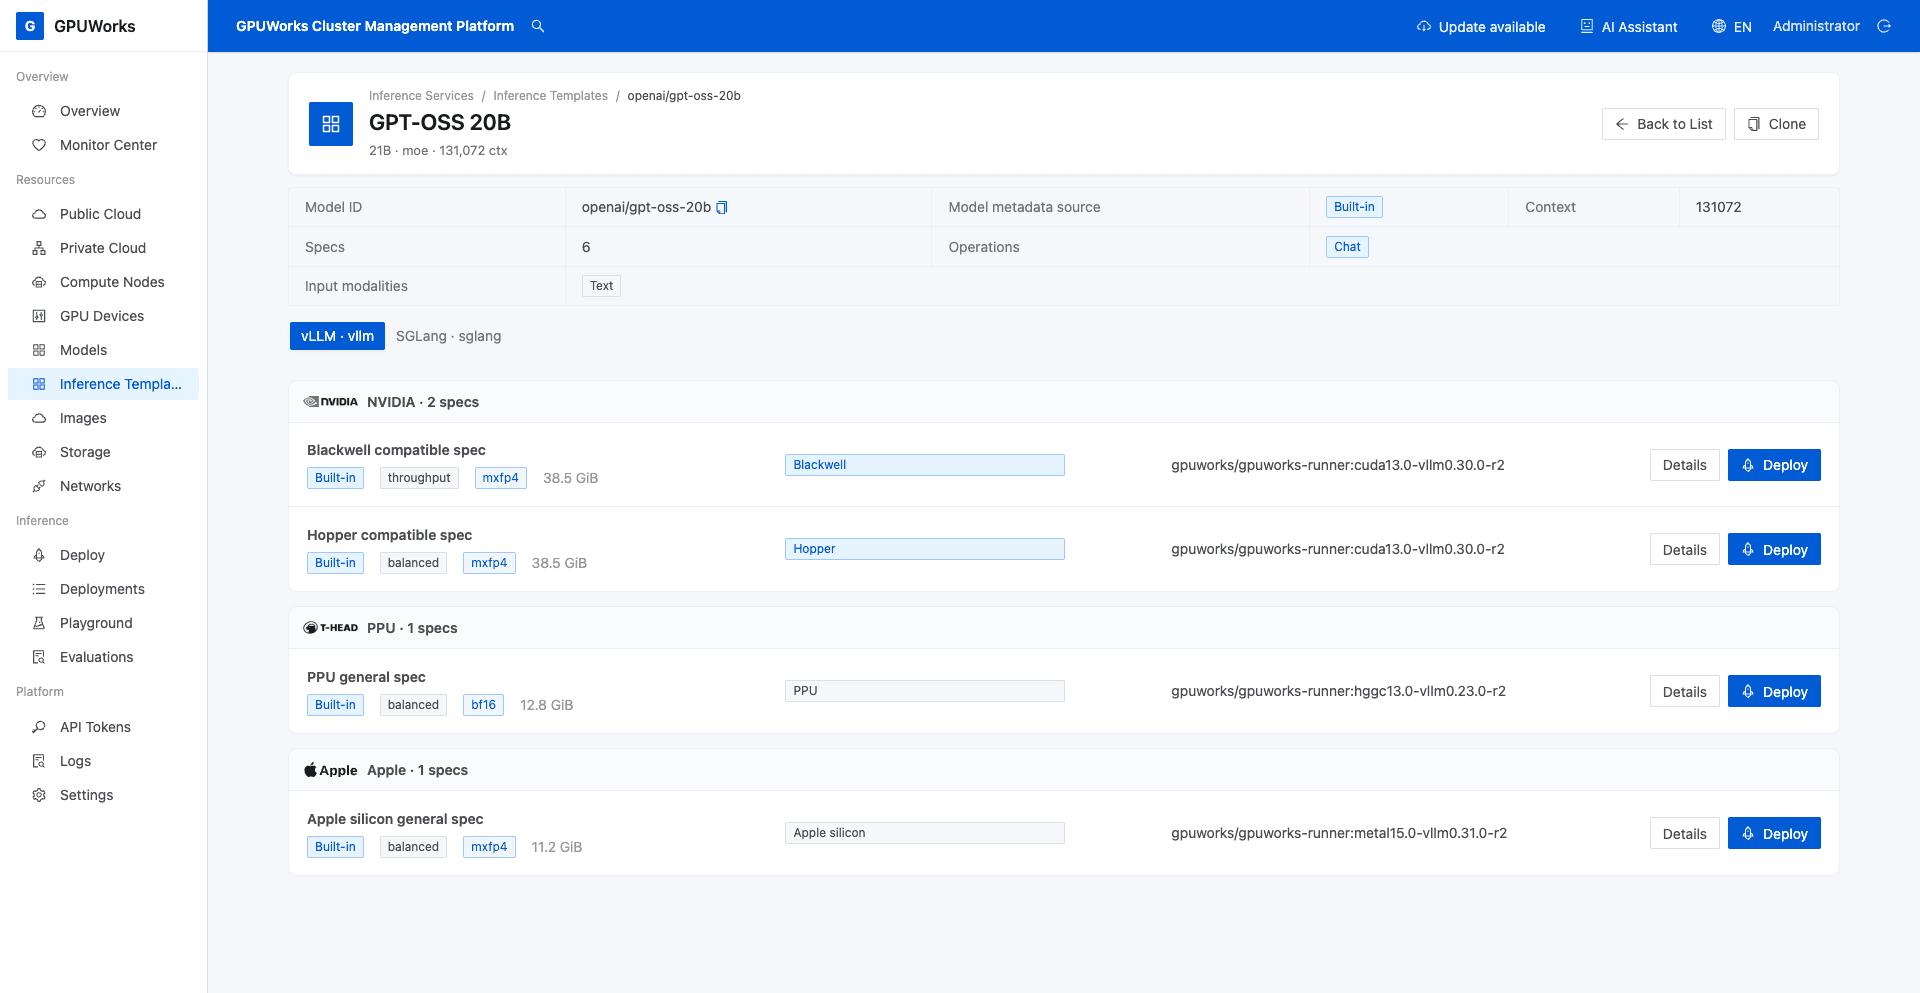
- On the vLLM tab, find the Apple silicon · MXFP4 row. Check that weight quantization is mxfp4, the displayed size is approximately 11.2 GiB, and the environment package is
gpuworks/gpuworks-runner:metal15.0-vllm0.31.0-r2. Click Deploy on this row.
- Select ModelScope as the model source, confirm that the repository is
mlx-community/gpt-oss-20b-MXFP4-Q8, and click Register model and deploy to open the deployment configuration.
Weight size does not represent total runtime memory use. You also need room for the context cache, engine, and system. In the next step, review the configuration evaluation before submitting the deployment.
4. Deploy to the Local Mac
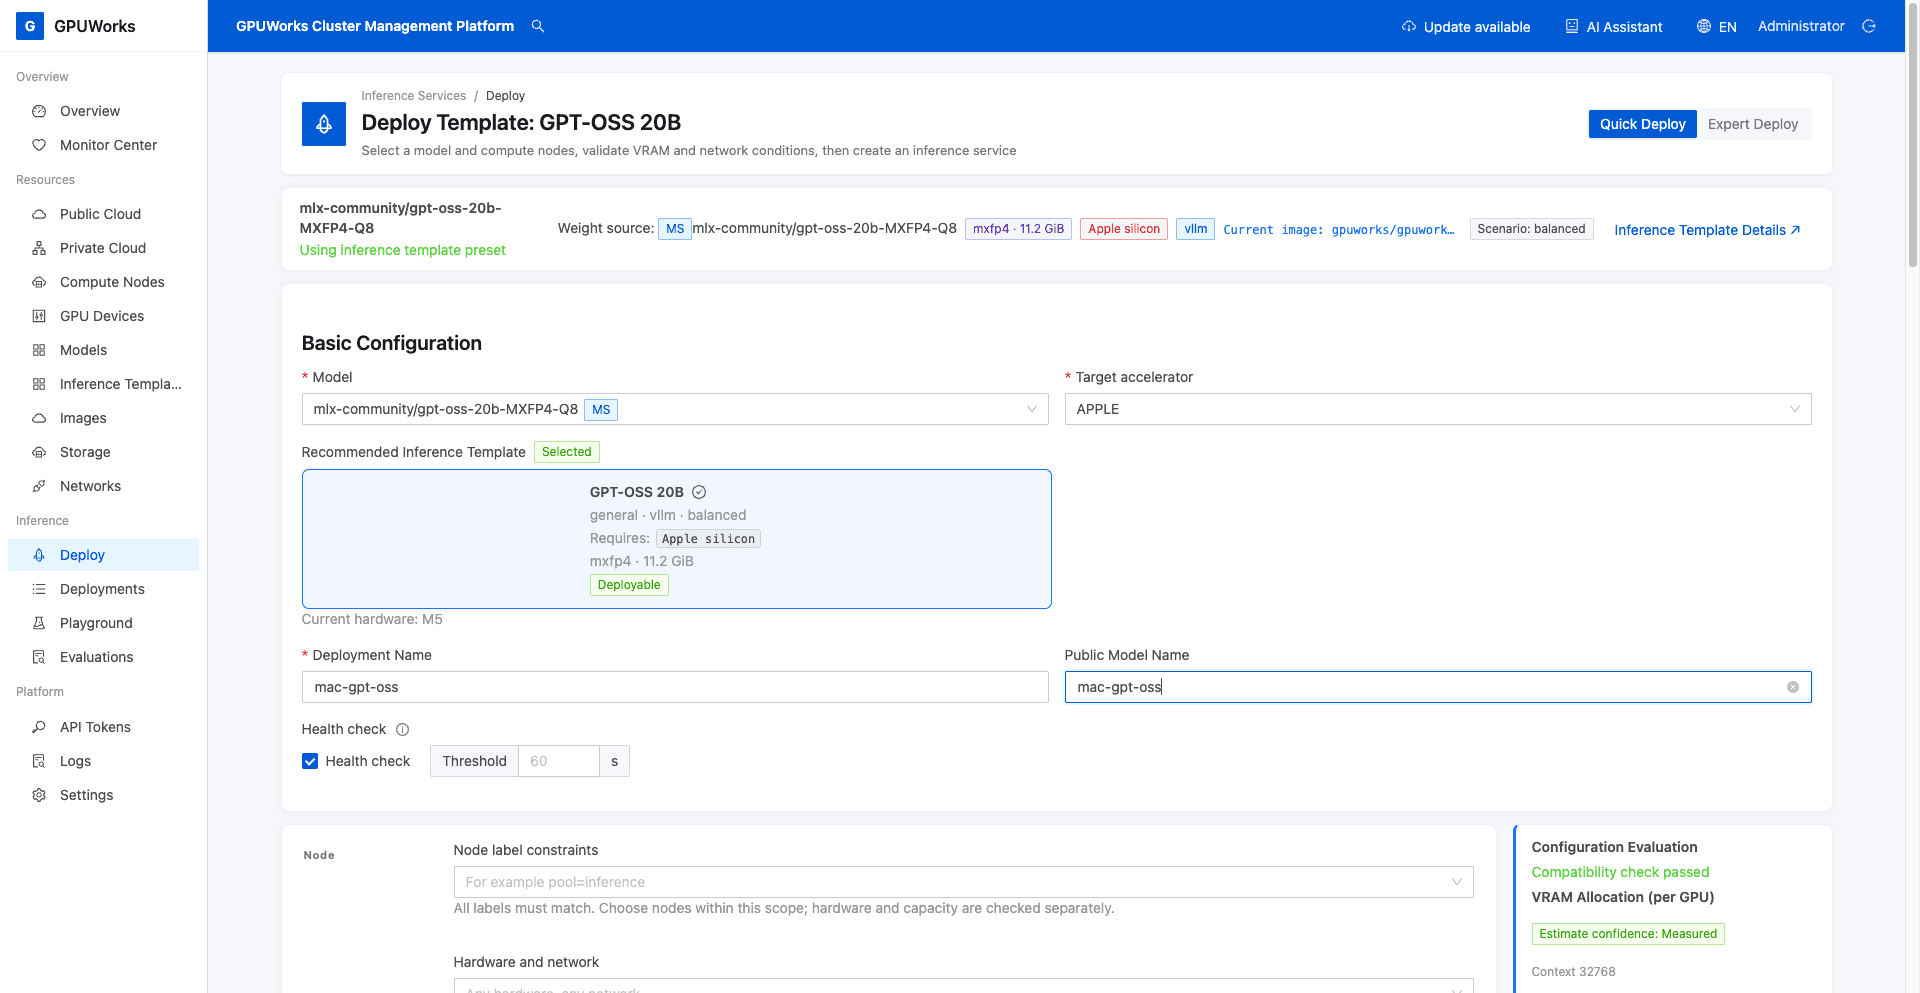
- On the deployment page, set both Deployment Name and Public Model Name to
mac-gpt-oss.
- Keep Single node, Automatic, and
1replica. In this example,mac-localis the only online node. Confirm that evaluation selects your local Mac. - Switch to Expert Deploy. Under All Parameters → Model and Context, change Maximum Context Length to
4096. Keep the selected template's defaults for the other parameters, includinggpu_memory_utilization=0.9.
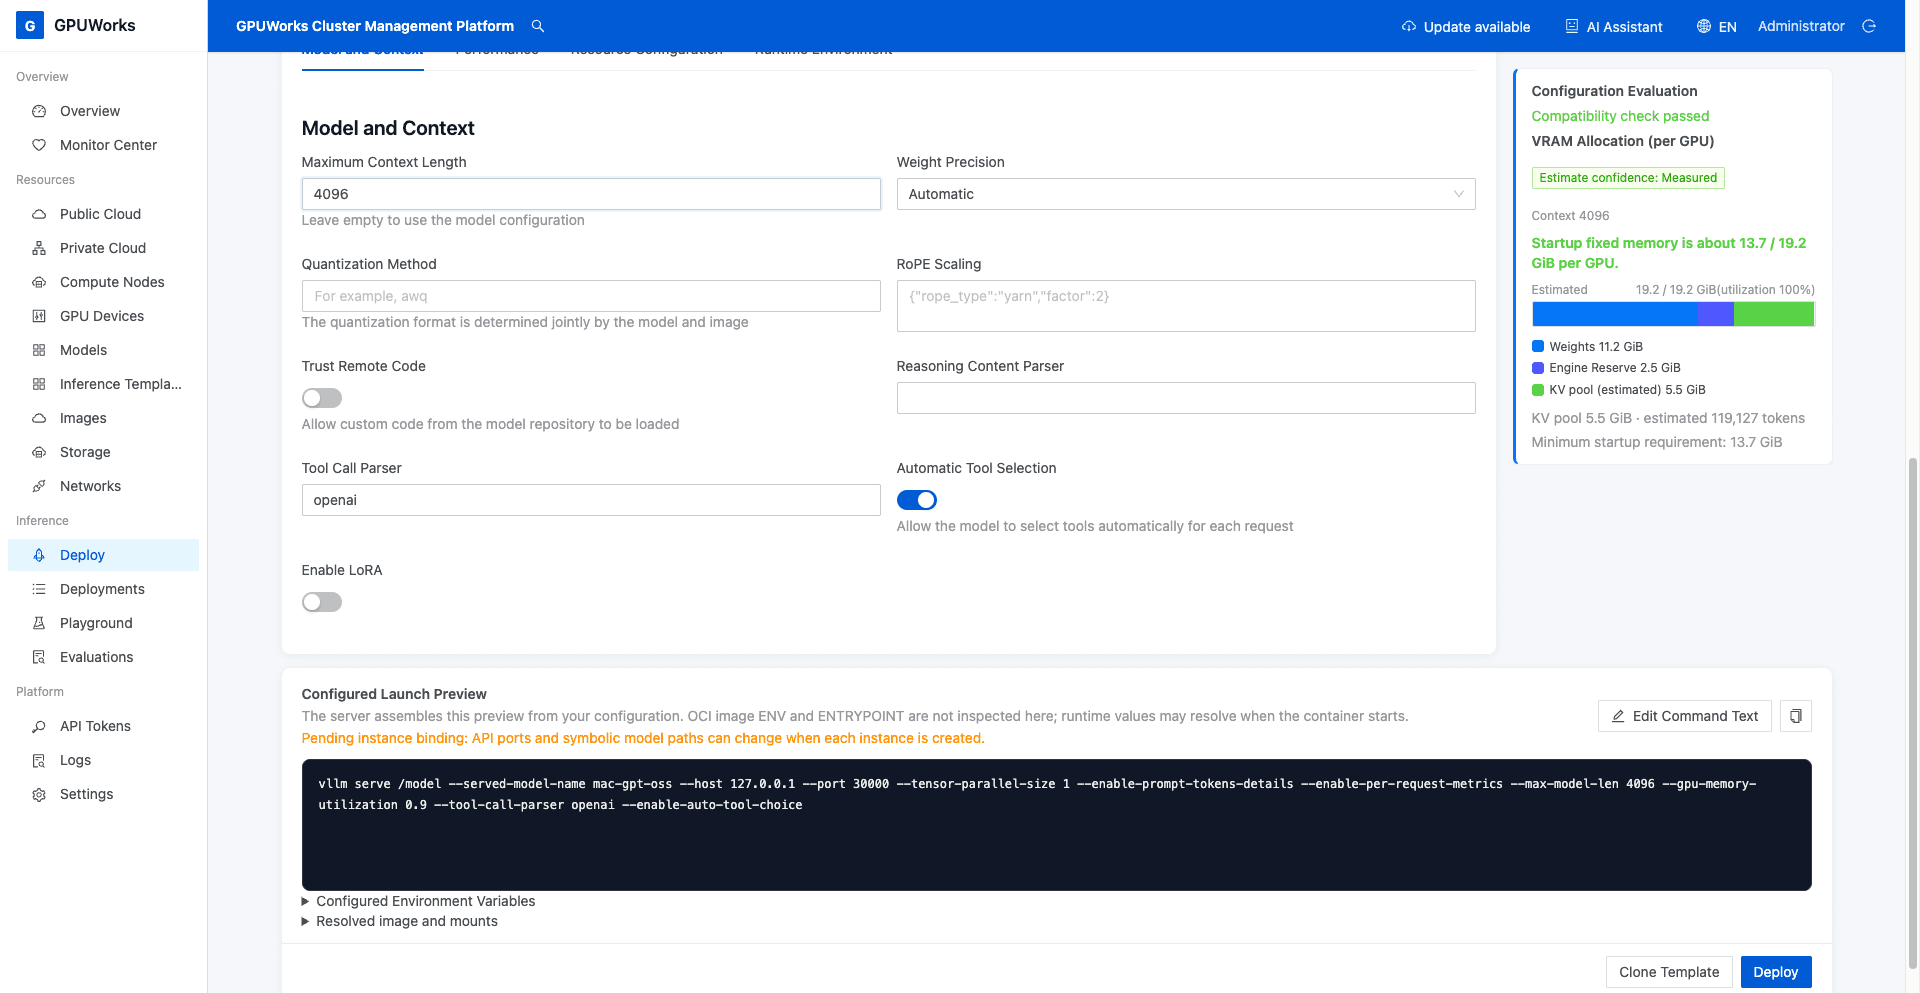
- Wait for Compatibility check passed on the right. Check the local node, GPU, environment package, and memory requirements, then click Deploy.
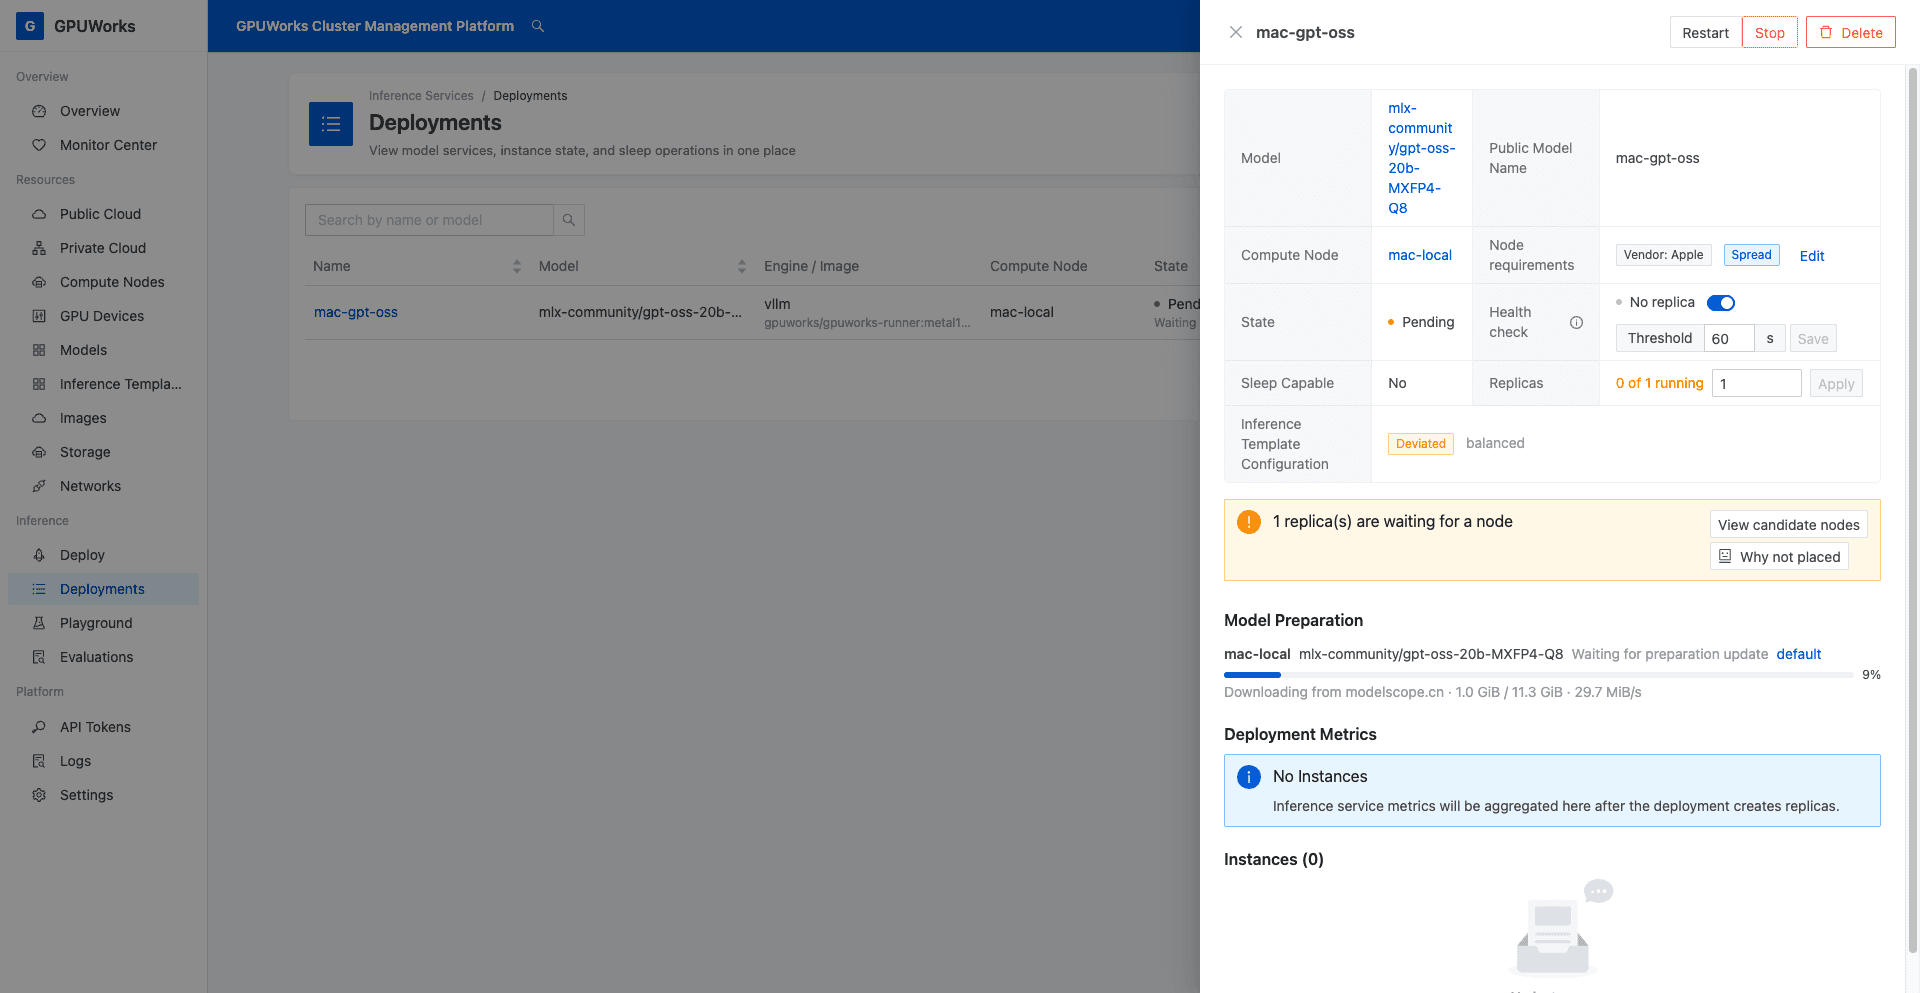
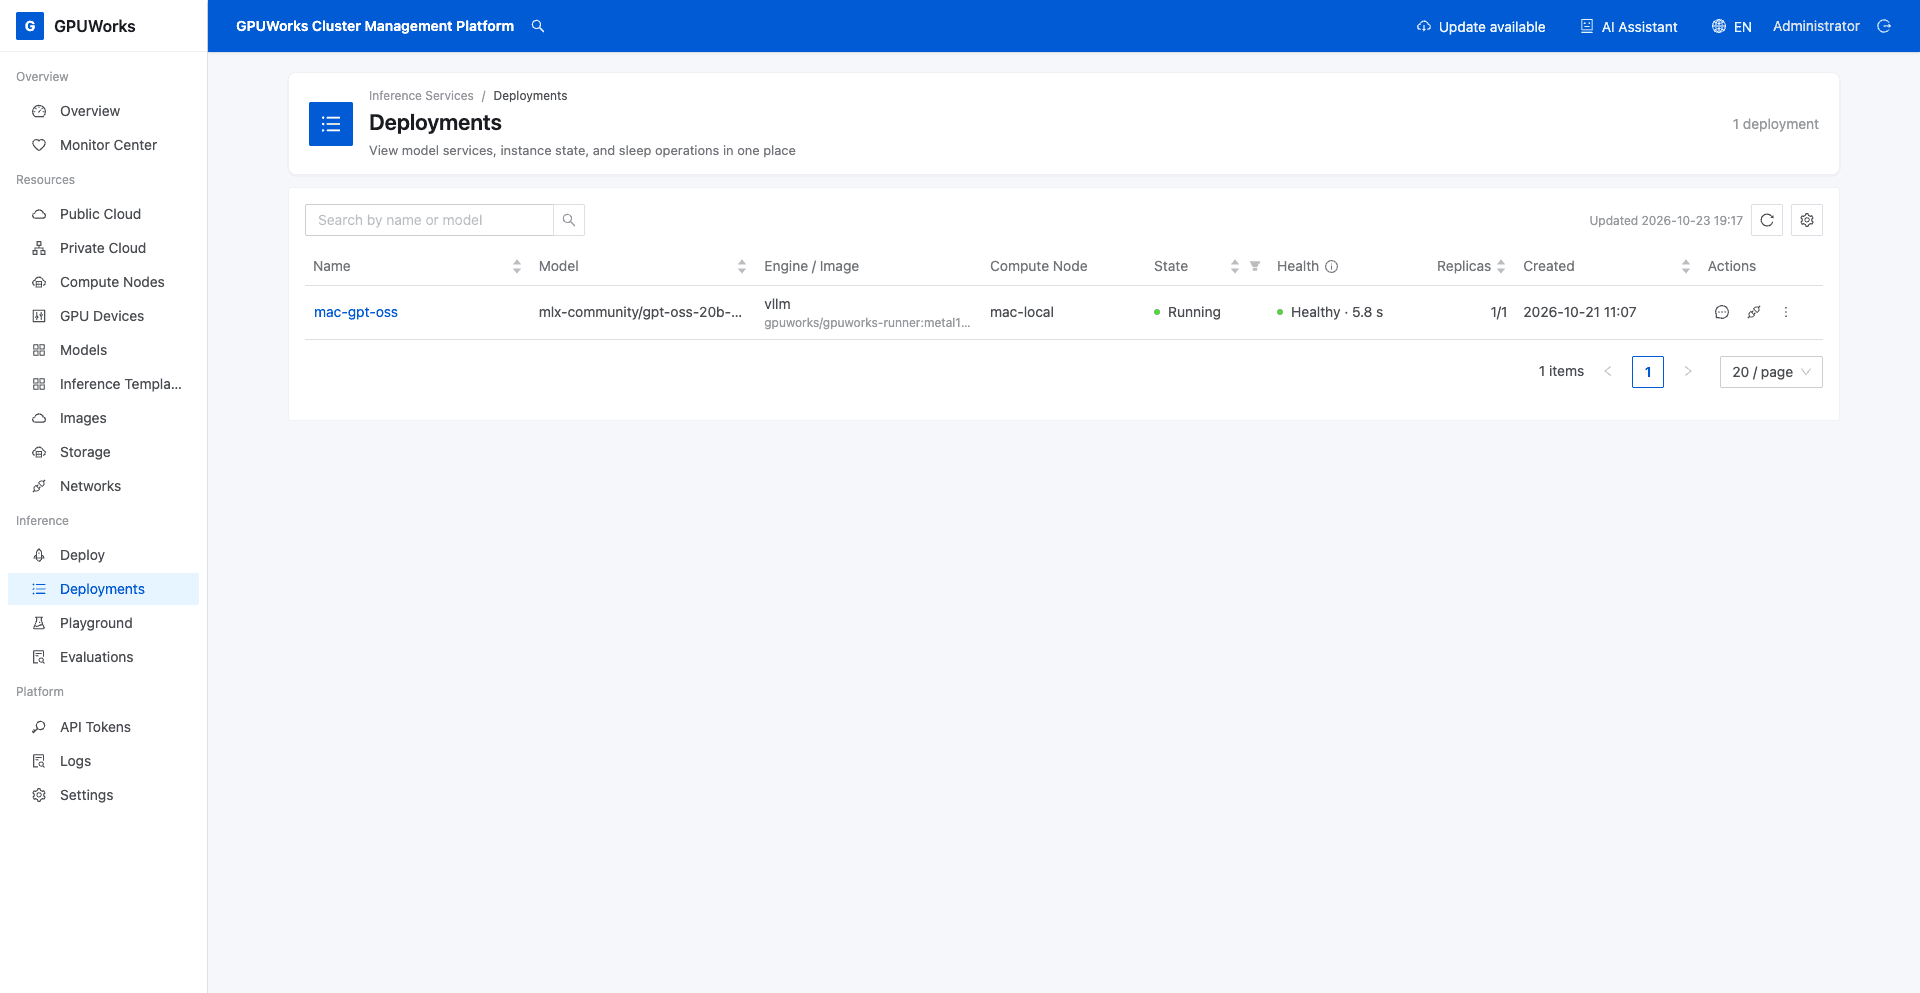
- Open Inference Services → mac-gpt-oss and watch model file preparation, environment package acquisition, and engine startup. Wait until the deployment is Running, its health is Healthy, and the replica count is
1/1before entering the Playground.
The first deployment downloads the model and environment package. After the downloads finish, you still need to wait for the engine to load the model. During file downloads, the deployment may show Pending, No replica, and 0/1. Check the downloaded amount, percentage, and speed under Model Preparation to confirm that files are still downloading. If configuration evaluation reports insufficient memory, first reduce other applications' memory use or adjust the model and context, then evaluate again. Do not decide whether the model can run based only on weight size.
5. Complete a Local Chat in the Playground
-
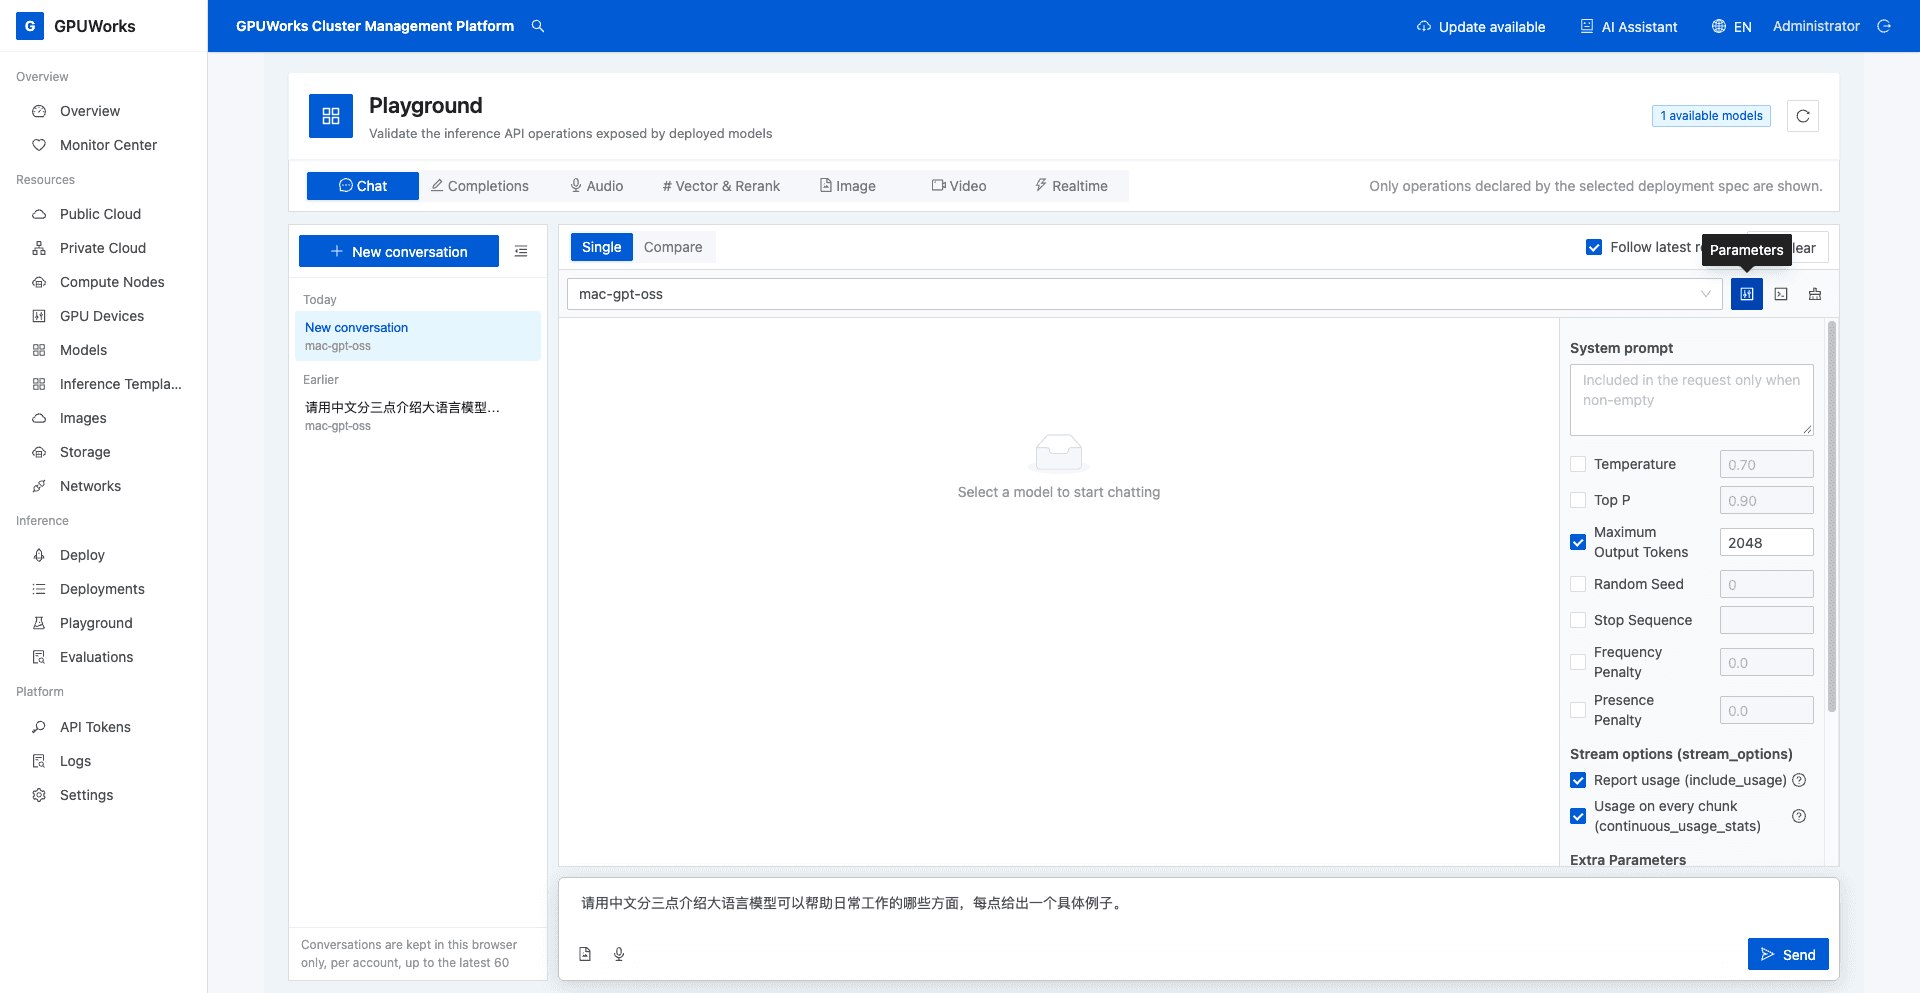
Open Playground → Chat, start a new chat, and select
mac-gpt-oss. -
Open Parameters to the right of the model selector. Select Maximum Output Tokens, enter
2048, and leave the other parameters at their defaults. This value is a generation limit; the model may finish earlier. Reasoning content also consumes output tokens. -
Enter the following question and click Send. It requests a Chinese answer to match the language of the recorded example. The screenshots use equivalent Chinese wording for the question.
In Chinese, explain three ways large language models can help with daily work. Give one concrete example for each.
- Wait for generation to finish. Confirm that normal Chinese answer text appears without request errors. This example returns explanations and examples covering communication efficiency, information retrieval and organization, and content creation and code generation. The answer does not need to match word for word. If only reasoning appears with no answer text, continue checking the output limit and request result.
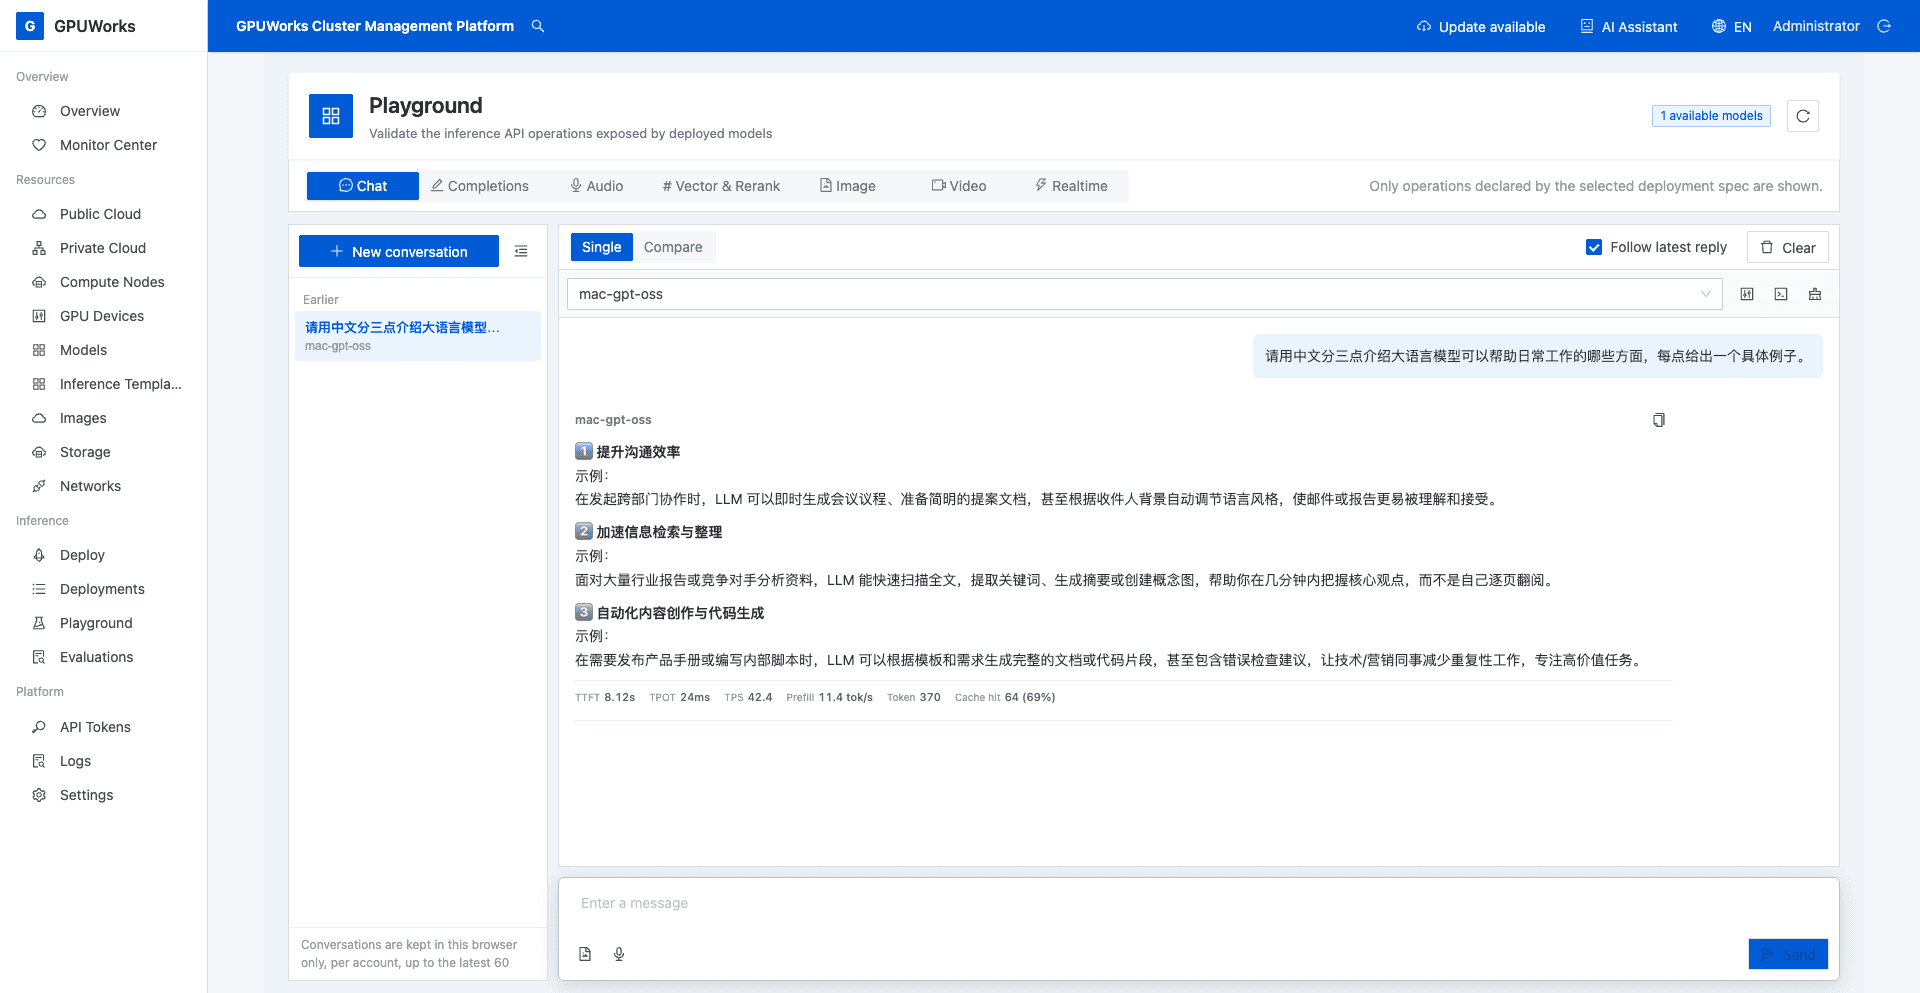
When the local node is online, the deployment is healthy, and the Playground returns normal answer text, you have completed this tutorial's first local inference goal. The speeds and token counts in the screenshots represent only this request and are not a performance guarantee for other Macs.
Optional: Stop the Model When You Finish
When you do not need inference, you can stop the model to release runtime resources. While stopped, mac-gpt-oss cannot accept chat requests.
- Return to Inference Services, open
mac-gpt-oss, and click Stop at the top of the details. Click Stop again in the confirmation page. - Wait for the deployment to show Stopped, the replica count to become
0/1, and the instance count in the details to become0. To use it again later, return to the same deployment, click Start, and wait for it to become healthy before sending requests.
Stopping the deployment retains its configuration, model files, and environment package; it does not uninstall GPUWorks. The console and agent continue running independently. The console installed in this tutorial is not registered to start at boot.
Was this page helpful?