Tutorials
Install GPUWorks and Deploy Your First Model
On this page
Use case: Install GPUWorks for the first time, connect a GPU node, and deploy a chat model.
Prerequisites: The Linux hosts, permissions, and network access listed below. This tutorial does not cover upgrading an existing environment.
Goal: Call Qwen/Qwen3-1.7B through the OpenAI-compatible API and receive a model response.
Screenshots in this tutorial show the English UI.
Before You Begin
If these hosts already run another inference platform, or you plan to reuse its GPUs, first follow Replace an Existing Inference Platform to back up the environment, stop the old services, and check port and GPU occupancy. Then begin this tutorial. The installation command does not automatically take over the old platform.
| What you need | Description |
|---|---|
| Control plane host | Linux x86_64 + systemd, with Bash, curl, tar, sha256sum, and sudo privileges. The browser and GPU node must be able to reach port 8800 on this host. The control plane provides resource management, the web console, and the inference endpoint |
| GPU node | A Linux x86_64 + systemd host dedicated to this experiment, with no other GPUWorks agent installed. It needs curl, root access or passwordless sudo, and local disk space for models and images |
| GPU and driver | This example uses a GeForce RTX 4090 (48 GiB), NVIDIA driver ≥ 580, and a GPU recognized by nvidia-smi. For other models, confirm compatibility with the recommended template |
| Runtime environment | Use Docker when available; otherwise, the agent uses built-in runveil. The driver, GPU, and inference image must be compatible. Check the configuration evaluation before deploying |
| Network | The control plane host can download GPUWorks release packages. Both the control plane and the node can access ModelScope, and the node can access the inference image registry. For offline environments, use Offline Deployment instead |
The control plane and GPU node can share a host; still run each command in the location specified below. Model and image download times depend on network and disk speeds. For a local Mac trial, see Run Your First Local Model on a Mac. For Linux environments without sudo or systemd, see Install and Upgrade the Control Plane.
This tutorial uses host3 as the node display name; you do not need to change the operating system hostname. Enter model, deployment, and token names in the corresponding steps.
1. Start the Server
For a permanent deployment, use the install command (it writes a systemd unit, runs persistently in the background, and uses /opt/gpuworks/server as the default directory):
./gpuworks install --addr 192.0.2.10:8800This tutorial uses 192.0.2.10 to represent the server host address (an example address reserved for documentation). Replace it with your host's IP address when running the commands.
For release package download and verification steps, see Install and Upgrade the Control Plane. To take a quick look first, you can also run a temporary instance in the foreground:
./gpuworks serve --addr :8800 --data ./dataExpected result: The install command prints an installation summary at the end, including the access URL and initial admin password. For either startup method, curl http://192.0.2.10:8800/healthz returns {"status":"ok",...}.
The first startup creates an admin account. Its password is recorded in initial-credentials (0600 by default; 0660 for the trusted Linux platform group) in the data directory and is also printed once in the installation summary.
Open http://192.0.2.10:8800 in your browser and sign in as admin. Change the password, then delete that file. By default, the UI follows your browser language;
choose English in the upper-right corner to match this tutorial.
2. Connect a Node
Open “Compute Nodes” in the left menu and click “Add node” in the upper-right corner. This tutorial uses the broadly applicable curl method: set “Does the target machine support SSH?” to
“SSH unavailable”, enter host3 for “Node name”, and leave “Connection direction” as “Agent-initiated connection”. “Management node address” is prefilled with the address currently used by your browser (you can also change it to
a domain name or reverse proxy address). Then click “Create node and generate command”.
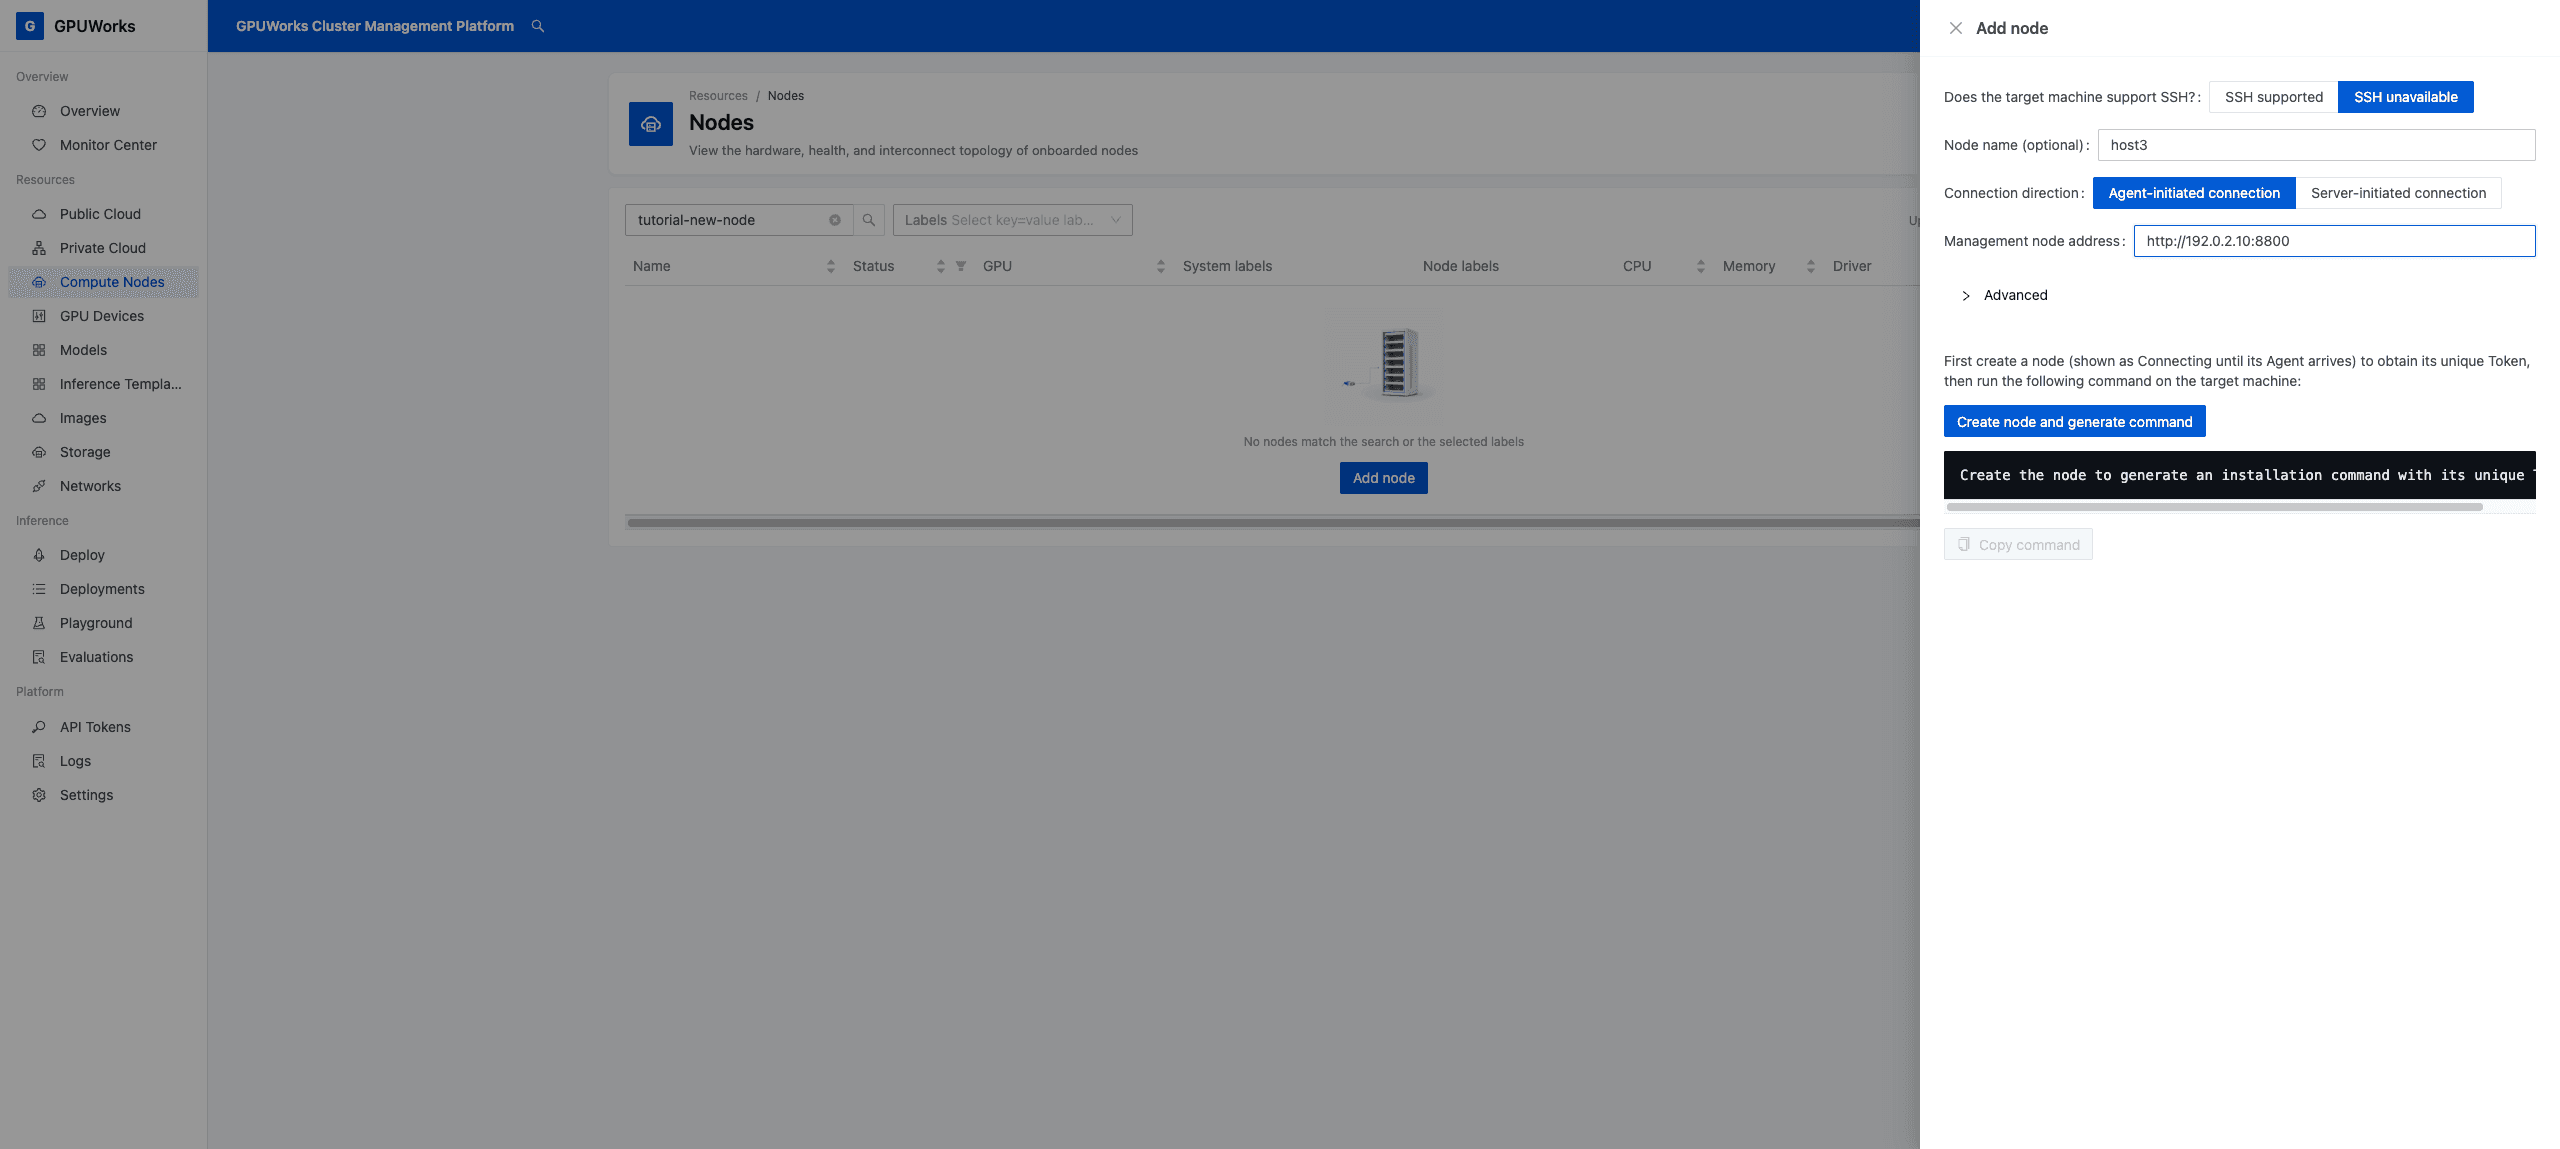
Copy the generated command and run it on the GPU node (the command already includes this node's unique token):
curl -fsSL http://192.0.2.10:8800/install.sh | sh -s -- \
  --server http://192.0.2.10:8800 --token <node-token>
By default, the agent initiates an outbound connection to the server, so the node needs no open inbound port. If the node cannot connect outbound to the server, but the server can directly reach the node's listening port, use the server_dial Connection Guide instead.
Expected result: Return to “Compute Nodes”. Within a few seconds, the status changes to “Online”, and the page shows the GPU model and count, driver version, memory, and CPU. Click “Details” at the end of the row to see the runtime (docker / runveil), agent version, network addresses, and other information.
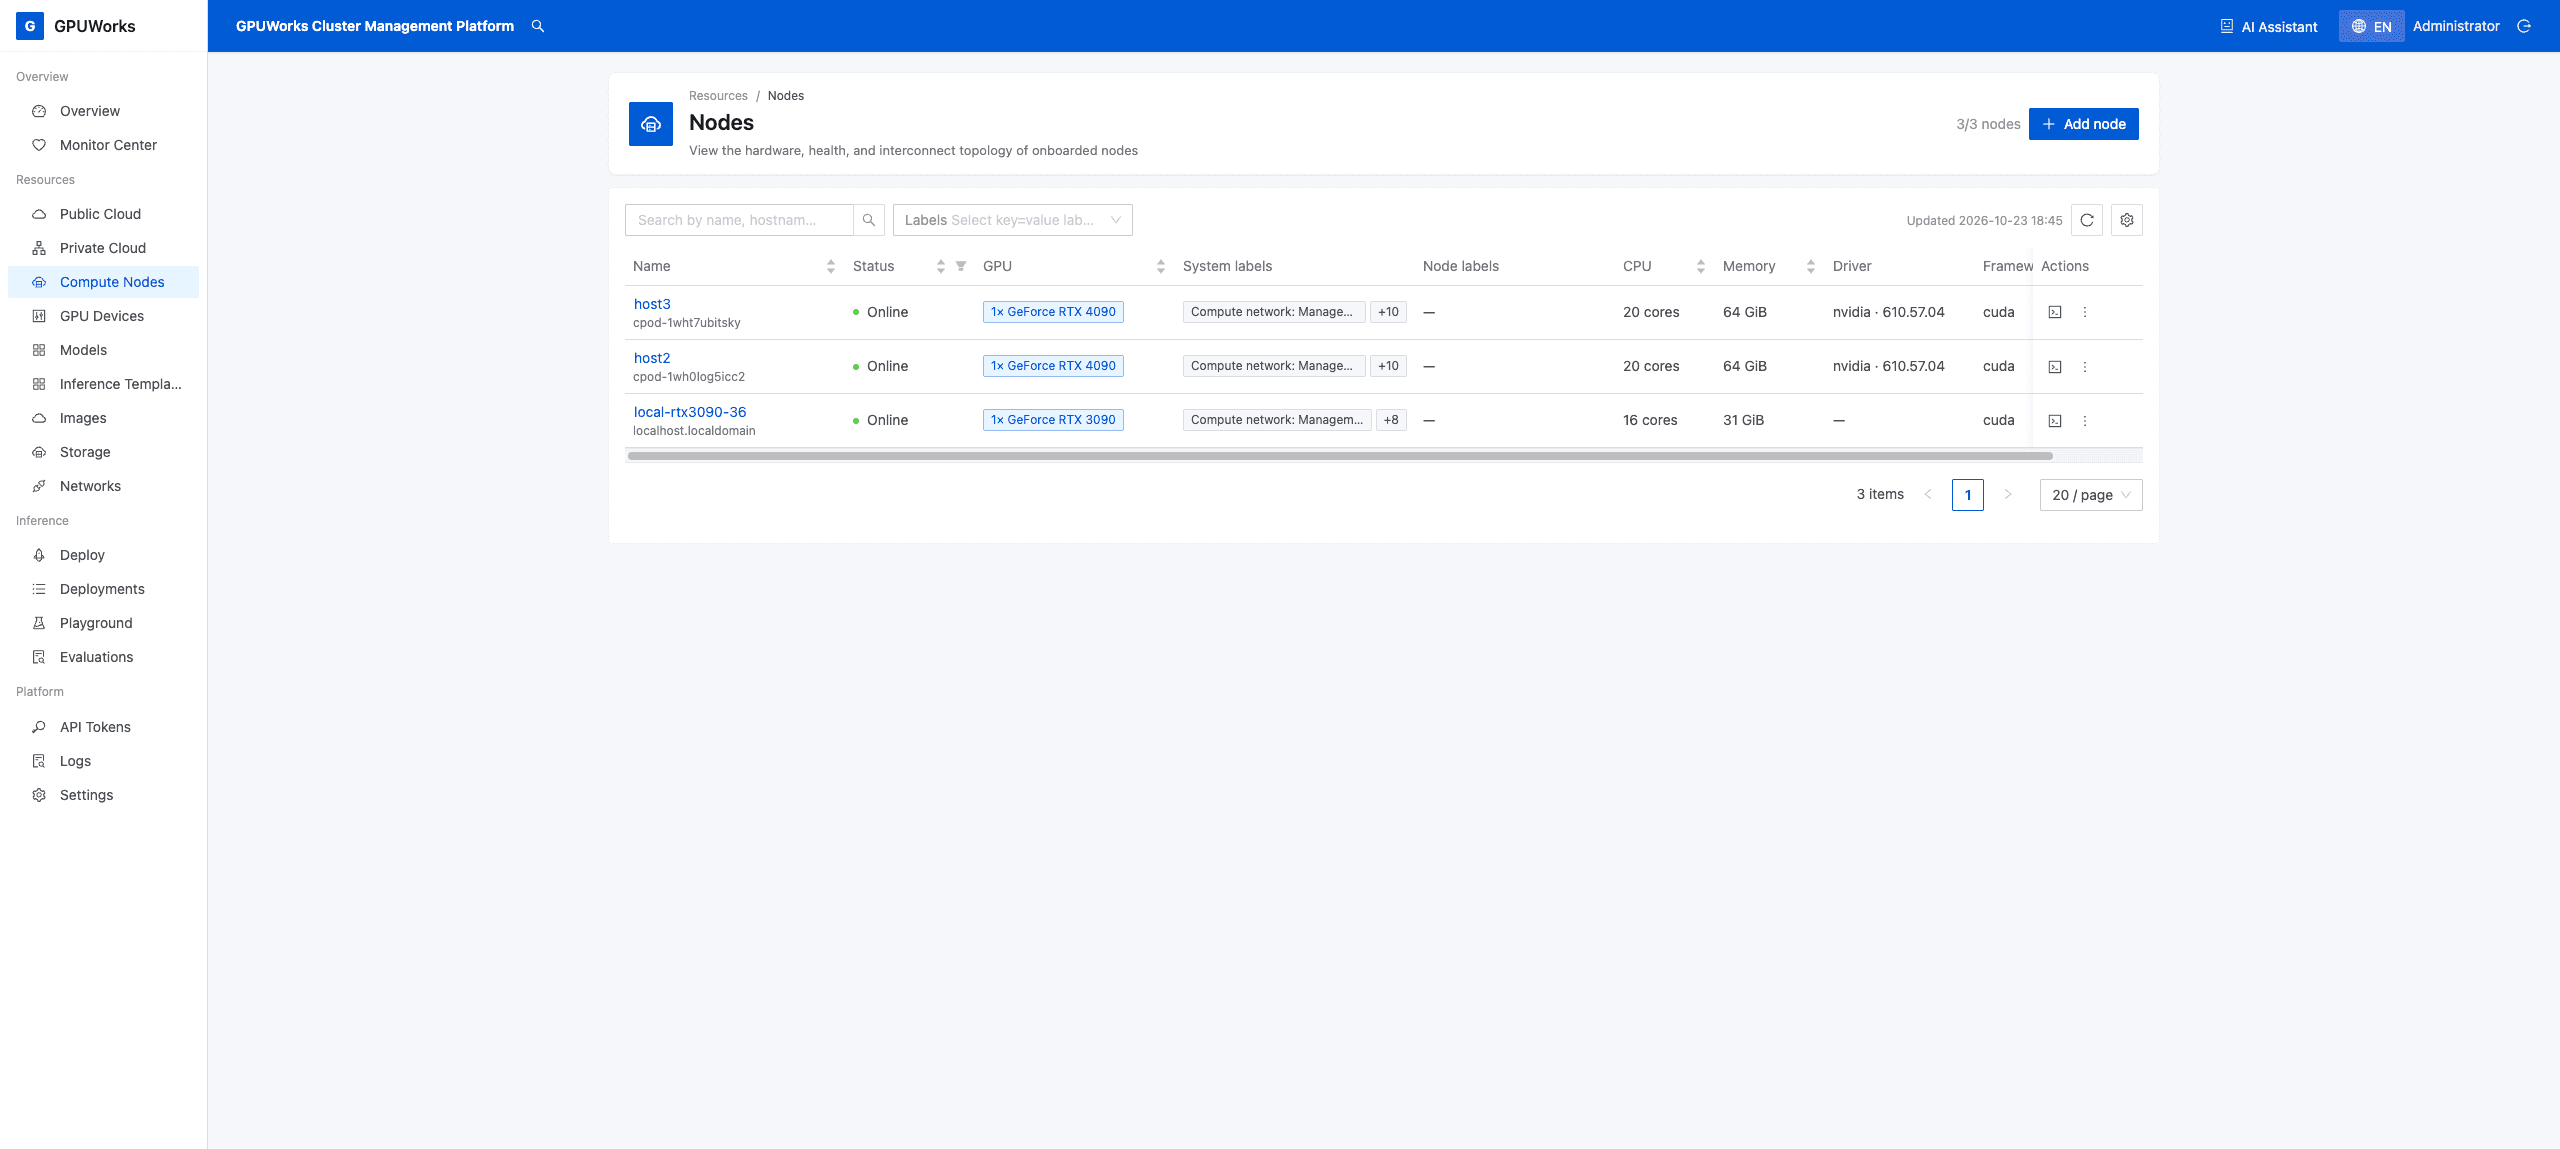
If the node stays offline, see “Node Stays Offline” in the Troubleshooting Guide.
3. Register and Download a Model
Register the Model
- Open Models in the left menu and click Register model.
- Select ModelScope as the Source, enter
Qwen/Qwen3-1.7Bas the Source ID, and enterdgpu-demo-a-msas the Name. Leave Advanced options → Revision blank to use the default branch. - Click Confirm registration, then check the name and source ID in the model list.
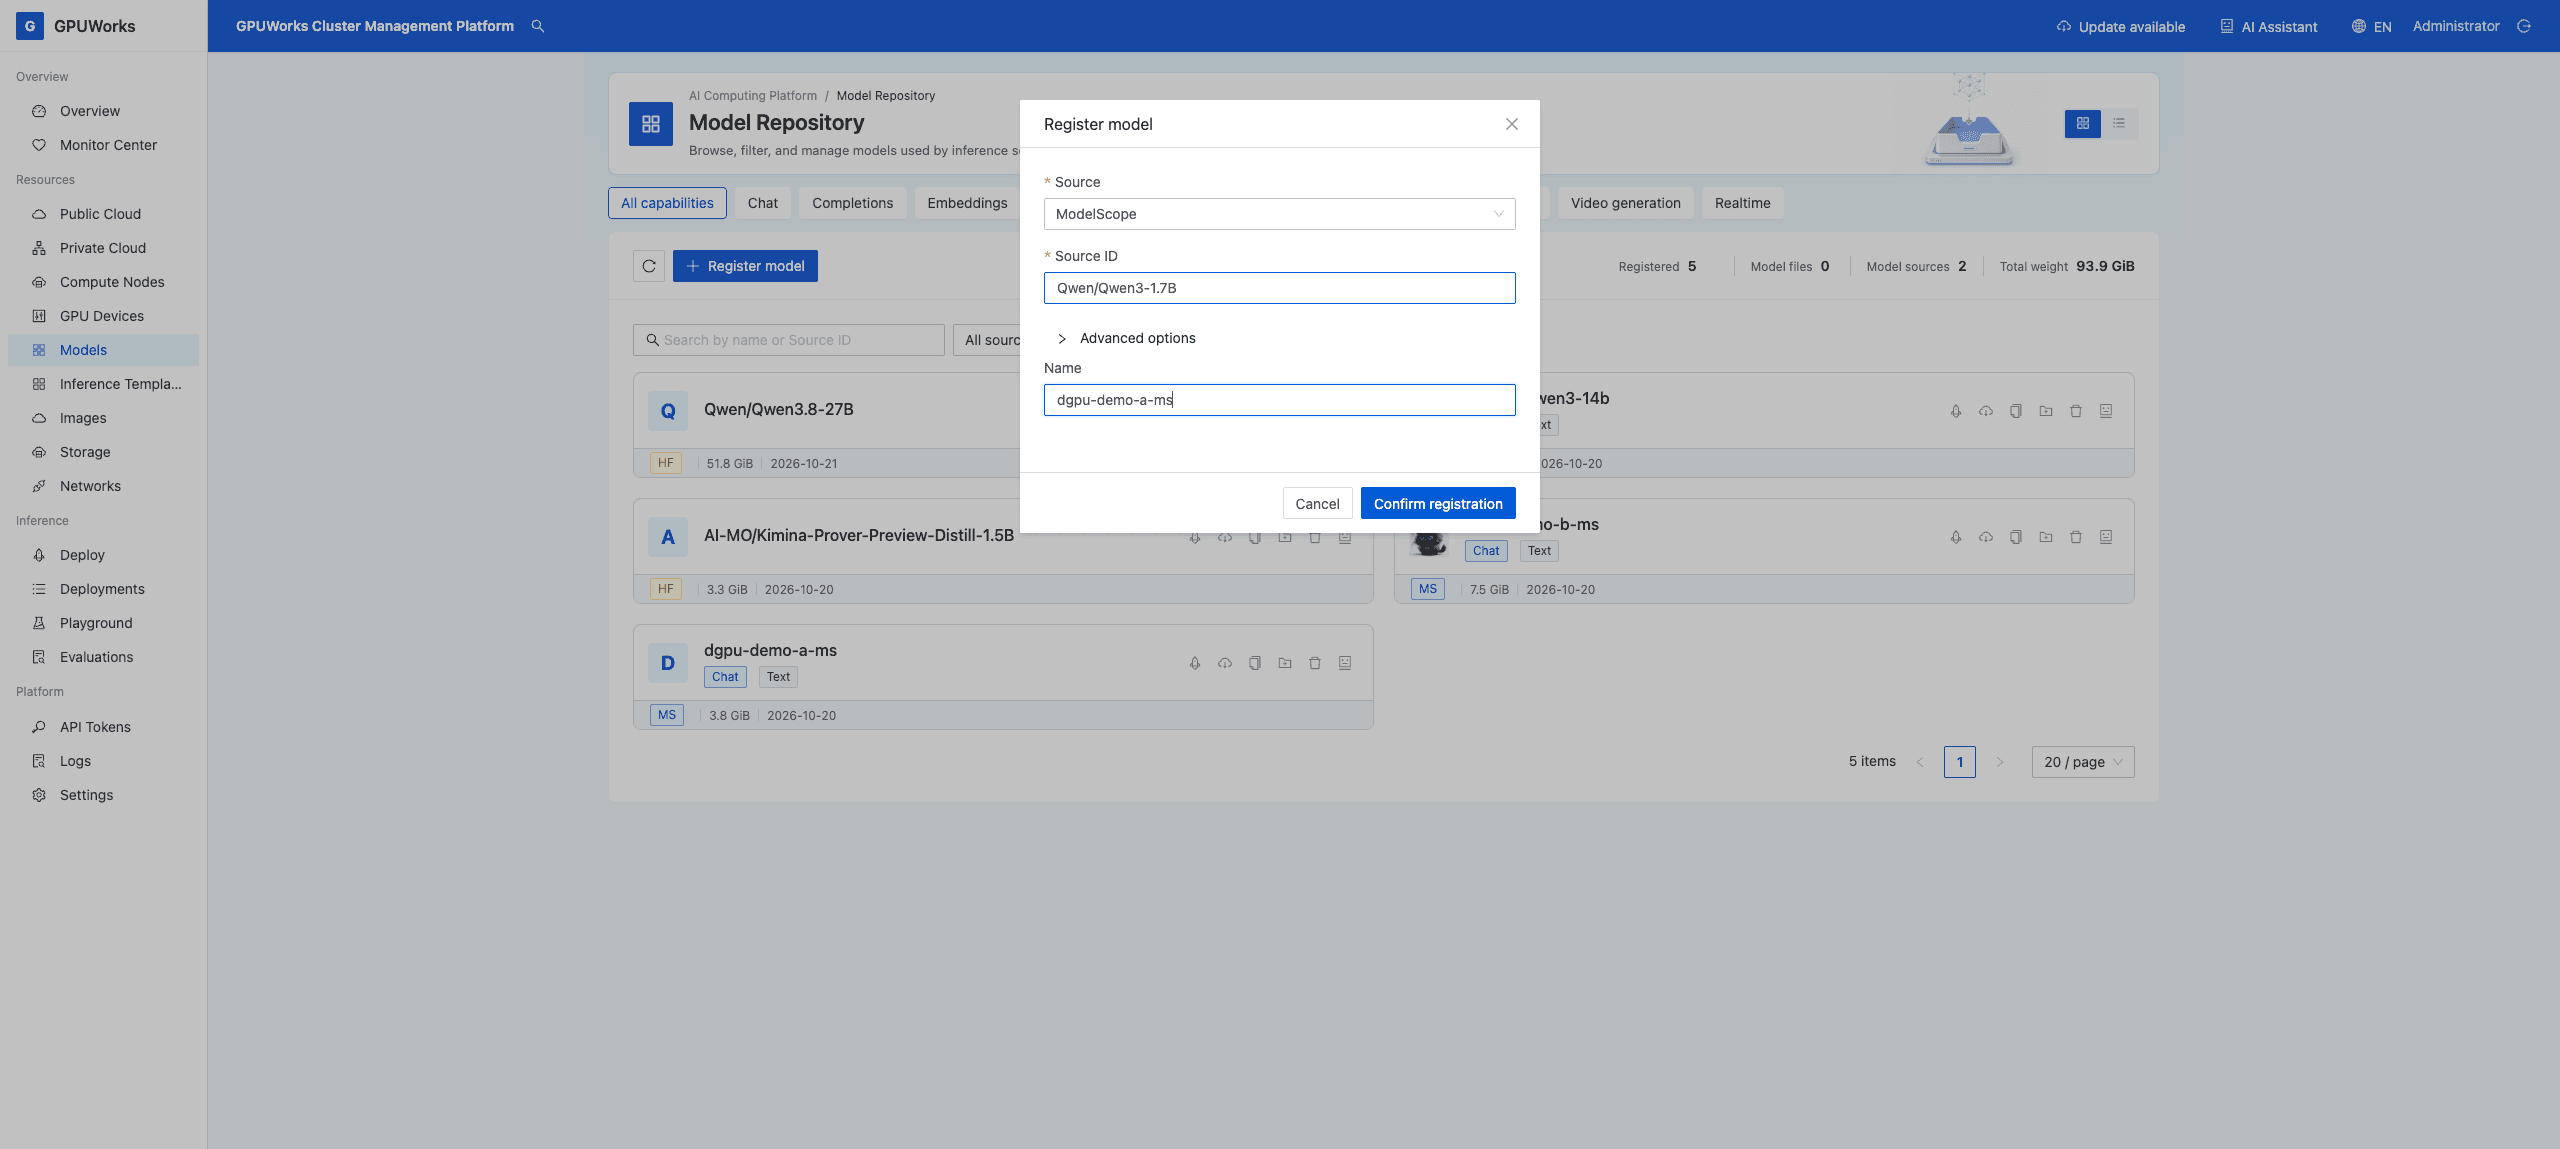
Figure: Select ModelScope as the source and enter dgpu-demo-a-ms as the name.
Registration only records model information; you must download the weights separately. dgpu-demo-a-ms is an example name and does not enable dGPU. You can reuse this model and the vLLM image in later deployments.
Download to the Node
- On the
dgpu-demo-a-msmodel card, click Download to…. The download icon tooltip is Download from the model source to a storage. - For Storage, select the local storage used by the node (if only one writable local storage is available, it is selected automatically and this field is hidden).
- Under Nodes, select only
host3, then click Download. - Click the model name, find
host3under Model files in the details, and wait for the download to finish and the status to become Available before continuing. Download started only means the task has been submitted.
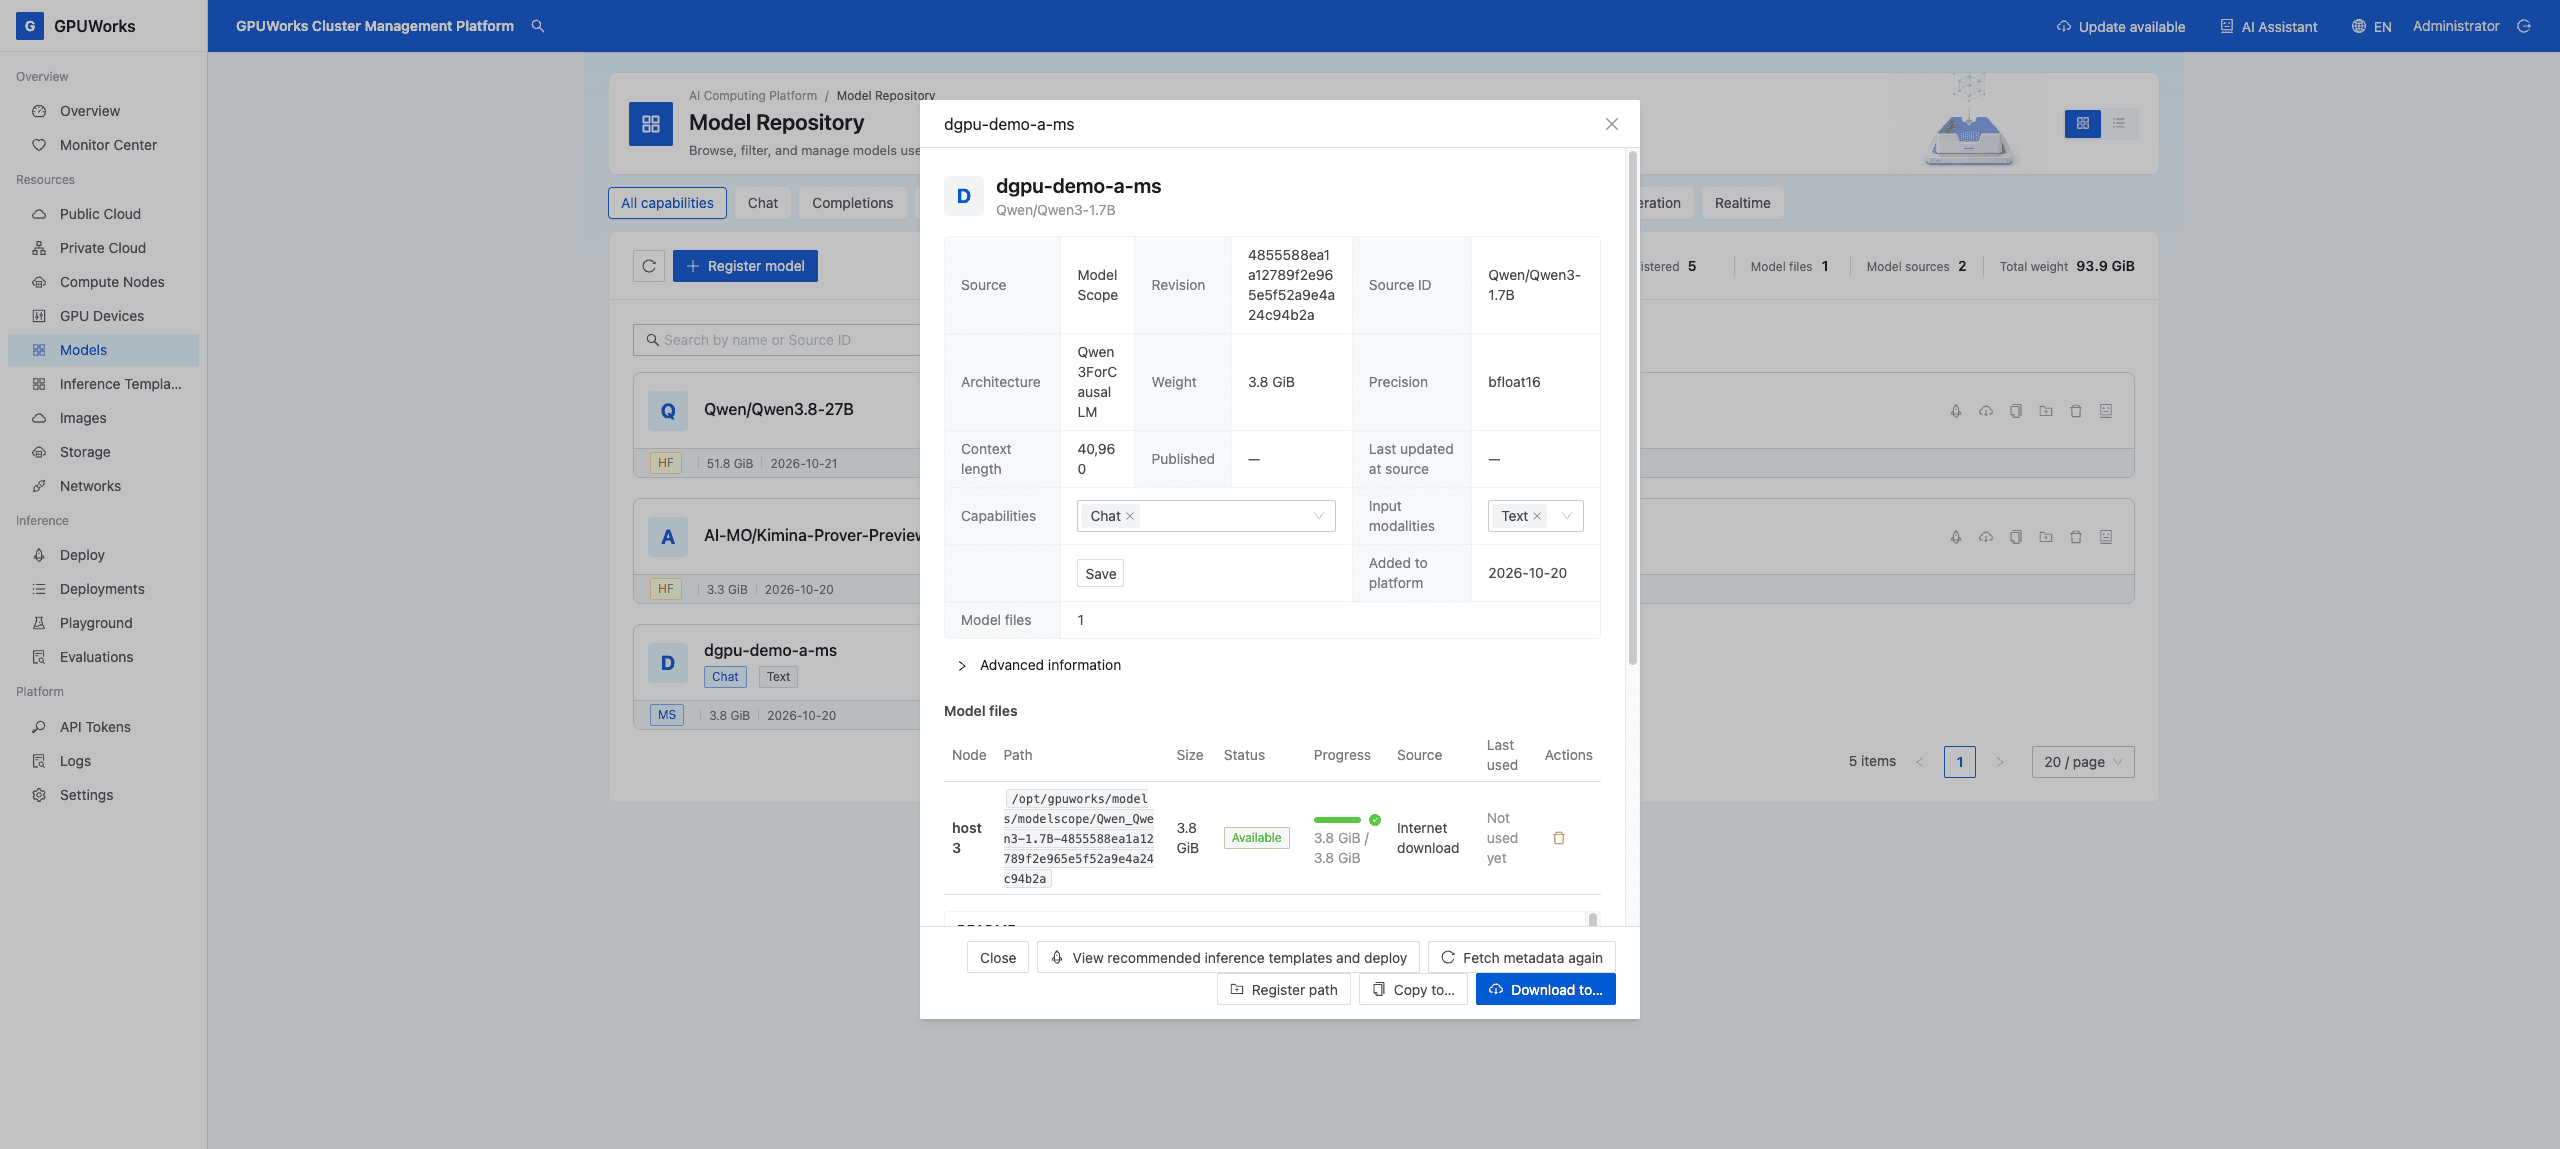
Figure: Confirm that the model files on host3 are “Available”.
4. Create an Inference Token
- Open API Tokens in the left menu and click Create inference token in the Inference tokens section.
- In the Create API token page, enter
tutorial-qwen3-17bas the name and click Create. - In the Save this API token now page, click Copy API token, save the full value securely, then click I have saved it.
Completion criteria: tutorial-qwen3-17b appears in the list, and you have saved the full token beginning with gw-. The list only shows a prefix, which cannot be used for requests.
A fresh server ships with no token at all, so you have to create one here: /v1 requires a key by default and refuses every inference request until the first token exists. Tokens beginning with gwp_ are Platform API tokens for management APIs and are not used in this tutorial.
5. Deploy the Model
- Open Inference Services in the left menu, click Create Deployment, and use Quick Deploy. Select
dgpu-demo-a-msas the Model and NVIDIA as the Target accelerator. - Under Recommended Inference Template, select Qwen3-1.7B → general · vllm · balanced. The image should be
gpuworks/gpuworks-runner:cuda13.0-vllm0.30.0-r4. If Use a registered model? appears, selectdgpu-demo-a-mswith the MS and 1 node labels, click Use this model and deploy, and check the selected model after returning. - Enter
tutorial-qwen3-17bfor both Deployment Name and Public Model Name. The latter is used asmodelin requests.
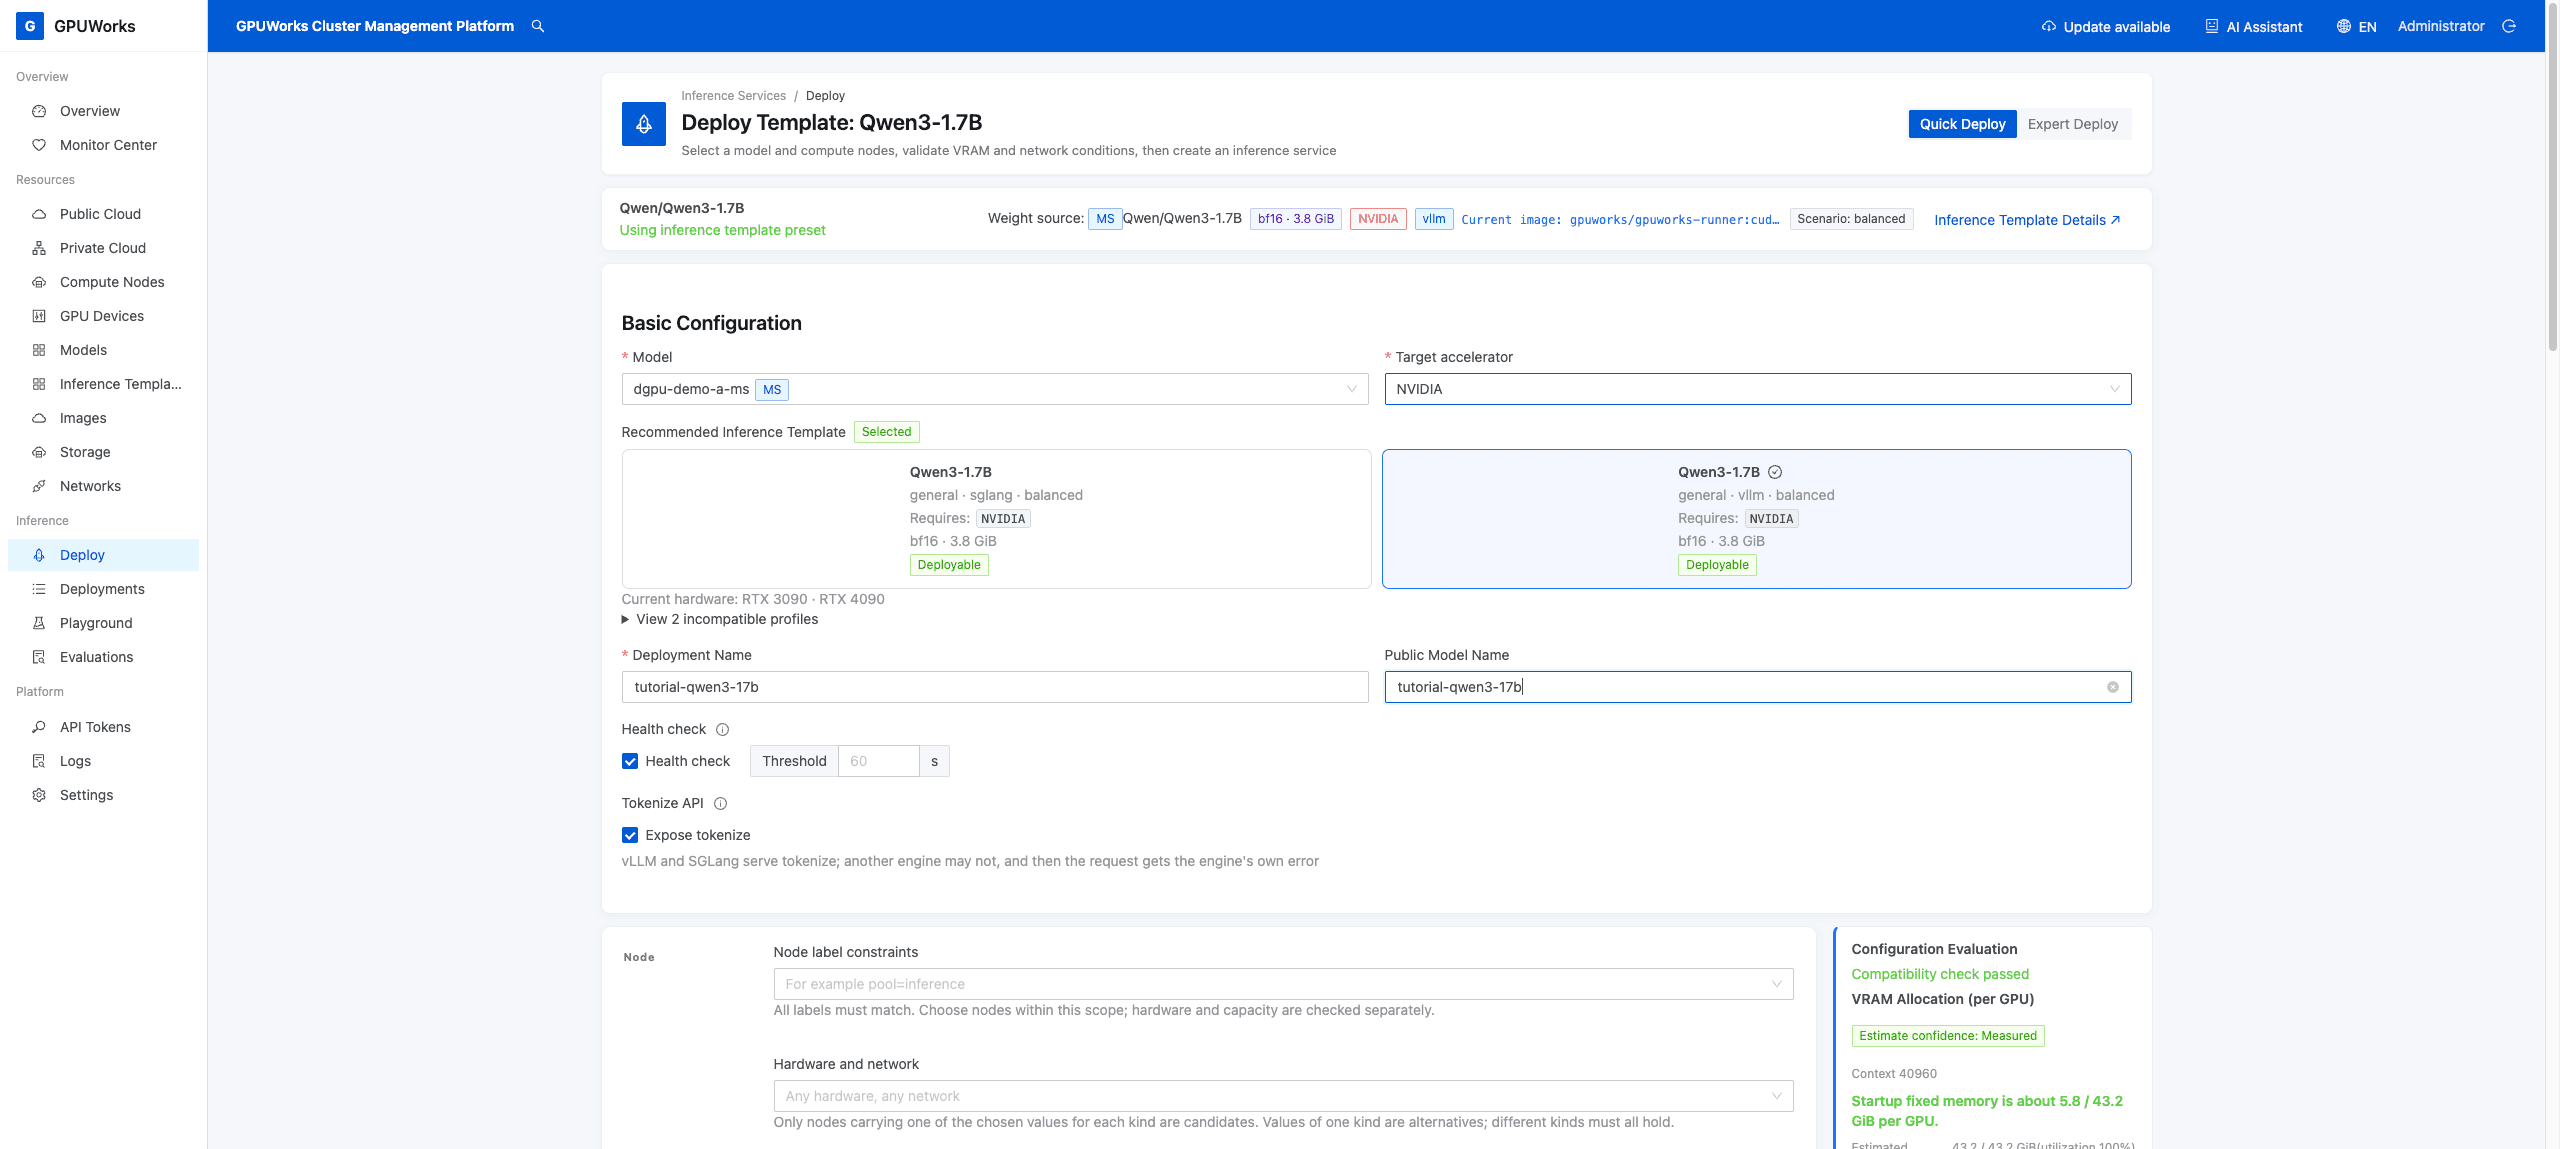
Figure: Keep the deployment name and public model name identical.
- In the Nodes section, select Single node and Manual, then select
host3and the idle GPU 0. Keep the replica count at1. Leave dGPU Memory (GiB) blank (use the full GPU), and turn off Sleepable. Set Maximum Context Length to2048and GPU Memory Utilization to0.90; keep template values for the other settings.
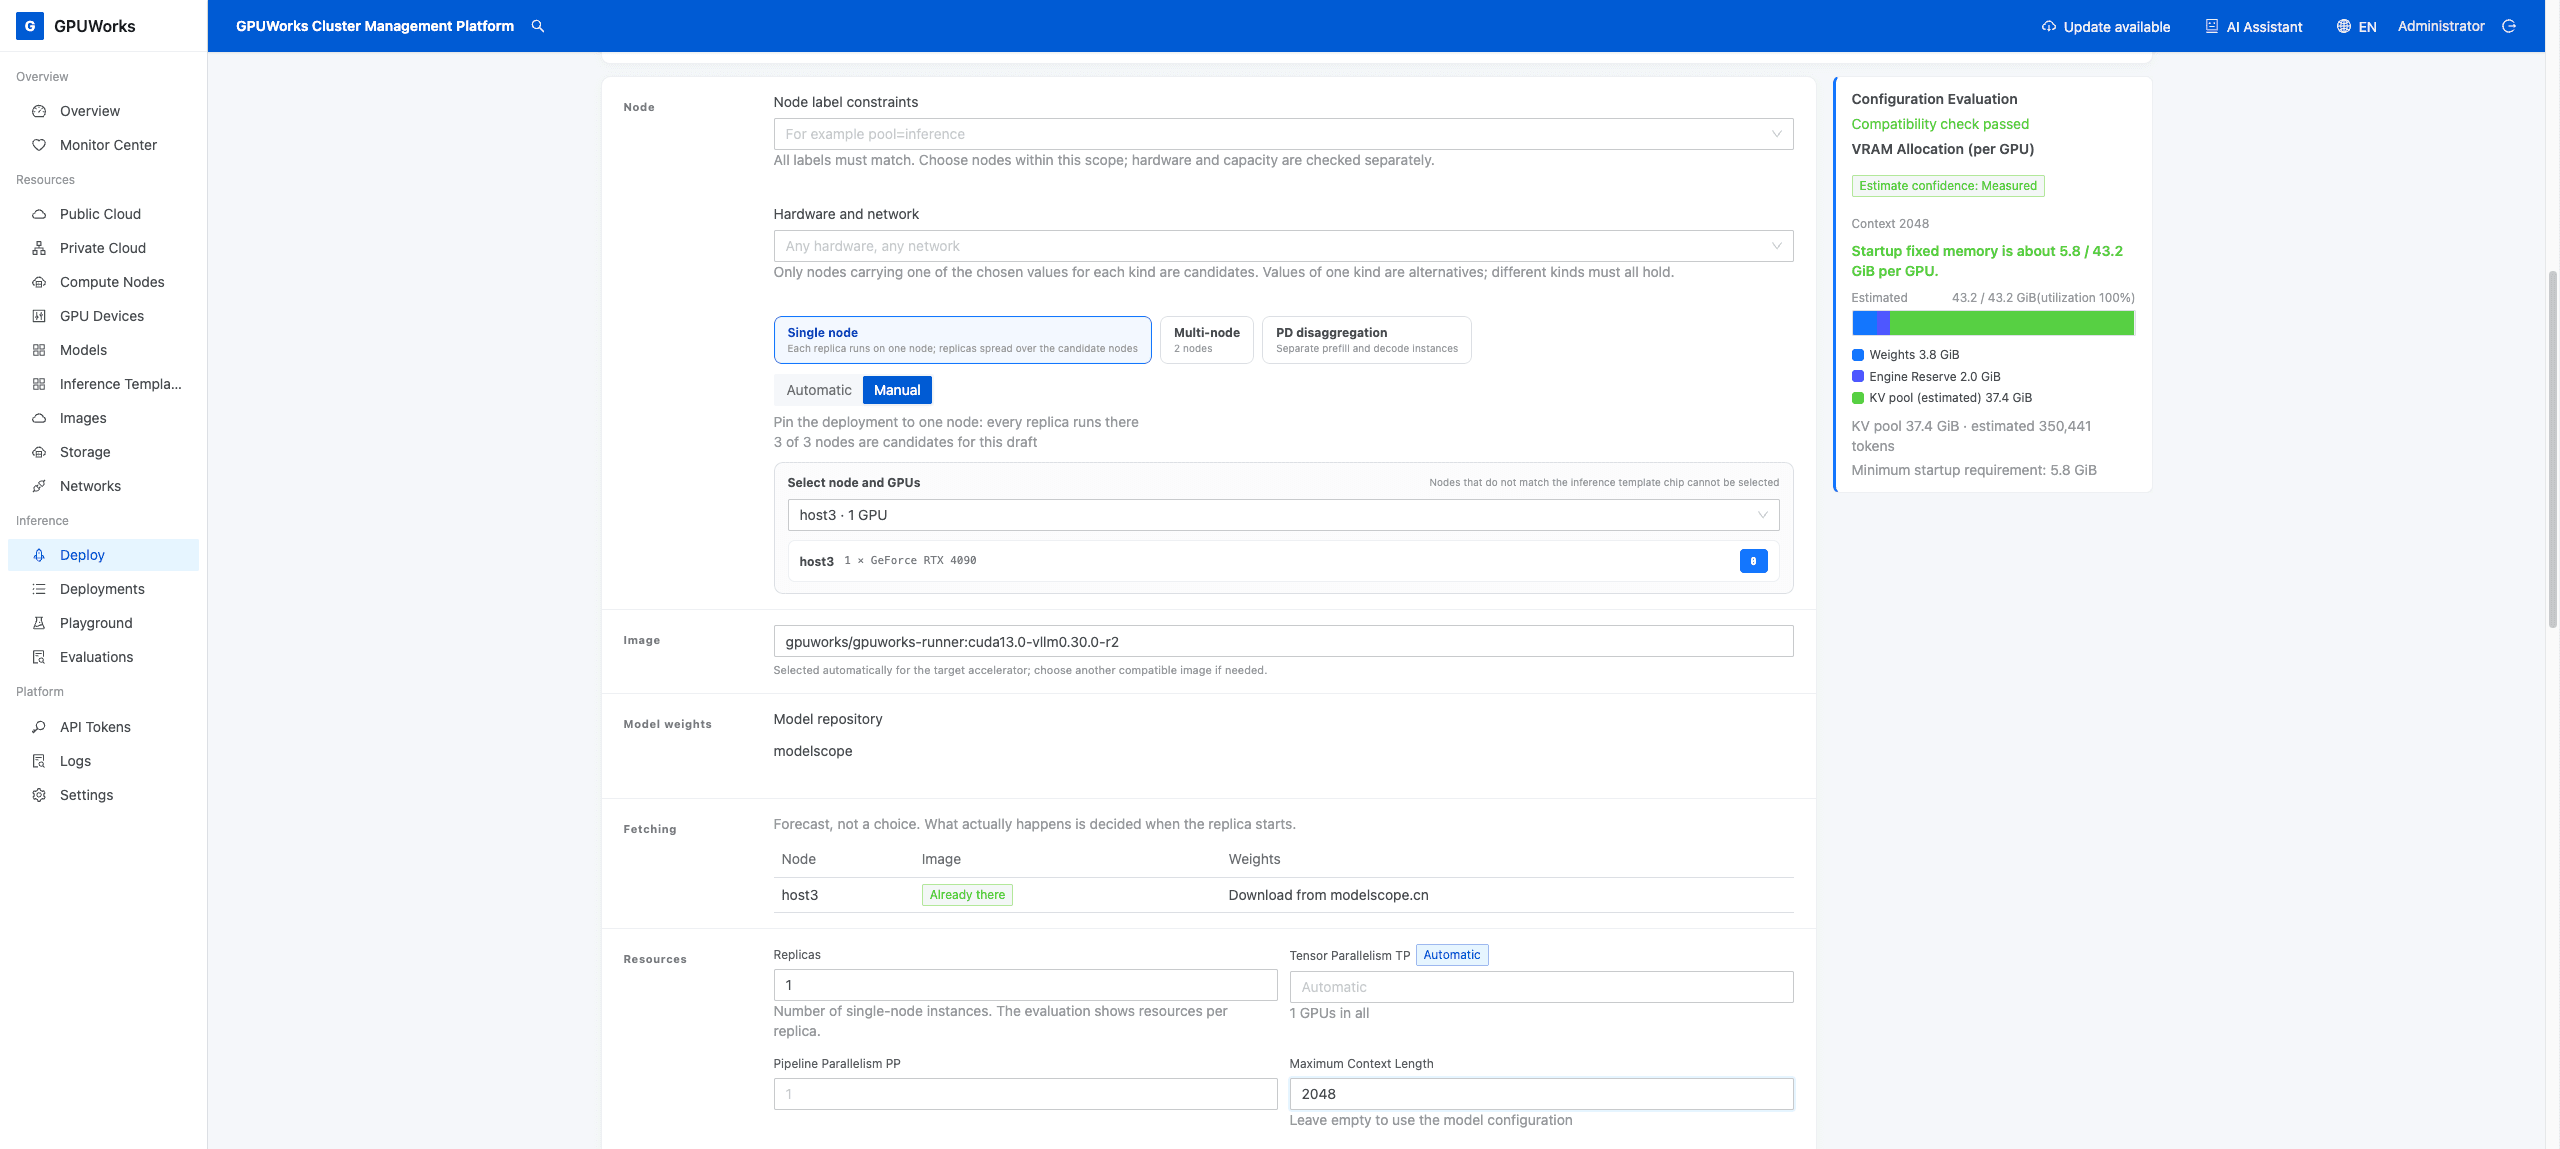
Figure: Select GPU 0 on host3 and check the configuration evaluation on the right.
- Wait for Configuration Evaluation to finish. Check the node, GPU, image, and GPU memory, and confirm there are no errors blocking deployment.
- Click Deploy, open
tutorial-qwen3-17bin Inference Services, and check model preparation, image pulling, and instance startup progress.
Completion criteria: Both the deployment and instance are Running. The first startup downloads the image and loads the model; wait for it to finish. In the next step, verify the inference API with a real request.
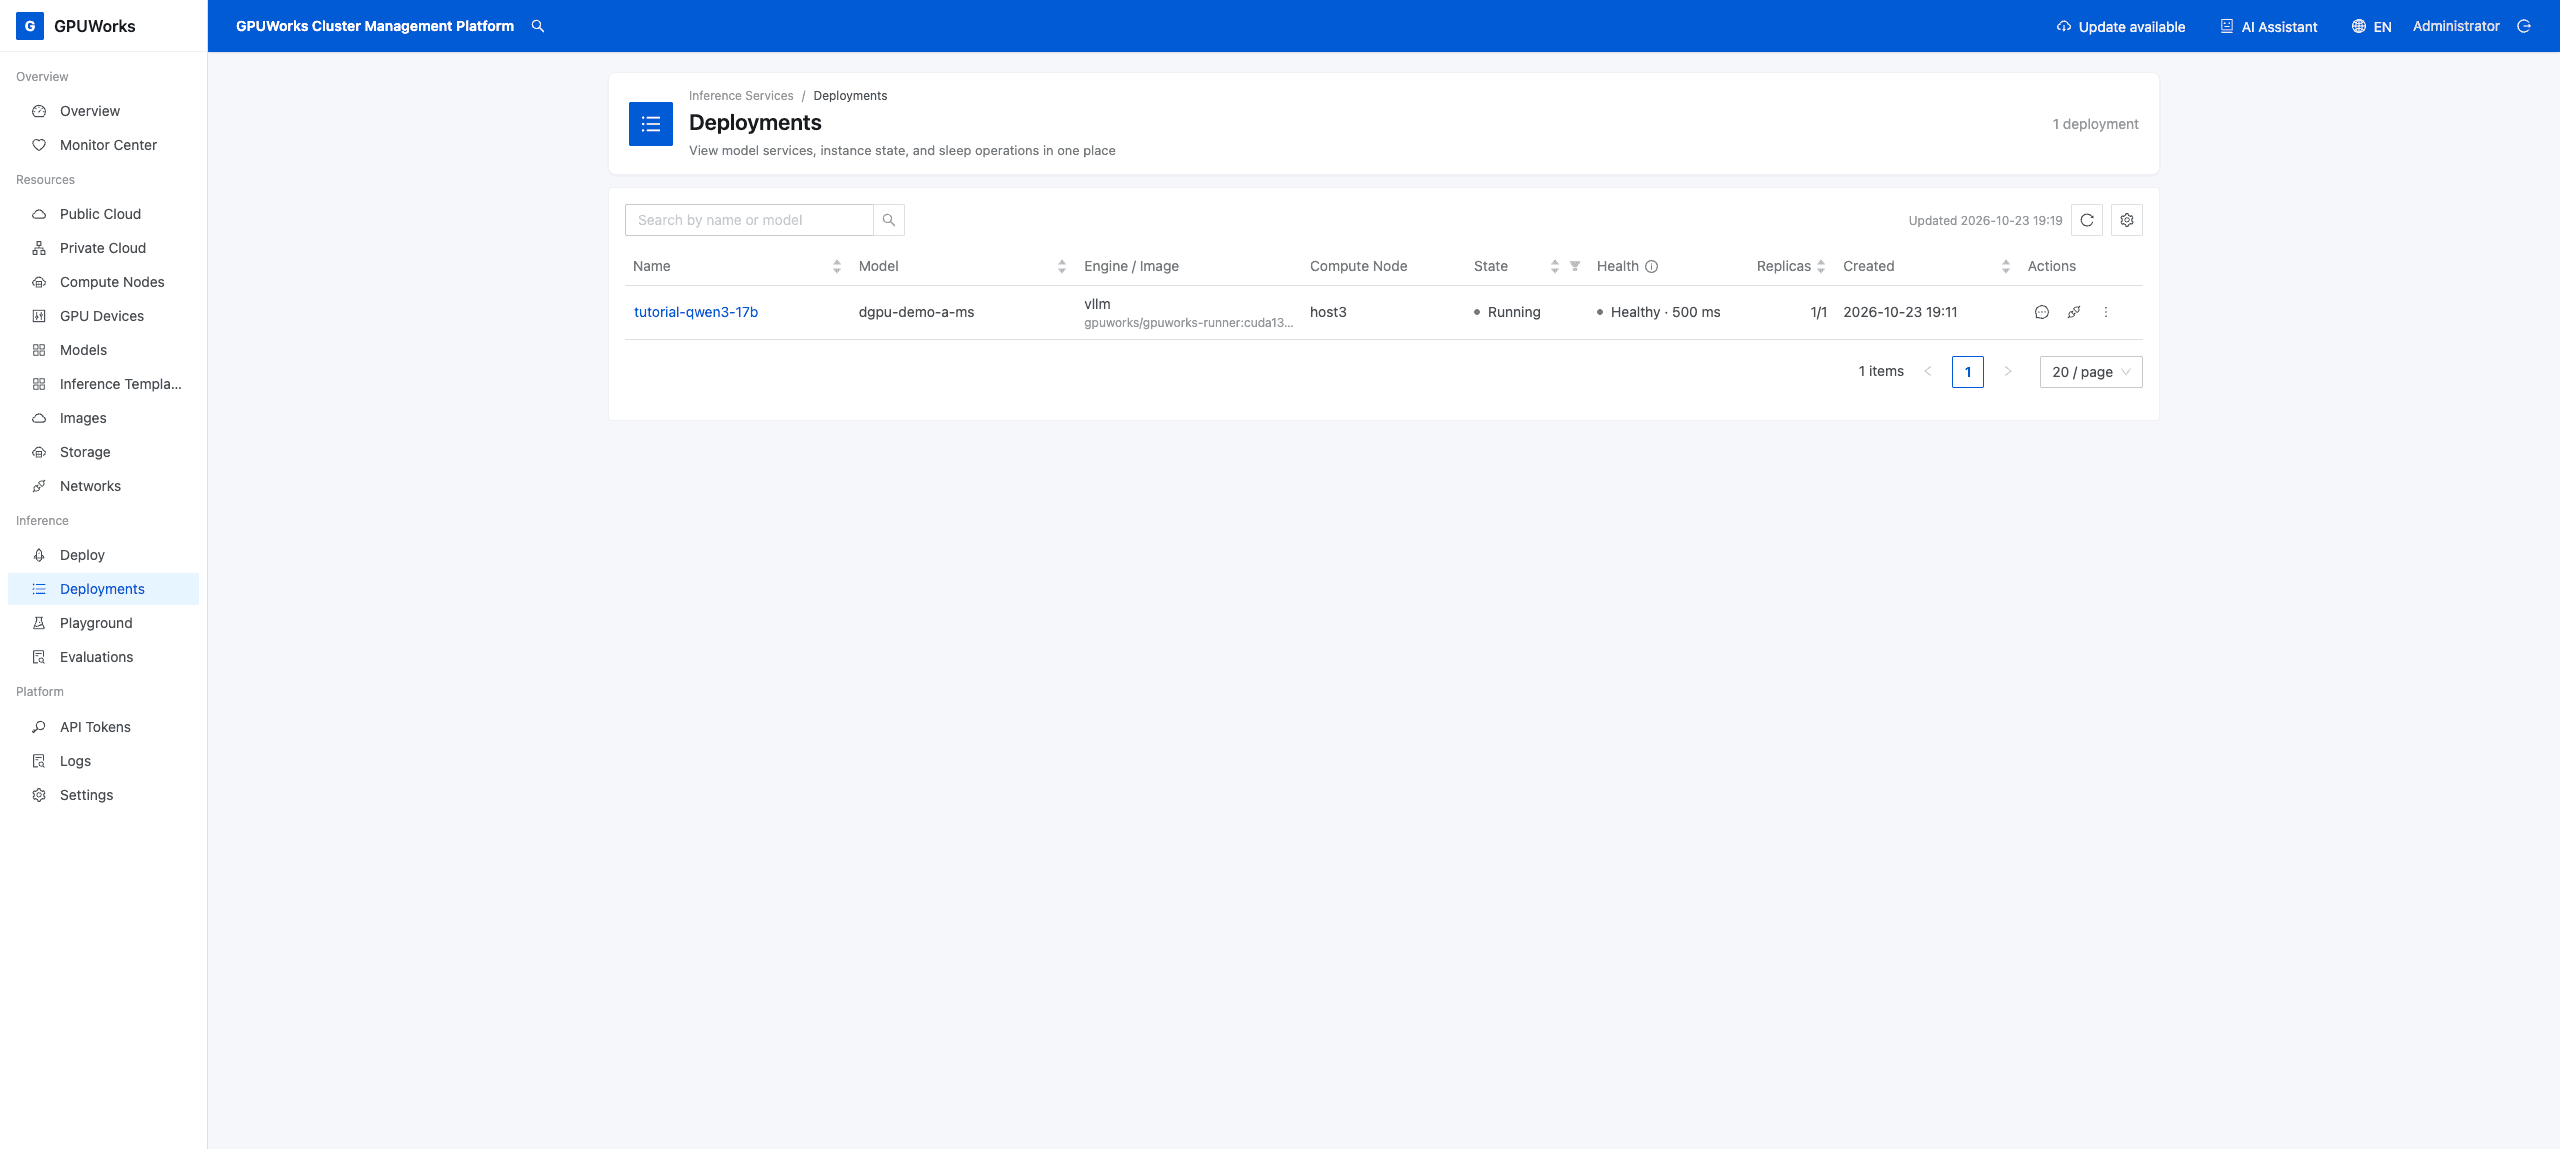
Figure: Confirm that the deployment is “Running”, the health check is healthy, and the replica count is 1/1.
6. Call the Model and Verify the Response
Open a Bash terminal on a machine that can reach the control plane. Replace the URL and run the following command. When prompted, paste the full inference token from step 4 (input is hidden).
GPUWORKS_URL=http://192.0.2.10:8800
read -r -s -p 'Paste your inference token: ' GPUWORKS_API_KEY
printf '\n'
curl -sS -w '\nHTTP %{http_code}\n' "$GPUWORKS_URL/v1/chat/completions" \
  -H "Authorization: Bearer $GPUWORKS_API_KEY" \
  -H 'Content-Type: application/json' \
  -d '{"model":"tutorial-qwen3-17b","messages":[{"role":"user","content":"Please introduce yourself in one sentence."}],"max_tokens":256,"chat_template_kwargs":{"enable_thinking":false}}'
unset GPUWORKS_API_KEY
The example request asks the model to introduce itself in one sentence and disables Qwen3 thinking mode to make a short response easier to check. Final verification requires both of the following:
- The command ends with
HTTP 200. choices[0].message.contentin the returned JSON contains a response; its content does not have to match the example.
A “Running” status alone, or an HTTP error response, does not count as completion.
You can also select tutorial-qwen3-17b under Playground → Chat, enter “Please introduce yourself in one sentence.”, and click Send to view the response.
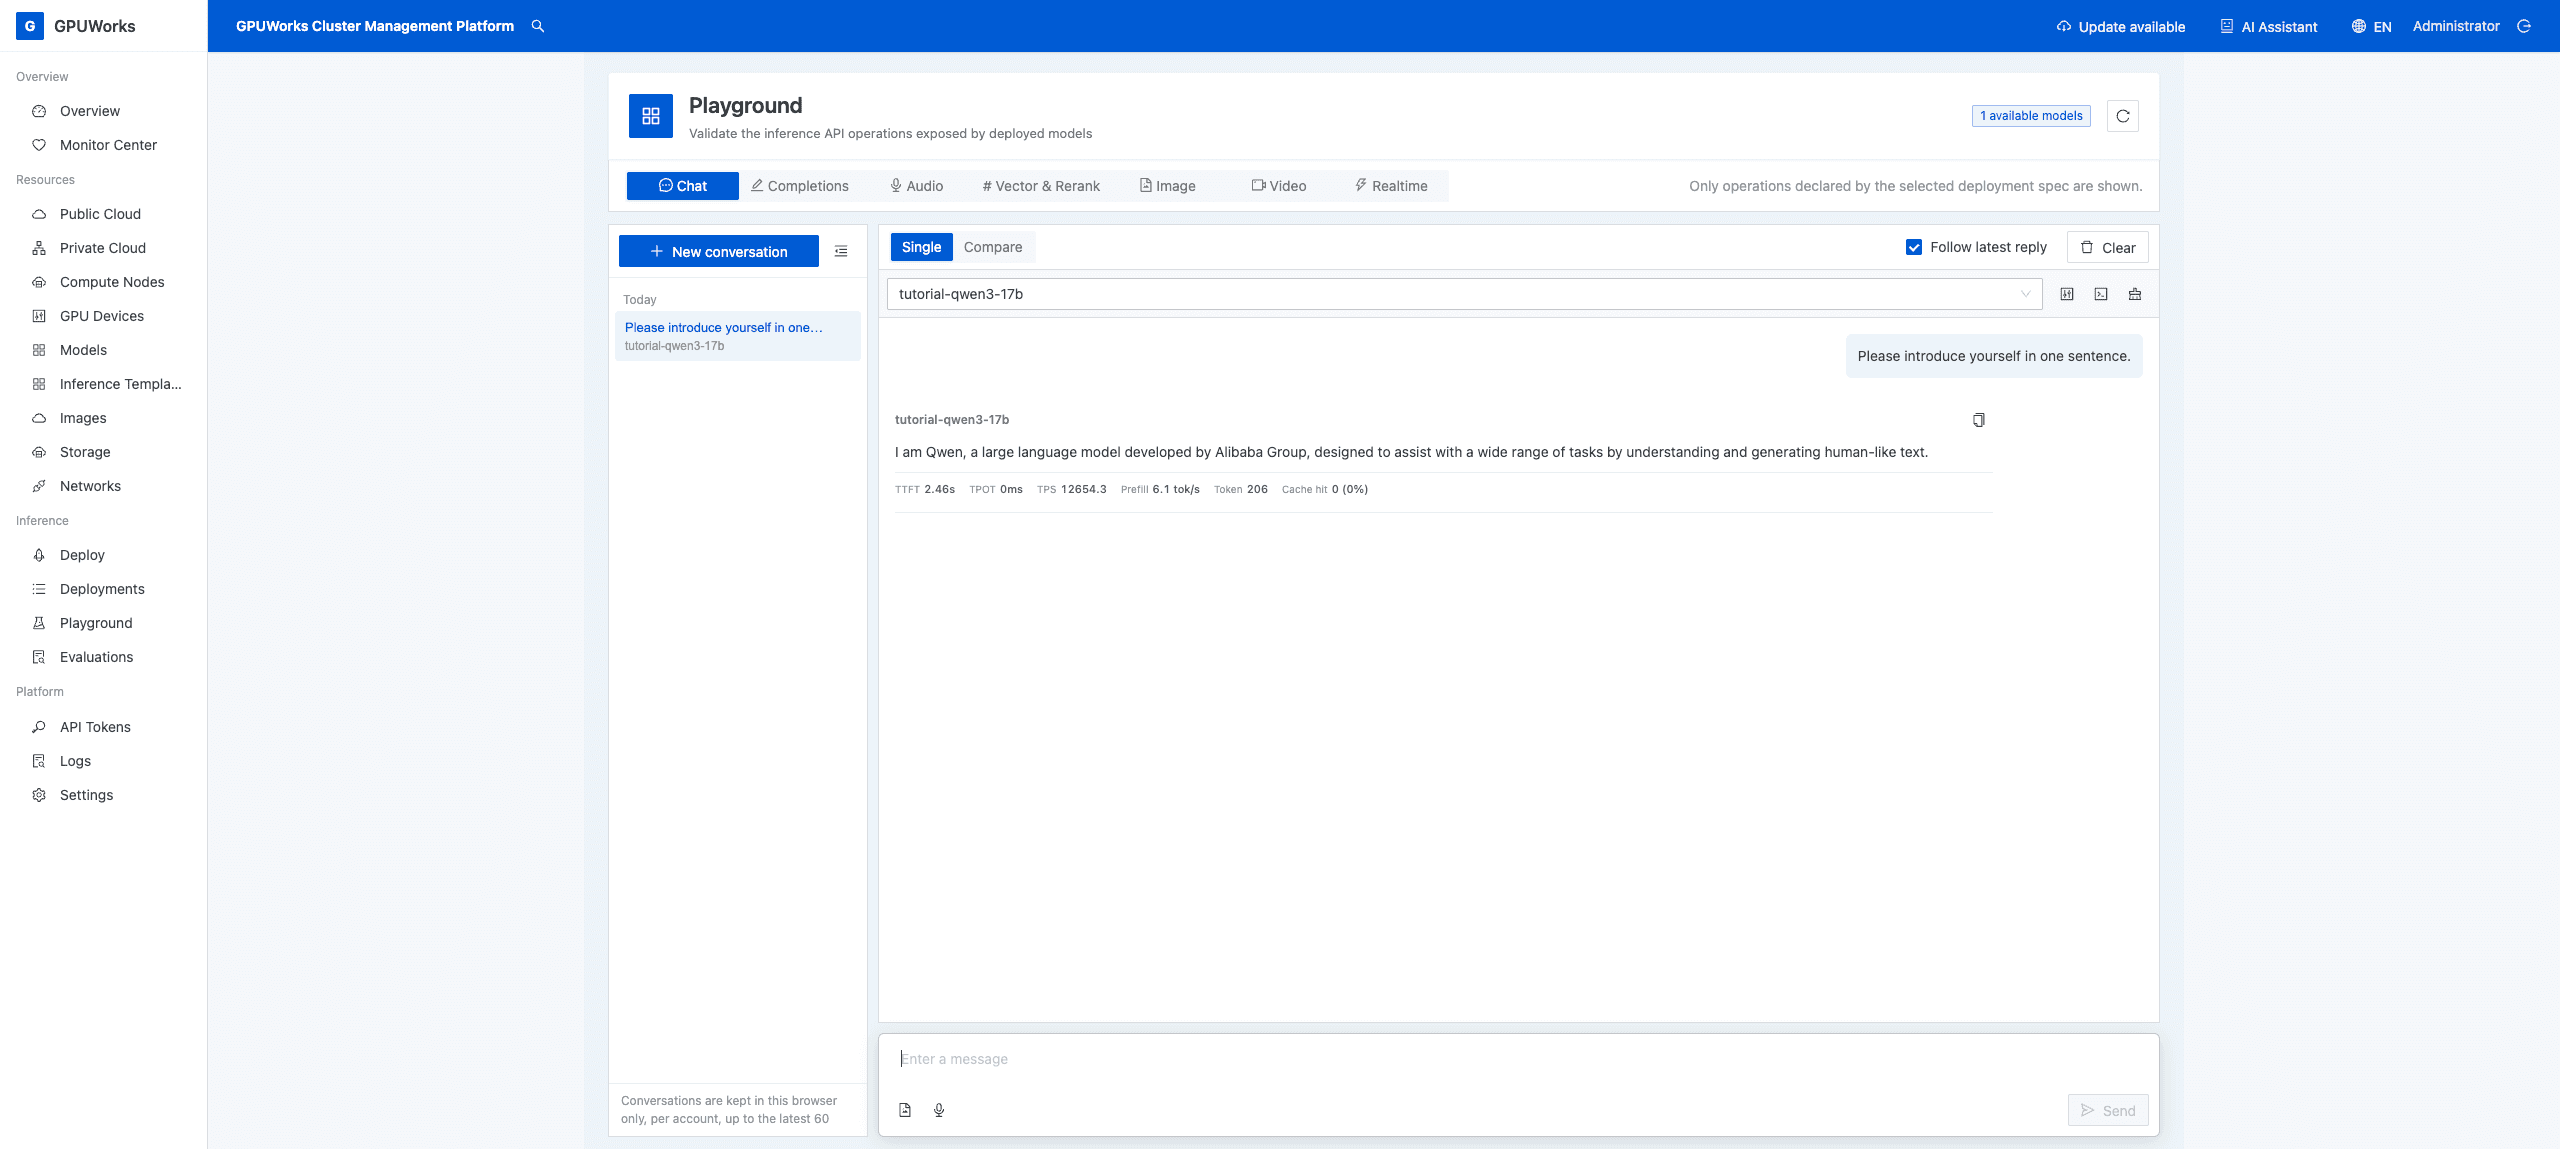
Figure: The model name matches the public model name entered during deployment, and the response to this question appears below.
Next Steps
- Run two models on one GPU at the same time: Run Two Models on One GPU
- Understand each field in the deployment form: Deploy Models and Interpret Scheduling Results
- Explore the entire console: Console Page Tour
- Choose the right combination of features: Choosing Features: dGPU, Sleep/Wake, Multiple Nodes, Replicas, and PD
- Before going into production: Production Deployment
Was this page helpful?